Showing posts with label breads. Show all posts

Friday, October 10, 2025

Crockpot Herbed Dinner Rolls


 I recently discovered this recipe from a short video by a Youtuber named Chef Robyn Q. Frankly, I love everything she makes, and when I saw this technique, I thought "Why have we not done this before?" So I immediately tried it, posted a quick pic on FB, and everyone had LOTS of interest. Usually, when you think of a crock pot, you're not thinking of BAKING, but this recipe works perfectly! And when you have limited oven space around the holidays, this allows you to have freshly baked warm dinner rolls on the table with your fabulous holiday feast. How perfect is that? This one is definitely a keeper!


Frozen unbaked dinner rolls
1/4 cup melted butter
1/2 tsp garlic powder 
Choice of fresh or dried herbs- thyme, rosemary, oregano, etc


Line a crockpot with a piece of parchment paper.
Arrange the frozen dinner rolls in the bottom of the crockpot, leaving space between them.
Cover and set on warm for 1 1/2-2 hours or until double in size.
Drizzle with melted butter. Sprinkle herbs and garlic powder.
Cover the top with a paper towel and put the lid over it. 
Cook on high for 1 1/2 hours. Then, turn the crockpot OFF, and let stand covered for 30 minutes.
Remove the herbed dinner rolls from the crockpot and serve with butter.


Tips:
The amount of rolls you bake depends on the size of your crock pot. In the original video by Chef Robyn, she used an oval shaped crock pot, and was able to fit 14 rolls. I used a 9x13 rectangular crock pot, which has more space for more rolls, so I was able to do 24. You just want them to be close to each other, but not touching. That will give them space to rise.  

Monday, May 19, 2025

Joey's Hawaiian Banana Bread

 
 I recently found myself with a few extra bananas that were bordering on being over ripe. And what do you do with over ripe bananas? You make banana bread, of course! And since I can never leave well enough alone (as my Mom used to say), I decided to switch it up and have a little fun with the flavors. 
 So I began to think of which flavors I love to pair with bananas. Hm.. Chocolate? or maybe peanut butter?
 And then I remembered a cake I had made years ago called Dr Bird Cake which combined the flavors of banana and pineapple. (It's actually one of my all time favorite cakes, tbh). That sounds perfect! Actually, while I'm at it, why not go full Hawaiian and add coconut too? Boom. That's the answer. 
 I figured I could just use my go-to Banana Bread recipe and add pineapple and coconut to it, but it's always nice to try new recipes, dontcha think? This recipe is my version of a recipe I found on food.com. It's very light and sweet and definitely blurs the line between banana bread and banana cake, but either way it's absolutely delicious. It's perfect for a nice brunch, an afternoon tea, or just when you feel like a little sweet treat. 
Time to buy more bananas... I think I need to make this one again!


1 cup sugar
1 stick butter
1 1/2 cups mashed banana
2 eggs
1 tsp rum extract
1 1/4 cup flour
1 tsp baking soda
1 tsp salt
1 tsp cinnamon
1 cup diced fresh pineapple
1 cup shredded coconut

Preheat oven to 350ºF.
Grease and flour just the bottom of a 9x5x3 loaf pan. Set aside.
Cream sugar and butter very well. Add bananas, eggs, and rum extract.
In a separate bowl, sift flour, salt, baking soda, and cinnamon.
Blend flour mixture into banana mixture, making sure not to overmix.
Gently fold in diced pineapples and coconut.
Turn batter into prepared loaf pan.
Bake for 55 minutes, or until toothpick inserted in center of loaf comes out clean.
Cool on wire rack.


Tips:
 People have asked why I specifically say to grease and flour the bottom of the loaf pans, but not the sides. The truth is you can grease the whole pan if you want to. But I find that your bread bakes up with a cleaner edge if you just do the bottom. If you're worried about it sticking to the sides, just run a knife around the side edges of the pan before you turn it out onto a wire rack for cooling. 
 You can serve it plain as it is, but if you want to get creative, trying toasting a slice then topping it with a pat of butter. HEAVEN. For a little more wow factor, drizzle it with a cream cheese glaze. 
 This recipe can easily be doubled. Bake two and freeze one!


Wednesday, December 25, 2024

Holiday Cinnamon Rolls


  Did you ever see any of those trending videos of people baking canned cinnamon rolls with heavy cream poured over them? Well, this is just a variation of that theme. Only this time, instead of heavy cream, I used egg nog! Now, I know egg nog is sometimes divisive, but frankly, I love it, so I went with it. It turned out perfectly! Seriously, when I made it for our Christmas Breakfast, every single person raved about how delicious it was. I'm not even kidding when I tell you you'll be tempted to go back for a second piece! It's just that good. It's DEFINITELY worthy of a holiday brunch. Make this the next time you want to impress someone. I promise you'll be a hit!


2 cans regular Pillsbury cinnamon rolls
1-2 cups egg nog
1/2 cup (1 stick) melted butter
1/2 cup brown sugar
Cinnamon
Nutmeg
Craisins and/or chopped pecans (optional)


Arrange rolls in large shallow baking dish. 
Drizzle egg nog around the rolls to fill in all the spaces, just enough to cover the bottom of the dish.
In a small bowl, stir together melted butter, brown sugar, and spices. Drizzle about a tablespoon over each roll. Sprinkle with craisins and pecans, if using. Cover with foil and bake at 350ºF for about 40-45 minutes. Remove foil and check to make sure the center ones are done. If the dough is still raw in the middle, put it back in for a few more minutes, uncovered. When the rolls are done, remove from oven and let cool for 10 minutes. Using the containers of icing that were included with the rolls, spread icing over warm rolls and let the icing melt right in. Top with more craisins and pecans. Serve warm. Try not to eat the entire pan of cinnamon rolls in one sitting.


Tips:
I used a large rectangular casserole dish, which fits 15 rolls, perfectly. The problem is that 2 cans of rolls equals 16. So what do we do with the extra roll? I just split it into a couple layers and added them on top of a couple of the other rolls. They bake up together anyway, so who's to know otherwise?
The spices are just to taste. Do you like a lot of cinnamon, add a lot!
Use any kind of nuts or dried fruits you like!
If you don't like the icing that comes with the rolls, mix it with some whipped cream cheese. That'll make it taste more like home made. And seriously, does anyone NOT love cream cheese icing? 
If you're not making this for your holiday brunch, just use regular heavy cream!

Monday, July 18, 2022

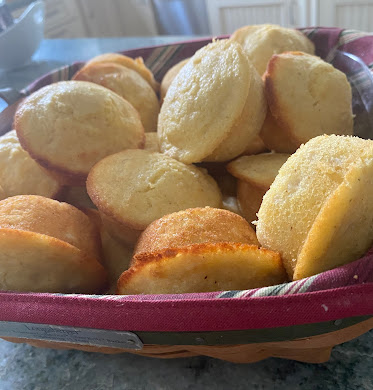
Corniest Corn Muffins


  One of the very BEST things about living in the Garden State is our Jersey fresh corn on the cob. I'm not even kidding when I say I challenge anyone to find farm fresh corn that is sweeter or more delicious than ours. It's one of my favorite things about summer!! (well, that and our Jersey tomatoes!)
 So I was recently talking with my sister, Jeanie, and she was telling me how she made these corn muffins. She absolutely RAVED about them! She said they're the absolute best! In fact, she wrote a A++ note in the cookbook where she got the recipe, which is called Baking from My Home to Yours, by Dorie Greenspan. 
 She also said she only makes this recipe when she has fresh corn on the cob because it just makes all the difference in the world. I mean, yes, of course, you could use canned or frozen corn, but when you have fields of corn growing practically right in your back yard, why not use fresh, right?
 We do have a rule in our family, btw. We don't buy fresh corn until after the 4th of July. THEN we know it's good and ready. And with so many farmers markets around... OH MAN... you know it's just as fresh as can be. It also makes me feel good to support local farmers!!
 So, if you live in New Jersey, go to your favorite local farm market, buy some fresh corn, and make these muffins. In fact, make a double batch and throw half in the freezer for another time. 
 You'll be SO glad you did!!!! Promise!


1 cup flour 
1 cup yellow corn meal, preferably stone-ground  
6 tbs sugar 
2 1/2  tsp baking powder   
1/4 tsp baking soda
1/2 tsp salt 
1 pinch of freshly grated nutmeg (optional) 
1 cup buttermilk 
3 tbs unsalted butter, melted and cooled 
3 tbs corn oil 
1 large egg 
1 large egg yolk 
1 cup corn kernels (add up to 1/3 cup more if you'd like) 
 
 
Center a rack in the oven and preheat the oven to 400ºF. 
Butter or spray the 12 molds in a regular-size muffin pan or fit the molds with paper muffin cups. Alternatively, use a silicone muffin pan, which needs neither greasing nor paper cups. Place the muffin pan on a baking sheet.  
In a large bowl, whisk together the flour, cornmeal, sugar, baking powder, baking soda, salt and nutmeg, if you’re using it. In a large glass measuring cup or another bowl, whisk the buttermilk, melted butter, oil, egg and yolk together until well blended. Pour the liquid ingredients over the dry ingredients and, with the whisk or a rubber spatula, gently but quickly stir to blend. Don’t worry about being thorough - the batter will be lumpy, and that’s just the way it should be. Stir in the corn kernels. Divide the batter evenly among the muffin cups.
Bake for 15 to 18 minutes (12 minutes for minis), or until the tops are golden and a thin knife inserted into the center of the muffins comes out clean. Transfer the pan to a rack and cool for 5 minutes before carefully removing each muffin from its mold.


Tips:
Just like my sister, I'd add more corn. I mean, it says we can add up to 1/3 cup more, why not just bump it up to 2 cups? NOW we're talking!


Monday, April 11, 2022

What the Fig Ham and Cheese Pinwheels


 Here's an easy little 'picky uppy" finger food that you should add to your repertoire. It's an easy do-ahead for a party, and they're always a big hit!
 It's just my own little variation of a Pillsbury recipe. I added a little fig jam to balance with the salty ham, and the result was magic! I made them for Carly and Christopher's housewarming party and everyone loved them! They would also be perfect for a Brunch, or even just a quiet movie night.
You really can't go wrong with Pillsbury, can you?? Give 'em a try!


1 can crescent rolls or full crescent dough sheets 
4 thin slices Swiss cheese or American cheese
4 slices deli sliced ham
2-3 tbs fig jam
 
 
Heat oven to 375°F. 
Spray large cookie sheet with cooking spray, or line with cooking parchment paper. Unroll dough sheet onto large cutting board; press into 12x8-inch rectangle. If using crescent rolls, unroll and press into 12x8-inch rectangle, pressing seams together. Using an offset spatula, spread with a VERY thin layer of fig jam over the dough, leaving 1/2-inch border on each of the short ends. Top the jam with cheese and ham slices. Starting on short edge of rectangle, roll up tightly and pinch seam together. With serrated knife, cut into 8 slices, about 1 inch wide. Arrange on cookie sheet. Bake 17 to 20 minutes or until golden brown.


Tips:
Be sure to choose a salty deli ham. If you use a honey ham or something on the sweeter side, it might wind up being too sweet with the jam. 
Don't like figs? Use a different kind of jam, or just omit it! The original Pillsbury recipe said to drizzle the baked pinwheels with honey, but the jam was what I had on hand! Not a fan of salty and sweet? Go completely savory! Try some sliced roast beef and pepper jack cheese. Or maybe ham, cheddar, and a pinch of crushed red pepper flakes! You do you!
The parchment paper is key! Don't forget it! Otherwise, your pinwheels will stick from all the jammy goodness.  
This only makes 8 pinwheels. Baking for a crowd? Do several batches!

Monday, February 8, 2021

One-Bowl Chocolate Chip Bread


OK, this one is so quick and easy, you won't even believe it.
I was browsing some recipes to use up a bag of chocolate chips, and I found this one on Taste of Home. I knew at once that I needed to test this one for my sister, Cathy, because (as I immediately texted her), this one has her hubby, Gregg's, name written all over it. Seriously, though, that's the absolute truth. You could bake ANY kind of cake or bread, and he'll say "it's great, but it would be better if it had chocolate chips in it." Not even kidding.
 Anyway... whenever I read recipes on different websites, I'm always sure to read the comments below. More times than not, it aggravates the hell out of me when someone says all the changes they made to the recipe, and then only give it one star because they didn't like the way it turned out. Are you kidding?? I want to say "Just make it as directed and maybe it'll turn out!"
 So, with this recipe, I noticed a lot of the comments said that it needed to be split into two loaves, or that it was too dense, or that it had too many chocolate chips for one loaf (as if that's possible). Honestly, I have no idea what recipe they're talking about, because mine turned out perfectly. It was the perfect amount of batter for one loaf, it was just the right amount of chips, and in baked in exactly the time was supposed to. And, true to its name, I only used one bowl!  Sounds pretty perfect to me!
 So if you're looking for a not-too-sweet bread to have with your coffee or your cup of tea, you should try this one. I'm pretty sure if you just follow the recipe, it'll turn out perfectly for you too!
This one's for you, Gregg! Hope you like it!


3 large eggs, room temperature
1 cup sugar
2 cups sour cream
3 cups self-rising flour*
2 cups semi-sweet chocolate chips

Heat oven to 350°F.
Beat eggs, sugar, and sour cream until well blended. Gradually stir in flour. Fold in chocolate chips. Transfer to a greased 9x5" loaf pan. Bake until a toothpick comes out clean, 65-75 minutes. Cool in pan 5 minutes before removing to a wire rack to cool.

*As a substitute for 3 cups of self-rising flour:
Place 4-1/2 teaspoons baking powder and 1-1/2 teaspoons salt in a 1-cup measuring cup. Add all-purpose flour to measure 1 cup; combine with an additional 2 cups all-purpose flour.


Tips:
OK, usually this is where I would tell you everything I would do differently, but like I said, I wouldn't change a thing. It took literally only 5 minutes to prep and get into the oven, it baked perfectly (right at the 65 minute mark for me), and it was exactly perfect in one loaf pan. The only thing I can think of that I would do differently is maybe to try adding different mix-ins. Cinnamon chips? Peanut Butter Chips? Butterscotch chips? I bet they'd all be pretty fabulous!


Monday, December 14, 2020

Cinnamon Swirl Chocolate Chip Pumpkin Butter Bread


 Here we have another recipe from Half Baked Harvest via my niece, Casey. I figured since the chocolate chip pumpkin butter cookies were such a hit, why not do the same thing with a bread? (or is it cake? You decide!)
What’s not to love? Pumpkin with warm spices and chocolate chips… it’s the perfect thing to cap off this year’s “pumpkin season.” Serve it for dessert, or toast a slice of it in your toaster oven and have it with coffee.  Serious yum!


1/2 cup pumpkin butter*
1/2 cup pumpkin puree
1/2 cup melted salted butter
1/2 cup pure maple syrup
2 large eggs, at room temperature
2 tsp pure vanilla extract
1 1/2 cups all purpose flour
2 tsp baking powder
1/2 tsp baking powder
1/2 tsp plus 1 tbs ground cinnamon
1/4 tsp ground nutmeg
1/4 tsp ground ginger
1/4 tsp ground cloves
1/2 tsp kosher salt
1/2 cup semi-sweet chocolate chips
1/2 cup granulated sugar


Preheat the oven to 350° F. Grease a (9x5 inch) bread pan.
 In a large mixing bowl, stir together the pumpkin butter, pumpkin puree, melted butter, maple syrup, eggs, and vanilla until combined. Add the flour, baking powder, baking soda, 1/2 teaspoon cinnamon, nutmeg, ginger, cloves, and salt, mix until just combined. Fold in the chocolate chips.
 In a bowl, combine the granulated sugar with the remaining 1 tablespoon of cinnamon.
 Spoon half the pumpkin batter into the prepared pan. Sprinkle with the cinnamon sugar, reserving 2 tablespoons of sugar for topping the loaf. Add the remaining batter over the sugar. Run a knife down the center of the loaf 1-2 times to gently swirl the sugar. Sprinkle the remaining cinnamon sugar over top of the batter.
 Transfer to the oven and bake for 55-65 minutes, or until the center is just set. I usually cover the bread with foil at the 30 minute mark to prevent the top from burning.
 Remove the bread and let cool for at least 30 minutes before cutting...or just eat it warm with a smear of butter (you should do this!). Enjoy!

*Recipe note from the author:
Pumpkin butter substitute: you can use 1/2 cup additional pumpkin puree plus 2-4 tablespoons all purpose flour. Start with 2 tablespoons flour, then add 1-2 tablespoons more of the dough feels a little too wet. Don't add more than 1/4 cup additional flour.


Joey’s tips:
-Buying spices can be pretty expensive, especially if you’re only buying them to try this recipe. Instead of buying all four, you can just use a pumpkin pie spice blend. It won’t be EXACTLY the same result, but it’ll be pretty darn close!
-Since you’re only using 1/2 cup, what will you do with the rest of the can of pumpkin? Simple! Make two loaves and freeze one!

Monday, June 15, 2020

Coconut Bread


Ok, this is a quick one. Quick story, quick recipe, quick bread!

   Recently, my fabulous sister, Cathy, was about to celebrate a very special birthday. At first, I wasn't sure what her plans were, if any. But then her daughter, Carly, my buddy, texted that they were planning to surprise her with a bunch of friends and that I should stop by if I was able to make it. Well, of course, if you know me, you know I'm not likely to show up to a party without a yummy homemade something. My Dad used to always say that when you go to someone's house, "you should ring the doorbell with your elbow." (in other words, your hands should be carrying a gift for your hosts!) So I did a quick search and found this recipe on a blog called Baking a Moment. It was the perfect thing to bring! Not only did I already have all the ingredients on hand, but I had just enough time to whip it together. The recipe is so easy, you don't even need a mixer. You just stir everything together, bake it in a loaf pan, and boom, there you have it. Also, this recipe has Cathy written all over it. She loves anything coconut, and this is just the thing that I knew she'd love to have with a cup of coffee. The other thing I love about this recipe is that is has coconut 3 ways: coconut milk, coconut extract, and shredded coconut.  There's no question that this is definitely coconut! (now, whether it's a bread or a cake, is still a matter of debate, but that doesn't really matter, does it? lol)
 So there you go, Cath. I'm so glad I got to celebrate your special birthday with you, and I'm thrilled that you liked this little yummy something. We'll make it again soon. This one's definitely a keeper!


Bread:
2 cups flour
1 1/2 cups sweetened shredded coconut
1 cup sugar
1 tbs baking powder
1/2 tsp salt
1 cup unsweetened coconut milk
1/4 cup butter, melted 
1 large egg 
1 tsp coconut extract
1 tsp vanilla extract
  
 Topping:
1 cup unsweetened coconut flakes
1 1/2 cups powdered sugar
1/4 cup unsweetened coconut milk
1 tsp coconut extract


Preheat the oven to 375ºF,  and mist a loaf pan with non-stick spray.
Place the flour, coconut, sugar, baking powder, and salt in a medium bowl and stir to combine. Place the coconut milk, melted butter, egg, and extracts in a large liquid measuring cup, and whisk to combine. Pour the liquid ingredients into the dry, and fold together just until combined. Transfer the batter to the prepared pan, and bake for 55 to 65 minutes, or until a toothpick inserted in the thickest part of the bread comes out clean or with a few moist crumbs. Cool for 20 minutes in the pan, then invert onto a wire rack to cool completely.

Lightly toast the coconut flakes in a dry pan over medium heat, until just beginning to turn brown. Set aside. Place the powdered sugar in a medium bowl and add the coconut milk and coconut extract. Stir together until smooth, then drizzle over the coconut bread and top with toasted coconut flakes.


Tips:
I didn't have unsweetened coconut flakes, so I just used more of the sweetened shredded coconut to sprinkle over the top after it was glazed.  I also didn't toast it because I was short on time, but you do you!


Monday, May 11, 2020

Homemade White Bread


OK, so, right off the bat, I should tell you, I'm not the biggest bread baker of the world. I mean, I've dabbled here and there, but full disclosure, I've always felt a little intimidated by it. But just like anything else, the way to diffuse the fear of it is to learn about it. So I began reading different bread recipes, reading about why yeast makes it rise, etc. and then it started to make more sense to me. Now it doesn't seem so daunting! So I decided to try just a basic white bread recipe. I figured if I'm gonna start baking breads, I might as well start with the basics, right? I found this recipe from a blog called the Brown Eyed Baker, and I swear to you it's REALLY easy! I just followed the recipe straight through, and it turned out perfectly on the first go! Yes, the two loaves of bread in the picture are the very first loaves of white bread I've ever baked! Aren't they perfect? And I love that the first thing I ate on a toasted slice of home made bread was some of my home made jam. FABULOUS. I guess I now have to start making home made butter to go with it, right? It's gonna happen!
 So if you've ever thought of baking white bread, this recipe is the one to try. Like I said, it's REALLY easy and user friendly, and the final product was just as yummy as you want it to be. There's just nothing like warm baked bread right out of the oven. You MUST try it!


4 1/2 teaspoons instant yeast two 0.25-ounce packets 
3/4 cup + 2 2/3 cups warm water divided  
1/4 cup granulated sugar 
1 tablespoon salt  
3 tablespoons unsalted butter, cubed, at room temperature 
9 to 10 cups all-purpose flour  
3 tablespoons unsalted butter melted, for brushing


  In the bowl of a mixer, stir to dissolve the yeast in 3/4 cup of the warm water, and let sit for 5 minutes. Add the remaining 2 2/3 cups water, sugar, salt, room temperature butter, and 5 cups of the flour and stir to combine.
Using a dough hook, mix on low speed and gradually add the remaining flour until the dough is soft and tacky, but not sticky (you may not need to use all of the flour). Continue to knead until a soft ball of dough forms and clears the sides of the bowl, about 7 to 10 minutes.
 Place the dough in a lightly greased bowl and turn it over so it is completely coated. Cover with plastic wrap and set in a draft-free place to rise until doubled in size, about 45 minutes to 1 hour.
 Turn the dough out onto a clean, lightly floured surface. Gently press it all over to remove any air pockets. Divide the dough in two and, working with one piece at a time, gently pat it into a 9x12-inch rectangle. Roll up the rectangle, starting on the short end, into a very tight cylinder. Pinch to seal the seams and the ends, tuck the ends of the roll until the bread, and place into greased 9" loaf pans. Cover the loaves loosely and place in a draft-free area until doubled in size, 30 to 45 minutes.
Position an oven rack on the lowest setting and preheat the oven to 400ºF.
 Brush the loaves with some of the melted butter. Bake the loaves for 30 to 35 minutes, rotating halfway through, until golden brown (an instant-read thermometer inserted into the center should read 195ºF).
 Remove from the oven and immediately brush with more of the melted butter. Allow to cool for 10 minutes, then remove from the pans and cool completely before slicing. The bread can be stored in an airtight bread bag or wrapped tightly in plastic wrap at room temperature for up to 4 days. It can also be frozen for up to 1 month.

Recipe Tips:
This recipe can be halved to make only one loaf.
You can substitute active dry yeast for the instant yeast. Ensure that it is indeed activated in step #1 before continuing, and note that the rise times will be slightly longer.


Joey's Tips:
Sometimes we get sidetracked and we forget about the dough as it's rising, which causes it to over proof. This is when it rises up and then sort of collapses on itself. If this should happen, fear not! All hope is not lost! Oddly enough, the solution to over proofing is to proof it again. Just press it back out on the work surface, roll it up like you did before, and put it back in the loaf pan. It will proof again, only this time, maybe set a timer so you won't forget about it again!


Monday, April 20, 2020

Attie's Artisan Rosemary Rolls


  Here's an easy recipe from my niece, Natalie, commonly known in my family as Attie. When I asked her where she got the recipe, she said she found it online, but then remembered she actually used a combination of recipes, so that means it's now hers! (I guess that must be a family thing, because I do the exact same thing all the time!) Anyway, I love that it only takes a few ingredients and you just mix everything together. I think I might need to make these the next time I make a batch of jam. YUM. Thanx Attie! And thanx for the awesome picture too!


3 cups all purpose flour
1 tsp yeast
2 tsp salt
1 tsp garlic powder
1 tbsp chopped rosemary


Mix together all ingredients, then add 1 1/2 cups warm water and 1-2 tbsp olive oil. It will be a shaggy mess. Cover with plastic wrap and let sit for 8 hours. It will look flat, sticky, and bubbly on top.
Turn dough out on a floured surface. Cut dough into 12 pieces. Quickly shape into scraggly balls (uneven edges lead to more crispy browned edges!) and put on dry baking sheet or parchment paper. Let sit again for 20 min. Bake at 425ºF for 20 min or until golden brown.


Notes from Natalie:
Honestly, you can't really mess this recipe up. No kneading, you literally mix it and let it sit over night.
Another way to do this is to bake as one loaf in a Dutch oven:
Preheat the dutch oven for 30 min in a hot 450ºF oven. Throw the dough in, bake for 30 min lid on, 10 minutes lid off.To keep it from sticking, you can either put parchment paper in the bottom or do a light sprinkle of flour AFTER the Dutch oven is heated (otherwise, it'll burn!)

Sunday, January 5, 2020

Old Fashioned Oatmeal Raisin Muffins


  Ok here's a quick and easy one for you. It's so simple, you don't even need a mixer! You just stir it all together and you're ready to go! I made them for my sister, Patty, as she was planning to host a big party. When I asked her if she needed anything, she said "I wouldn't be mad if you threw something together for the kitchen crew, maybe something easy and quick to go with coffee", so this is what I made! It's from Apriljharris.com, adapted from her mom's recipe, and it's perfect! It's just exactly what you want in an oatmeal raisin muffin. Perfect with a cup of coffee or tea, you could add a little glaze to it if you'd like to sweeten things up a bit. It's also the perfect thing to whip up on a cold day, just to warm up the whole house with the heavenly aroma of cinnamon and nutmeg.
If you like oatmeal raisin cookies, then you'll LOVE these muffins!


1 cup all purpose flour
1 cup rolled oats
1/2 cup packed light brown sugar
1 tsp baking powder
1/2 tsp baking soda
1/4 tsp salt
1 1/2 tsp cinnamon
1/4 tsp ground nutmeg
1 large egg, beaten
1 cup buttermilk
1 tsp vanilla extract
1/2 cup mild olive oil (not extra virgin)
1 cup juicy raisins or sultanas


 Preheat the oven to 375°F. Line a 12 cup muffin pan with paper baking cups.
In a large bowl, mix together the flour, oats, sugar, baking powder, baking soda, salt, cinnamon and nutmeg. In a medium bowl, mix together the egg, buttermilk, vanilla, and oil. Pour the wet ingredients into the dry ingredients and stir just until mixed. Gently stir in the raisins or sultanas. Scoop the batter into muffin cups. Bake for 15 to 20 minutes or until a skewer inserted into the center of a muffin comes out clean. Cool in the tray for 5 minutes before transferring to a wire rack.


Tips:
I doubled the recipe, because more is more!
For extra plump juicy raisins, I soaked mine in apple cider for a few minutes before adding them to the batter. Just place them in a small bowl, pour enough cider to cover, microwave them for a minute or two, then drain them well before adding to the batter. I also gave them a quick toss in a tbs of flour. Perfect plump juicy raisins!!
 Oh, also, I used regular vegetable oil because I didn't have any olive oil on hand, just sayin'!
To make homemade buttermilk, add a tbs of lemon juice or vinegar to a 1-cup measure. Add milk to fill. Microwave it for about a minute. The milk will immediately curdle, which is exactly what you want. Works perfectly in any baking recipe calling for buttermilk!


Wednesday, November 20, 2019

Sausage and Potato Stuffing


 Back in the day, there used to be a TV commercial that begged the question: Do you want stuffing or potatoes? And to that I say "why do we have to choose one or the other? why can't we have both?! And that brings me to this stuffing recipe. It's your classic stuffing with sausage and sage, but it has potatoes too! It's the best of both worlds, all in one dish. I found it on Allrecipes.com, which is one of my go-to websites for recipes. One of the things I love about that website is that it shows you lots of comments by regular home cooks who have made it, and very often what minor tweaks they did to make it their own. Many said that "this is now their new holiday stuffing." I guess you can't get much better than that! So give this one a try. Maybe it'll be YOUR new go-to holiday stuffing!


1 pound lean pork sausage
2 potatoes, peeled and diced
1 1/2 cups chopped celery
3/4 cup diced sweet onion
3/4 cup butter
 9 cups soft bread cubes
1/2 teaspoon dried thyme
1/2 teaspoon ground sage
1 teaspoon salt
1/4 teaspoon ground black pepper

Preheat oven to 350ºF.
Place sausage, potatoes, celery, onion and butter in a large, deep skillet. Saute over medium high heat until sausage is crumbled and evenly cooked. Combine the bread cubes, thyme, sage, salt and pepper. Toss together with the sausage and potato mixture. Add chicken or vegetable broth if needed. Bake stuffing in a covered casserole dish for 40 to 50 minutes.


Tips:
Instead of peeling and dicing potatoes, I just used halved baby red potatoes. No need to peel!
Many of the reviews on this recipe said that it can easily be cooked in a slow cooker. 3-4 hours on low should do the trick! Also the slow cooker will retain moisture (plus it creates steam), so just keep an eye on that. If your stuffing looks too wet, just remove the lid and let some of the moisture evaporate. If it becomes VERY wet, put it in a pan, uncovered, and pop it into the oven. That should dry it out a bit. On the flip side, if it looks too dry, just add a little chicken broth. Easy!

Monday, March 4, 2019

Guinness Bread


 A few weeks ago, my Kristin invited me over for dinner. It was just a no nonsense Friday night, nothing special going on, perfect night for some delicious home made soup. Not only did she make a tasty and healthy vegetable soup, but she also made a FABULOUS beer bread to go along with it. It got me to thinking, "hey, how come I don't have a beer bread recipe?" So I was inspired to see what different recipes I could find. I didn't want one that used bread flour or yeast because, well, frankly, I never keep them on hand. Clearly this meant that I'd be making a quick bread. I also wanted a recipe that would use an entire bottle of beer. I don't drink beer, so using anything less than the entire bottle would be wasteful. Then I found this recipe on a website called The Black Peppercorn, and it was exactly what I wanted!! It's so easy to make, you don't even need a mixer. Just stir everything together, pop it in the oven, and bake!
 Now, first, let me just say that even though this is not the sort of bread you'd use for sandwiches, this is definitely still a BREAD, not a cake. It does have a little sweetness from the brown sugar, but there is no mistaking that hoppy bite from the beer. It's not overpowering, but it's definitely there. It's fabulous with a schmear of soft butter served alongside a rich and luscious Lamb Stew or any favorite hot and hearty soup. Even better if you toast it first!
 So thank you again to The Black Peppercorn, and of course to my Kristin for the yummy dinner, and also for the inspiration! This is definitely a winner!


3 cups flour 
1/2 tsp salt 
4 tsp baking powder 
1/3 cup oats 
2/3 cup dark brown sugar 
12 oz Guinness 
1 tbsp oats 
1 tbsp butter


Preheat oven at 350ºF.
Grease a loaf pan with the 1 tbs butter. Whisk together the flour, baking powder, salt, 1/3 cup oats and brown sugar. Slowly beat the Guinness into the dry ingredients using a wooden spoon or an electric mixer on the low setting. Do not over mix the batter, but make sure that it is not too lumpy. Pour the batter in the greased loaf pan and sprinkle the 1 tbsp of oats on top. Bake the bread for 50 minutes. The bread is done when an inserted toothpick comes out clean. Place on a cooling rack until it is room temperature.


Tips:
Not a fan of Guinness? Use whatever kind of dark beer you like! And don't forget that little sprinkle of oats over the top. It adds great texture and chew!


Sunday, December 23, 2018

Philadelphia Cinnamon Buns


 OK, so here's a pretty amazing story....
 Once upon a time, my sister Reen discovered a recipe for sticky buns in a newspaper. So she decided to clip the article, and give it a try. Long story short, it was a huge hit, and she even won a baking contest with it! (The running joke was that everyone said she had the best buns. But I digress..) Cut to literally 42 years later, my sisters and I were talking on Thanksgiving night, and somehow the topic of the recipe popped up. Even though we had just finished our fabulous family feast, Cathy and I were probably discussing what we would have for Christmas Breakfast, and this recipe became my focus.
 But how on earth would I be able to find it??? It was printed in some newspaper in 1976 and there was no way I was gonna be able to google it or find it anywhere. But wait! Patty said she thinks she has it scribbled down somewhere! Great! But wait, even better, Reen still has the actual newspaper clipping!! WHAT??? Can you stand it??? She had saved it in a binder and kept it all these years. We are ABSOLUTELY having cinnamon buns for Christmas Breakfast!!
 And then I read the recipe. WHOA. OK this is gonna take a minute. Admittedly, I'm not the most experienced when it comes to making breads and doughs and such, and actually, it has always seemed a little daunting to me. But I figured, well, how hard can it be?? I'll just follow the recipe! Also, I had just binged several episodes of The Great British Baking Show, and I was inspired by Paul Hollywood, one of the show's judges, who just happens to be an expert in bread baking.
  My only concern was that this NEEDED to come out perfectly because it had to be special enough for CHRISTMAS. No pressure. No pressure. I'll just to do a test run. Great. I also needed to see how long it would take for all the rising, etc. So I gave it a go, and guess what?!?! It turned out perfectly!! Honestly, I really wasn't sure what I was doing through half of it, but I just followed the recipe, and just look at my buns! Wait, that came out wrong. LOL I was shocked and amazed and delighted because this was authentic good old fashioned BAKING. No can of store bought dough here. This is the real deal! And if I'm being completely honest, I think I conquered a little bit of that fear of baking breads. Suddenly it's not so difficult! It's just a recipe like any other. It just needs a little extra time, that's all. And they are absolutely 100% delicious enough for Christmas Breakfast. Yes there are several steps, yes this takes a lot of time, yes this is a splurge, and yes this is not something you'd make every day, but for a special occasion or holiday, this is definitely worth the time and effort!
Btw, one last note, I don't even know whose recipe this is. I believe the paper was called The Evening Bulletin, and the recipe is called Philadelphia Cinnamon Buns because that's how it was titled in print. That's as much as I know about it. Thanx again to Reen for clipping and saving it all these years!
Clearly this recipe is still a keeper!


1/4 cup warm water
1 packet active dry yeast
1 tbs sugar
1 tsp salt
1 1/4 cups milk
5 cups flour
1/4 cup shortening
3/4 cup sugar
2 eggs

brown sugar
Karo or pancake syrup
cinnamon
raisin and/or pecans


  Measure warm water into a cup and stir in yeast and 1 tbs sugar. Set aside until the yeast blooms and it becomes bubbly. Meanwhile, prepare the pans. Use 3 9" round or square pans, or you can also use a sheet pan. Butter them generously and pour in your syrup. Make the syrup about 1/8-1/4 inch deep over the bottom of the pans. Sprinkle in raisins and/or chopped pecans, if desired. Set pans aside.
 Now make the dough. Add salt to milk, and gently warm (either on the stove or in the microwave) just until it feels neither hot nor cold to a testing finger. Stir the yeast mixture, add it to the lukewarm milk, and gradually add 2 cups of the flour. Beat well. Cover bowl with plastic wrap and set aside in a warm place until it gets bubbly. (The inside of an unheated oven is a good place for this.) Meanwhile, beat shortening, 3/4 cup sugar, and eggs, until very creamy, light, and smooth. When the yeast mixture is bubbly, add the sugar-egg mixture a little at a time, beating well after each addition. When it is thoroughly blended, add the remaining 3 cups of flour. Don't beat hard, just begin adding a little at a time and mix well before adding the next. The dough will be quite sticky. Cover dough and let rise in a cozy place until double in size. Punch it down, and then turn it out onto a floured work surface, knead a time or two with floured hands then roll out to make a rectangle. Spread with softened butter, leaving a 1/2" edge around all sides. Sprinkle with brown sugar, cinnamon, and raisins and/or pecans, then drizzle a track of syrup along the whole thing.
 Beginning with the long side of the rectangle, roll up the dough jelly roll style, and press the outer edge firmly to keep in place. With a very sharp knife, cut off short lengths (1-2 inches) and place in prepared pans, barely touching each other. Cover and let rise until doubled again. Place pans in preheated 350ºF oven and bake 35-40 minutes or until beautifully browned. Turn out of pans immediately.


Tips:
This dough is VERY sticky. RESIST the urge to keep adding more flour! If you happen to have a bench scraper, use it! It definitely turned out to be the most valued tool here.
If you need to, you can do the first half of this recipe the day before. I went as far as mixing up the dough and letting it double in size. Then I punched it down, placed it in a bowl, covered with plastic wrap, and left it in the fridge until the next morning. Then all I needed to do was to roll them out, let them rise again, and bake them. Every time you punch it down and let it rise again, the rise happens more quickly, so I think the last rise only took about 1/2 hour, as opposed to the first rise, which took about 2 hours.
Definitely do NOT wait to turn the buns out after they bake. The syrup will begin to set up like caramel and you'll never get the buns out of the pan. There's a reason they are also called STICKY buns!
Be VERY careful when turning out the buns after baking. That syrup is LAVA HOT. Be sure to use a plate or platter with extra room around the edges for the extra syrup. Then you can scoop up some of the extra syrup and drizzle it back over the top of the buns.
For more generous sized buns, cut them thicker, at least two inches wide.
I've made this with Karo syrup and pancake syrup. The pancake syrup wins. It just tastes better!

Monday, August 20, 2018

Blueberry Banana Zucchini Bread


  As the end of summer rapidly approaches, many home gardeners are faced with the same question: "what are we gonna do with all of this extra zucchini?" Well, my friends, here's the answer!
 Yes, I know that zucchini bread isn't exactly the most ground breaking idea to ever come into the kitchen, but when you add blueberries and bananas to the party, well now, THAT is something new!
 I found this recipe on one of my favorite blogs, Averie Cooks. It hits all of my recipe criteria (quick to throw together, ingredients that are readily available, easy enough for the baking novice) and it tastes absolutely delicious! It's not overly sweet, but it lets all the flavors shine through. Oh, and can we talk about how moist it is? Usually when you're baking breads, you have just one ingredient headliner that contributes a lot of moisture, such as blueberries, or zucchini, or bananas. Well, in this case, we have ALL THREE! So believe me when I tell you that this might be the most moist bread you've ever baked. I'm not even kidding!
 Ok, so, as I often do, I asked a few of my friends to try it, just to let me know if they think it's good enough to share on my blog. When they tasted this one, they ALL said "yes, absolutely, 100%!" (Actually, I think they were my friend Mack's actual words! lol) In fact, it was almost gone before I even had a chance to take a picture! So here we are. Sharing is caring!
 Oh, and one other thing. When I share recipes, I always post my own little hints or tips at the bottom, just in case there is anything extra that is noteworthy, but Averie has already done that for me too! So, thank you again, Averie, for another great recipe and also for the great tips. I'll definitely be making this one again!


1 large egg
1/2 cup light brown sugar, packed
1/3 cup vegetable oil
1/4 cup granulated sugar
1/4 cup cup sour cream
1 teaspoon vanilla extract
1 1/4 cups all purpose flour + 1/4 cup for tossing with blueberries
1/2  teaspoon baking powder
1/2  teaspoon baking soda
1/4 teaspoon salt, or to taste
1 cup mashed ripe bananas (from about 2 medium/large bananas)
1 cup coarsely grated zucchini, laid loosely in cup and not packed (don’t wring out)
1 cup (6 ounces) fresh blueberries


Preheat oven to 350F. Spray one 9×5-inch loaf pan with floured cooking spray, or grease and flour the pan; set aside.
To a large bowl, add the the first six ingredients, through vanilla, and whisk to combine. Add 1 1/4 cups flour, baking powder, baking soda, salt, and stir until just combined; don’t overmix. Add the bananas, zucchini, and stir to combine; set aside. To a medium bowl, add the blueberries, 1/4 cup flour (helps prevent them from sinking while baking), and toss to coat. Add the blueberries and all flour bits to the large bowl with the batter and stir until just combined; don’t overmix. Turn batter out into the prepared pan, smoothing the top lightly with a spatula.  Place loaf pan on a baking sheet and bake for about 90 minutes (start checking at about 75 minutes), or until the top is golden, the center is set, and a toothpick inserted in the center comes out clean, or with a few moist crumbs, but no batter. Allow bread to cool in pan for about 15 minutes before turning out on a wire rack to cool completely before slicing and serving. Bread will keep airtight at room temperature for up to 1 week, or in the freezer for up to 6 months.


Averie's Tips:
 Before baking, evenly sprinkle the surface with 1 to 2 tablespoons blueberries for a visual pop of color.
At the 45 minute mark, tent the pan with a sheet of foil draped loosely over it to prevent the top and sides from browning too quickly while giving the interior a chance to cook through.
I encourage rotating the pan a couple times during baking to ensure even baking because many ovens don’t bake evenly. Baking times will vary based on the moisture content of the bananas, zucchini, blueberries, climate, and oven variances.
Bake until done; watch your bread, not the clock and don’t worry if it takes more or less time to bake than the baking time estimate provided.

Monday, October 2, 2017

Cream Cheese-Filled Pumpkin Bread


 For years and years, any time I've ever made pumpkin bread, I've used my Mom's recipe for Pumpkin Loaf. It's simply perfect as it is, doesn't need any bells or whistles (as my Mom would say), doesn't need any icing or even powdered sugar. It's perfect as it is.
 But then I saw this recipe on a blog called Averie Cooks, and I thought "Why not? Lets switch things up this time!" So I did! I figured this one probably falls into the "how can this not be good" category, and I was absolutely right.  It's just as delicious as you'd think a rich layer of cream cheese filling in the middle of your pumpkin bread would be. So that's really all there is to say about it! If you're always looking for your next pumpkin something to try (like I am), then you should try this one! Oh
Oh wait, actually, there is one other thing I should say..
I love all of the tips that are included right in the recipe about testing for doneness. My favorite sentence is "Watch your bread, not the clock." I think that hits a note with me because that's how Mom always cooked. If you asked her how long to cook something, she'd say "Until it's done." Gotta love it! Thanx, Averie!

Bread:
1 large egg
1 cup pumpkin puree
1/2 cup light brown sugar, packed
1/4 cup granulated sugar
1/4 cup liquid-state coconut oil (canola or vegetable may be substituted)
1/4 cup cup sour cream (lite is okay; or Greek yogurt may be substituted)
2 teaspoons vanilla extract
2 teaspoons cinnamon
1 teaspoon pumpkin pie spice
1/2 teaspoon ground nutmeg
1 cup all-purpose flour
1/2  teaspoon baking powder
1/2  teaspoon baking soda
pinch salt, optional and to taste

 Cream Cheese Filling:
1 large egg
4 ounces softened brick-style cream cheese (lite is okay)
1/4 cup granulated sugar
3 tablespoons all-purpose flour

 Preheat oven to 350F. Spray one 9×5-inch loaf pan with floured cooking spray, or grease and flour the pan; set aside. 
Bread – In a large bowl, add the the first ten ingredients, through ground nutmeg, and whisk to combine. Add the flour, baking powder, baking soda, optional salt, and fold with spatula or stir gently with a spoon until just combined; don’t overmix; set aside. Turn about two-thirds of the batter out into the prepared pan, smoothing the top lightly with a spatula and pushing it into corners and sides as necessary; set aside. 
Cream Cheese Filling – In a large bowl, add all ingredients and whisk to combine. Alternatively, mix with a hand mixer. Evenly pour filling mixture over the bread, smoothing the top lightly with a spatula and pushing it into corners and sides as necessary. Top filling with remaining pumpkin batter, smoothing the top very lightly with a spatula as to not disturb cream cheese layer and pushing batter into corners and sides as necessary. Bake for about 48 minutes or until the top is domed, golden, and the center is set, and a toothpick inserted in the center comes out clean, or with a few moist crumbs, but no batter. Note this is tricky because the cream cheese never gets totally solid so the toothpick test isn’t the most accurate. Tip – Tent the pan with a sheet of foil draped over it at the 35 minute-mark if you feel the tops and sides will become too browned before center cooks through. Baking times will vary based on moisture content of pumpkin, cream cheese, climate, and oven variances. Bake until done; watch your bread, not the clock. Allow bread to cool in pan for about 15 minutes before turning out on a wire rack to cool completely before slicing and serving.

Tips:
I didn't have coconut oil, so I used regular vegetable oil. Worked perfectly! I added extra spice because I like a spicier pumpkin bread, and in my opinion there's no such thing as too much cinnamon! I also added the optional pinch of salt because it makes everything taste better!!
On Averie's blog, it says "Bread will keep airtight at room temperature for up to 1 week, or in the freezer for up to 6 months." My only thought is that there's no way this will last a week sitting on the counter. Mine was gone after the first day!

Wednesday, April 5, 2017

Banana Oatmeal Muffins


 Lately I've been in the mood for something banana. In cakes, breads, cupcakes, or even ice cream, I've always loved bananas, especially when they get to that perfectly delicious sweet spot where their peels are covered with little brown freckles. Before that, they're not as sweet, and after that, they go south rather quickly.
  I recently had a bunch of bananas that were just on the verge of going south, and I happened to find this recipe on a blog called Wellplated.com.  I figured, "ok, looks pretty simple, lets go for it!" They took no time at all, and boom, here I am with some deliciously moist banana muffins! Perfect! You just blitz everything together in a blender, pour it into your muffin tins, and then pop 'em in the oven. SO EASY! And they're pretty darn healthy too! (If you're one who has gluten restrictions in his diet, then this one is for you!) And the honey adds just the perfect amount of sweetness. I added mini chocolate chips, but add whatever mix-ins you like. Dried fruit, chopped nuts, it will all work!
 Better keep this one handy. I'm sure you'll be coming back to it again and again!


2 cups oats (quick cooking or old fashioned)
2 large very ripe bananas
2 large eggs
1 cup plain Greek yogurt
2 to 3 tbs honey (depending on how sweet you like it)
1 1/2 tsp baking powder
1/2 tsp baking soda
1/2 tsp pure vanilla extract
1/8 tsp kosher salt
Up to 1/2 cup mix-ins: chocolate chips (mini or regular), chopped dark chocolate, nuts, dried cranberries, or blueberries (fresh or frozen and rinsed)


 Preheat the oven to 400º F.
Lightly grease a 12-cup standard muffin tin or line with paper liners. If using liners, lightly grease them as well. Set aside.
 Place the all ingredients but the mix-ins in a blender or the bowl of a food processor fitted with the steel blade: oats, bananas, eggs, Greek yogurt, honey, baking powder, baking soda, vanilla extract, and salt. Blend or process on high, stopping to scrape down and stir the ingredients once or twice as needed, until the batter is smooth and the oats have broken down almost completely, about 3 minutes. By hand, stir in the mix-ins. If the batter is warm from the appliance’s motor, the chocolate chips may melt and swirl as they are stirred. If this bothers you, let the batter cool for 10 minutes before adding them.
 Divide the batter among the prepared muffin cups, filling each no more than three-quarters of the way to the top. Sprinkle with additional chocolate chips or nuts as desired. Bake for 15 minutes, until the tops of the muffins are set and a toothpick inserted in the center comes out clean. Place the pan on a wire rack and let the muffins cool in the pan for 10 minutes. They will deflate but still taste delicious. 

Tips:
Next time I make this, instead of throwing everything in at once, I think I'll blend the bananas, eggs, honey, yogurt, and vanilla first,  and then I'll add everything else. It might make the blending process a little easier for the blender!
This recipe says that it makes 12 muffins, but for some reason, my batch made 18, leaving me with 6 empty muffin wells in a second muffin tin. (I suppose I'll fill them a little more next time!) If it should ever happen that you're baking an incomplete muffin tin, always be sure to fill the rest of the muffin wells with water. This keeps the pan at an even heat so that everything bakes evenly, plus it keeps your pan from burning. Clever, huh?
 Wrap any leftovers tightly in plastic and freeze for up to 2 months!

Wednesday, March 29, 2017

Orange Vanilla Monkey Bread


 Every year, my family has a huge brunch on Easter morning, so I'm always searching for fun and different brunch recipes during the weeks leading up to it. Most of the time, I'll find savory recipes likes casseroles or quiches. But everyone knows that brunch also has its SWEET side, such as French Toast Casserole, and Cinnamon Buns. So this time, I opted to go for something sweet!
 This is Ree Drummond's recipe and it's really delicious. It's a simple twist on your regular Monkey Bread. Basically, instead of tossing biscuits with sugar and cinnamon, you toss them with sugar and fresh orange zest. Doesn't that sound bright and fresh and brunchy? (yes brunchy is a word. I've just decided.) It's pretty brilliant, as far as I'm concerned. The fresh orange flavor is SO bright, and the vanilla sort of smooths it all out. It's a definite keeper! And it's easy too! It makes me think "what other Monkey Bread variations can we do?" I'll be sure to let you know if I come up with any! In the meantime, make this the next time you have friends over for brunch. I promise it'll be a hit!


3 cans (7.5 oz each) buttermilk biscuits, cold 
1 cup sugar 
2 whole oranges, zested 
1 dash Salt 
2 sticks salted butter 
3/4 cups brown sugar 
1 tbs vanilla extract
 
 
Preheat the oven to 350 F. 
First, make sure all the biscuit cans are very cold. Open all the cans of biscuits and cut the biscuits into quarters. Fill a large ziploc bag with the granulated sugar, the orange zest, and the dash of salt. Seal the bag and shake it around until the zest and the sugar are totally combined. Add the biscuit pieces to the bag, seal it and shake/toss it around until all the biscuit pieces are coated in the orange sugar. Pour the pieces and sugar into a bundt or tube pan and set it aside. 
 In a medium pan over medium heat, melt the butter then stir in the brown sugar and vanilla until just barely combined. Pour the mixture all over the biscuit pieces, scraping the pan to get all the butter/brown sugar out of there. Let it settle for a second, then place the pan in the oven. Bake for 25 minutes, or until the top of the biscuits are golden brown. Then remove the pan from the oven and set it on a rack. Let the pan sit for at least 10 minutes (but no more than 15), then turn the cake out of the pan onto a cake plate. 
Note: When it first comes out of the pan, the melted sugar/caramel will be a little on the hot side. Wait a few minutes after turning it out before serving.
 
Tips:
Yes, I know there's quite a bit of sugar. Even with my insatiable sweet tooth, it was close to pushing my sweetness limits. I think, perhaps, next time I'll reduce the amount of white sugar to a half cup. But be sure to still toss the sugar with the orange zest. It's turns it into orange sugar, which will flavor the whole thing. You can add a bit of orange extract, if you like, but the fresh orange zest is MUCH better. For a stronger vanilla flavor, you can also scrape the insides of a vanilla bean into the brown sugar/butter mixture.
 

Monday, March 27, 2017

Classic Homemade Waffles


  Have you ever made your own waffles from scratch? They're really super easy to throw together, and they're SO much better than any waffles you'll find in your grocer's freezer. They only take a few minutes too! So, you may wonder, what's the difference between classic waffles and Belgian waffles? Well, Belgian waffles (in most cases) use a batter that contains yeast, and they're also cooked on very large waffle irons with deep pockets in them. Sometimes they'll have whipped egg whites folded into the batter for a lighter fluffier texture inside, and a crispier texture outside.
 This is a classic waffle recipe is from Delish.com, but there are many classic versions out there. They're all pretty similar and use mostly the same ingredients. Some use a little more flour or a little less milk. Some add melted butter and/or shortening which makes a crispier crust. But basically, they're all pretty much the same idea.
 Either way, classic or Belgian, I've never met a waffle I didn't like, especially with the endless combinations of toppings you can put on them. Usually, with classic waffles, I'm a butter and syrup kinda guy. Yes, syrup. Lots and lots of syrup! Then again, if we're talking dessert waffles, I love a yummy fruit pie filling with a scoop of vanilla ice cream. (Strawberry, blueberry, or APPLE. OMG yes, apple!) You could also do peanut butter and marshmallow creme for a Fluffenutter waffle. Maybe some chocolate chips in the batter for the chocoholics in your life. And you definitely can't go wrong with fresh fruit, whipped cream, and a dusting of powdered sugar. Or simply just your favorite home made jam! It all works, and it's all delicious! Or you can even do SAVORY waffles! Just omit the sugar, and top your waffles with fresh herbs like basil or chopped chives, and some shredded cheese. How about some smoked salmon and some herbed cream cheese? You could also add some crumbled bacon to your batter. Or how about adding some Cajun spices to the batter, and serving them with fried chicken and a drizzle of honey! OOO that sounds pretty amazing to me!
 Clearly, homemade waffles are SO much more versatile than your basic store bought frozen ones. So, have fun! Experiment with flavors! And if you don't have a waffle iron, I've just given you an excuse to buy one! You're welcome.


3 large eggs
1 1/2 c. whole milk
1 tsp. apple cider vinegar
1/2 c. canola oil
1 3/4 c. all-purpose flour
kosher salt
2 tsp. baking powder
1 tsp. baking soda
Cooking spray, for waffle iron


 Preheat your waffle iron. In a large mixing bowl, whisk together eggs, milk, apple cider vinegar, and canola oil until smooth. In a separate bowl, whisk flour, salt, baking powder, and baking soda. Pour dry ingredients into wet and stir until just combined. Spray heated waffle iron with cooking spray. Pour a generous amount of batter into the middle of the iron until it's completely covered. Cook until golden brown, 3 minutes. Repeat with remaining batter and serve immediately with butter and maple syrup.


Tips:
If you're making them for a crowd, place cooked waffles on a baking tray fitted with a wire rack. Place them in a 250ºF oven. This will keep them warm and will even make them a little bit crispier, which is definitely not a bad thing, in my book.
Melting your butter and then drizzling it over the top is easier than trying to spread butter over your waffles. Just sayin!
Be sure your waffle iron is hot before you load it with batter. Also be sure you don't over fill your waffle iron, otherwise you'll spill over and create a big mess. Not that I've ever done that before...

Wednesday, November 9, 2016

Caramelized Onion and Cornbread Stuffing


Ok, I have a confession to make. I Love Stuffing. Let me say that again. I. LOVE. Stuffing. It doesn't matter what kind, from my Italian Sundried Tomato Bread Stuffing, to Mare's Stuffing, and even your basic Stove Top that comes in a box, I love it all. And I know I already did a Sausage and Corn Bread Stuffing but I saw this one and HAD to try it. And frankly, I absolutely adore Tyler Florence, so trying another one of his recipes was a no-brainer. Seriously, could he be any cuter? Wait, what were we talking about again? Oh right! Stuffing! It's an easy do-ahead and it feeds a crowd, so it has Thanksgiving written all over it, and the fresh sage just drives that home. I made this for my most recent Friendsgiving, and it was a big hit! Now I can add this to my list of favorite stuffing recipes.
I'm sure you will too!


2 tbs butter
2 onions, chopped
6 large cornmeal muffins, cubed
handful fresh sage leaves, chopped
1 egg
1/4 cup heavy cream
1/4 cup chicken stock
Salt and freshly ground black pepper


Preheat the oven to 375ºF.
Melt the butter in a medium skillet over medium heat. Add the onions and cook, stirring, for about 10 minutes, or until soft and caramelized. Add sage and scrape into a large mixing bowl. Add the cornbread pieces, season well with salt and pepper, and give it a good toss until it's well combined. In a separate bowl, whisk together the egg, cream, and stock, and pour that over the cornbread. Stir the stuffing together and stuff the cavity of the turkey. You could also spoon it into a buttered baking dish and put it in the oven along with the turkey. Bake until hot and crusty on top, about 30 minutes.

Tips:
Instead of purchasing the corn muffins, I just purchased 2 boxes of Jiffy Corn Muffin Mix and baked them according to package directions. Then proceeded with the recipe as directed. SO much cheaper to do it that way!
The key to really good caramelized onions is to cook them low and slow. I wanted them to REALLY cook down to a rich deep dark color, so I cooked mine for much longer than the 10 minutes that the recipe suggests. Just bring them up to heat, and then turn it down to low. Let them saute and give them a good stir every few minutes. And be patient!! This will take a good 30 minutes or so, but it'll be worth it!
When I made it, I added A LOT of onions. I figure it's called CARAMELIZED ONION and corn bread stuffing, so it should definitely have a lot of onions. (I also added a few extra tbs of butter.) Add as much as you like!