Monday, December 5, 2022

Apple Pie Snickerdoodles

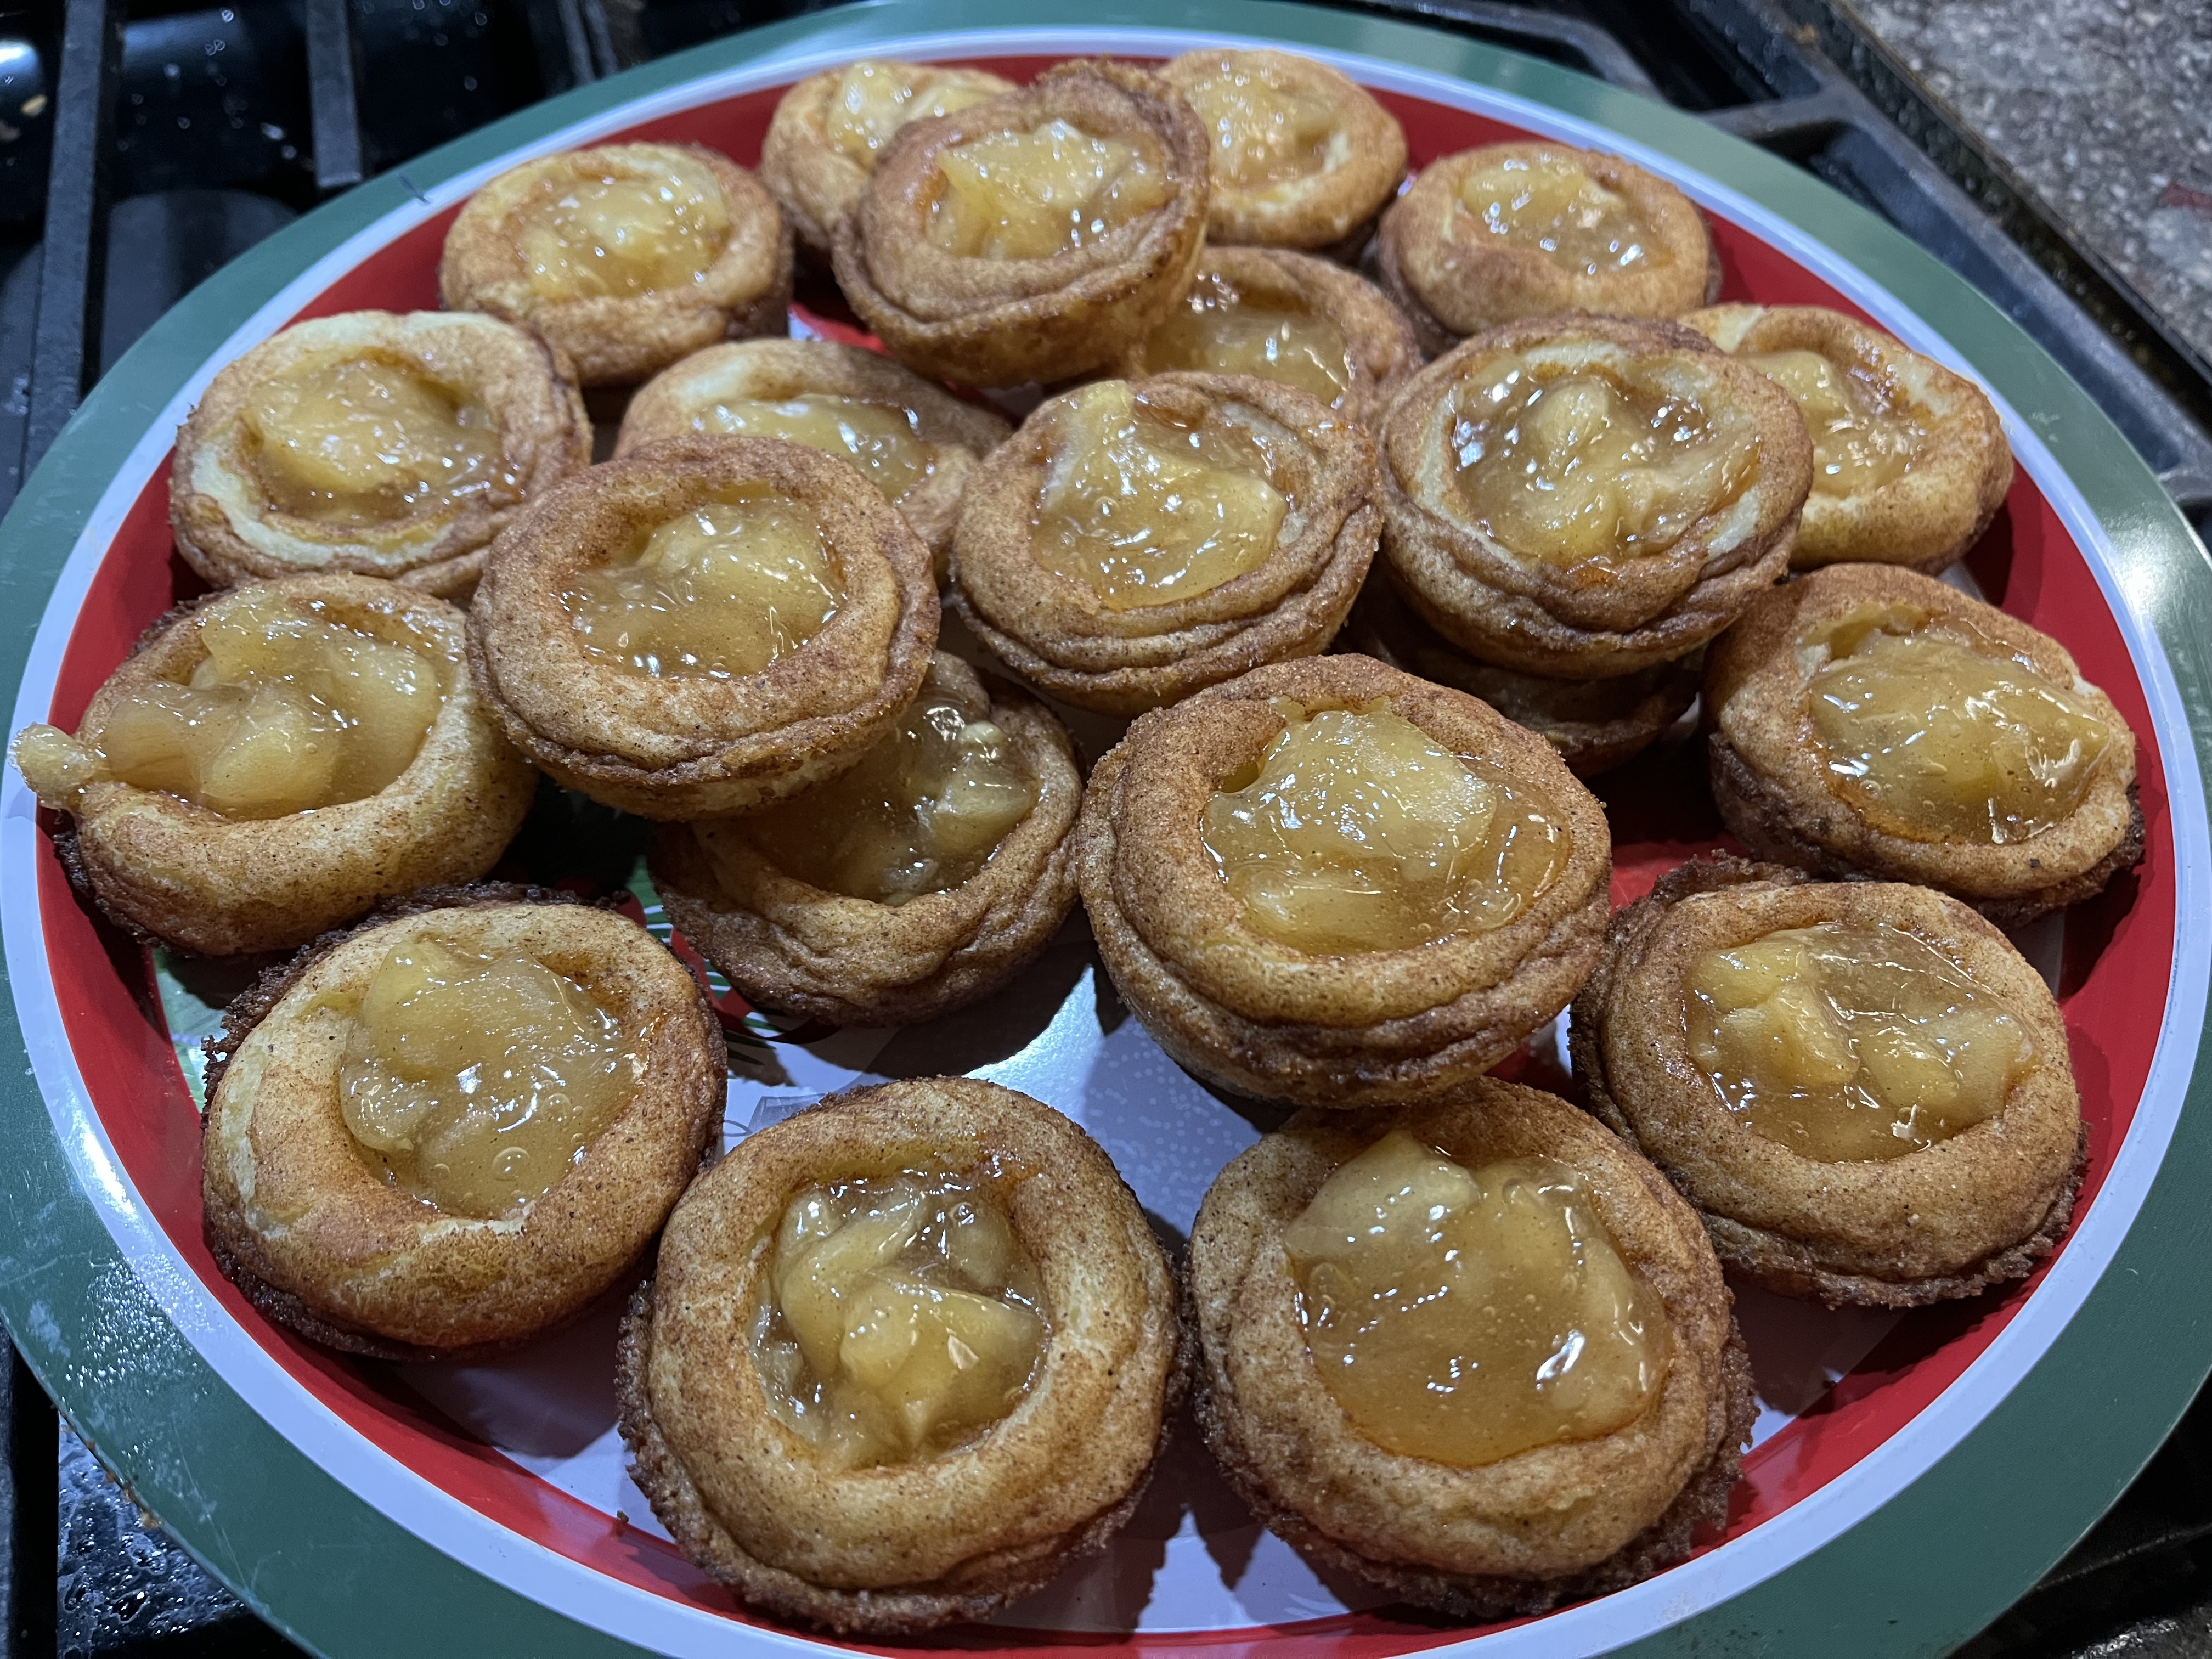
  I recently got together with my nephew, Tommy, for our yearly tradition of putting up his Christmas tree. It's something that we started many years ago when he asked for a little advice with his tree, and I was all to happy to help. This year, we were joined by my niece, Katie, and she brought a tin of FABULOUS Snickerdoodles. YUM! She told me how easy they are to make, and we discussed how much we liked the fact that the recipe uses butter instead of shortening as with other recipes. So she gave me the recipe. Thanx Katie Kate! It's called Grandma Ruth's Easy Snickerdoodle Cookies, and she got the recipe from Allrecipes.com. Frankly, I have no idea who Grandma Ruth is, but she certainly has a fabulous cookie recipe!! And when I was invited to a friend's house for a little Christmas Hang, I immediately thought of these cookies, and figured they would be great for the party. But then I wondered what I could do to make them extra special. I remembered seeing a tiktok video where a guy used purchased sugar cookie dough in muffin tins, then added pie filling to the center and I thought YES, that's the answer! I just happened to have some apple pie filling and it seemed like all the planets aligned perfectly for this dessert to happen. 
 OMG... when I tell you that they are delicious, I mean they are DELICIOUS. The buttery cookie crust, the apples and the cinnamon.. it was like they were meant to be together!! Everyone at the party absolutely loved them, and I'm pretty sure the entire tray was gone by the end of the party. 
 Now, of course, if you want to just make them into regular Snickerdoodles, you certainly can, and I promise they'll make the perfect addition to your Christmas cookie tray. But if you happen to have a can of apple pie filling, I urge you to go the extra mile. You and your guests will be glad that you did! Promise!


Cookie:
1 1/2 cups white sugar
1 cup softened butter
2 eggs
2 3/4 cups all purpose flour
2 tsp cream of tartar
1 tsp baking soda
1/4 tsp salt

Coating:
2 tbs sugar
2 tsp cinnamon
 
Filling:
Purchased or homemade apple pie filling
 
 
 Heat oven to 400ºF.
 Beat 1 1/2 cups white sugar, butter, and eggs together in a bowl using an electric mixer until smooth and creamy. Combine flour, cream of tartar, baking soda, and salt in a separate bowl; stir into creamed butter mixture until dough holds together. 
Form dough into 2-tablespoon-size balls and roll in the cinnamon-sugar mixture. Place dough balls in greased muffin tins. 
Bake for 6 minutes. Remove from oven. Reduce oven temperature to 350ºF. 
Using the bottom of a shot glass (or other similarly sized item), press a well into the center of each cookie. The dough will still be raw in the center, but the well will keep its shape. Fill each well with a tsp of canned apple pie filling. Place the muffin tins back into the oven for another 5 minutes, or until the cookie dough is set. Remove from oven and let them cool completely before removing them from the tins. You can put the tins in the fridge to speed this process. Use a fork or the pointy end of a knife to help you pop them out of the tin. 


To make the regular Snickerdoodles:

After you mix the filling as directed above, line a baking sheet with parchment paper or lightly grease, form dough into 2-teaspoon-size balls, and roll in the cinnamon-sugar mixture. Place dough balls, about 2 inches apart, on the prepared baking sheet.  Bake in the preheated 400º oven on the center rack for 7 minutes. Allow cookies to cool on the baking sheet for 5 minutes before transferring to a wire rack. 


Tips:
You definitely want to cool them completely or chill them in the fridge because they'll be too soft when you take them out of the oven and you don't want them to break when you take them out of the muffin tins. 
When you open the can of pie filling, if the chunks of apple are quite large, just chop them up a bit so that the apple pieces will fit nicely into each cookie well. 
 I was originally going to drizzle a little glaze over them after cooling, but then decided that they're just perfect without any additional glaze. But if you'd like to guild the lily, just add a few splashes of water or apple juice to some icing sugar until it's the right drizzling consistency, then pour a little over the top of each Snickerdoodle. You could also do a drizzle of caramel sauce, but I think I prefer to let the cinnamon and apples be the stars of the show. 

Original cook's notes:
When removing cookies from the oven, they make look doughy still. By allowing them to continue to cook on the cookie sheet out of the oven prevents hard cookies. For storing cookies, place cooled cookies in a plastic container or plastic bag with a piece or two of bread to keep cookies soft.


Sunday, November 13, 2022

Light and Fluffy Dairy Free Mashed Potatoes


Usually, when I'm choosing recipes, my first thought naturally goes toward what I like to eat. But then it occurred to me that very often people have food allergies and can't eat certain things that I take for granted.

 So today I decided to do a delicios recipe for mashed potatoes that doesn't have all the heavy cream that I usually add. But how do you make it rich without all the cream?? The answer is coconut milk! Yes, yes, I know, crazy, right? But seriously, trust me on this. No, it does't make them taste like coconut. It just adds the richness that you want! Add whatever seasonings you like, and there you go. Perfectly fluffy delicious mashed potatoes without any of the problems that might come with dairy. 

Surprising? Yes. Delicious? Absolutely! !


5 lbs Yukon Gold potatoes, peeled and quartered

1 1/2 cups chicken broth

1 can coconut milk

4 tbs ghee, melted 

Salt and pepper

Chives


Place potatoes and chicken broth in a slow cooker. Cook on low for 8 hours until fork tender.

Scoop the potatoes out of the slow cooker, and push them through a potato ricer set at its finest setting. 

Shake the can of coconut milk before you open it.  Now stir in the coconut milk a little at a time. 

Do the same with the melted butter and any broth left in the slow cooker. 

Season with plenty of salt and pepper.  Top with chopped chives.


Tips:

Usually, at this point, I'll mention what I believe to be the "key" to the recipe. Well, in this case, there are several:

First, you want to make sure you use the right kind of potato. Yukon Golds give you just the right amount starch without turning into spackle. 

Next is the potato ricer. If you've never used one, it kind of looks like a giant garlic press, and it's the best tool for mashing potatoes. Of course, you can use a hand masher, but I wouldn't use a mixer. Again, spackle.

Have you ever used ghee? It's just clarified butter with all of the milk solids removed. It works much better for people who don't do well with dairy. Of course, regular butter also works.

And finally, it's all about flavor! Use any seasonings you like. Garlic powder, onion powder, seasoned salt, all good! And remember, it will need more salt than you think it will!

Cooking the potatoes in chicken broth adds lots of flavor too, but you can easily keep it Vegan. Just use Vegan butter, and use water or a vegetable broth.


Tuesday, November 8, 2022

Slow Cooker Apricot Glazed Carrots


Here's a side dish recipe that is so easy you won't believe it. It takes literally 5 minutes to prep in your slow cooker (as far in advance as you'd like), and then all you have to do is turn it on. It doesn't get easier than that! This qualifies as one of the easiest most delicious Thanksgiving recipes I've ever tried, and believe me when I tell you that's saying something!! Oh, and one other thing, if you think you don't like carrots, give this one a try. It just might change your mind! 


2 lbs baby carrots
1 medium onion, sliced
1/2 cup water
1/4 tsp salt
1/3 cup honey
1/3 cup apricot preserves
2 tbs chopped fresh parsley


In a 4-5 quart slow cooker, place carrots, onion, and water. Sprinkle with salt. Cover. Cook on low for 8-10 hours or on high for 4-5 hours. Discard any liquid in cooker. Toss carrots with honey and preserves. Turn to high. Cover. Cook for addition 10-15 minutes. Garnish with fresh parsley on top. Serve. 


Tips:
Whenever I buy bags of baby carrots, I find that some are thinner than others. Choose the ones that are thicker. They'll do much better in this recipe. Don't want baby carrots, use regular carrots! Just peel them and cut them into bite sized pieces. 
Not a fan of apricots? Use any favorite fruit jam. I looked for hints from The Betty Crocker Kitchens, since thats where I found this recipe.. they said that "peach, plum, pineapple or another flavor preserves will lend these carrots a subtly different yet equally delicious fruit flavor." I couldn't have said it better!
Oh, btw, the original recipe did not include the half cup of water. I was worried that it would be too dry, so I added the water. Since we drain it anyway, it just made sense to me! 


Monday, October 10, 2022

Joey's Slow Cooker Bean and Beef Stew


  Whenever we transition from Summer to Autumn, my way of cooking changes too. Suddenly, we go from cookouts and grilling to making large pots of stews and soups. I'm immediately reminded of going back to school and then returning home to the intoxicating aroma of whatever my Mother had cooking on the stove that day. 
  This year, instead of a slow transition from warm Summer days into crisper Autumn nights, it seemed like Summer clocked out on its very last calendar day, and we jumped right into Autumn. I kept thinking "whoa, that was abrupt! Time to make a pot of stew!" And so, after thinking about it for a little while, I decided to find a new beef stew recipe for just a little variety. 
  As I was browsing recipes, I found a slow cooker recipe that had beans, beef, and potatoes. Nothing else, that was it, thrown into a crock pot. My first thought was "hmm....that's probably pretty bland." No seasonings, no aromatics, nothing. Just beans, beef, and potatoes. OK, lets build on this, shall we? I bought a few ingredients, and got down to business. I started throwing things into the slow cooker, and before I knew it, I had basically just made a tweaked version of my beef stew, with the addition of baked beans. OK! Lets run with it and see where it lands!
  HOLY BEEF STEW, Batman! Why have we never added beans to beef stew before?? It's fabulous!! Not only does it add body to the sauce, it adds a fabulous, almost velvety texture to the gravy. I thought, "oh this would be perfect with some freshly baked corn bread!" Yum!
 I threw it together and let it cook overnight, just because I knew I would want it for earlier in the day, and then it occurred to me that this would be the perfect plan for your Trick or Treaters. 
 When I was growing up, my Mother always had a huge pot of something cooking on the stove all day for Halloween. It was great because we had a houseful of kids, all coming and going at different times, and this was the perfect thing whenever we returned home. It was love in a bowl, and it always warmed us right up. Plus, Mom always said it was easier because there was no worry of trying to fix dinner while answering the door all day giving treats to the neighboring ghouls and goblins. 
So, prep this the night before Halloween, let it slow cook all night, and you'll be ready for the next day. Keep this recipe handy for winter too. It'll warm you up on the snowiest of days!!
If you like beef stew and/or baked beans, you must give this a try!!!


2 lbs stewing beef cubes
1-2 lbs baby red potatoes, halved
1-2 lbs baby carrots
1 large onion, roughly chopped
1 28oz can pork and beans
1 10oz jar beef gravy
1 1/2  tsp dried thyme leaves
2 tbs soy sauce
Salt and pepper to taste 
2 heaping tbs corn starch
1/4 cup cold water

If the beef cubes are large, cut them in half. 
Place all ingredients except the cornstarch and water in a large slow cooker. Cover.
Cook on low for 8-10 hours. 
In a small bowl, stir together the corn starch and cold water to make a slurry. 
Add to the stew. Gently stir to combine.
The sauce will gradually thicken. 
Serve with corn bread, or a hearty crusty bread with lots of butter. 


Tips:
-For an extra added campfire vibe, add about a 1/2 cup of your favorite smokey BBQ sauce. If everyone isn't keen on BBQ sauce, just add a little to your bowl when serving!
-I mentioned cutting the beef cubes in half because I believe they should be bite sized. Sometimes, they leave them in such giant chunks, you can barely even fit them in your mouth! They need to be cut down.  
-Using baby potatoes and baby carrots eliminates the need for peeling and cutting. So much easier! I do like to cut the potatoes in half, though, because of that whole bite sized thing again. Plus, I like the way the look when they're cut in half!
-The amounts of beef, carrots, potatoes, and onions are up to you. I like a lot of potatoes and carrots, so I added 2 lbs of each. Plus adding more potatoes and carrots will make the meal go further! You can literally feed your entire family and only use one little pound of beef. The kids will never know!
-When choosing your brand of baked beans, just go for the basics. There are a million kinds from honey to brown sugar to maple and on and on. In this case, you don't want them to be too sweet. Just the plain original baked beans here. 
-Usually I would use fresh thyme, but in the case of something cooking over a long period of time, I think the dried is just fine. 
-Btw, one of the key ingredients is the soy sauce. You don't really taste it, but it gives you that little bit of savory umami flavor that you want in a beef stew. If you don't have soy sauce, a little Worcestershire sauce or a sprinkle of MSG will do the same thing.
-And as always, when a recipe says "add salt and pepper to taste", it really needs more salt than you think it does. A little sprinkle across the top of the pot isn't gonna cut it. I'm not saying to add a HANDFUL of salt, but you should definitely add a good 2-3 teaspoons of salt and a good teaspoon of black pepper for a whole pot of stew. Did you ever wonder why food at a fancy restaurant always tastes so good? It's because they use enough salt!!! True story.


Monday, September 12, 2022

Joey's Scalloped Tomato Casserole


 Usually, whenever I decide to "just throw something together", I decide who the star of the dish is going to be, and then I see where the inspiration takes me.
The first spark of inspiration for this one came from one of my favorite Youtubers. Miss Lori over at Whippoorwill Holler was making an old timey tomato casserole with layers of fresh tomato slices and day old bread.  That sounded pretty awesome to me, especially with all of the fabulous Jersey Tomatoes available. Perfect! There's the star of my show! The problem was that I didn't have any bread or rolls or anything to add to the casserole. Hmm... 
 So I decided to do it anyway, but instead of doing layered slices of bread, I thought, "well, how about bread crumbs instead?" I had tons and tons of Panko bread crumbs, and I thought "oh, yes, THAT would work." Great. What else? Well.... you can't go wrong with something onion-y... chives, scallions, onions, onion powder.. definitely! What else? Garlic? Sure! And how about something fresh? Basil? Parsley? of course. Salt and pepper? Absolutely. It was all coming together quite nicely!
 The only question that remained was: cheese or no cheese? Since I happened to have it on hand, I went with it. I melted some cheese over the top, and I used quite a lot, actually. The result was pretty fabulous, I must say! And it turned out to be a great way to use up the few ingredients I had on hand. It would be a great way for you to use up those extra few tomatoes you have ripening on the window sill!
 Oh, and btw, it would have been perfectly fabulous without any cheese melted over the top. And it would work as a fabulous side dish, maybe with a piece of grilled fish and some roasted green vegetables. I do think the cheese turns it into a stand alone entree, though. 
 Either way, if you love tomatoes as much as I do, especially JERSEY tomatoes, you simply MUST give this one a try! Thanx again to Miss Lori for the spark of inspiration!


4 large tomatoes
3 scallions, chopped
1 large clove garlic, minced
2 tbs fresh basil leaves, minced
1 1/2 cups panko bread crumbs
1/4 cup AP flour
Salt and pepper to taste
1-2 cups shredded Mozzarella cheese 

Cut out the core of the tomatoes and cut them into large chunks. Place in a large bowl along with all remaining ingredients except the cheese. Give everything a good toss. Now place in a large caasserole dish. Top with cheese, bake at 350ºF for about 30-45 minutes, or until golden and bubbly on top. Let it sit for a good 10-15 minutes before serving. 


Tips:
You can peel the tomatoes if you want to, but I just left the skins on. To peel them, cut an X in the bottom of each tomato, then plunge into rapidly boiling water for about 30 seconds to a minute. Now remove from boiling water and plunge into ice water.  The peels will slip right off. 
Don't have scallions? or garlic? or basil? Use one of the other things I mentioned. Garlic powder or garlic salt instead of cloves of garlic. Onion powder, chives,  minced onions or shallots instead of scallions. Any fresh herb you like... parsley, basil, oregano, even fresh thyme or rosemary would work. That's the beauty of a casserole. It will all work!
Yes, that's the correct amount of bread crumbs. 1 1/2 cups is a lot, but remember, this isn't just a little sprinkle on top. This is an actual ingredient in the casserole and it adds body in addition to soaking up some of the tomato juices. The flour does the same thing, especially if you add the cheese over the top. The fat from the melted cheese will mix with the flour and that's how the sauce sets up. (Look at me, always thinking!)
And finally, this was meant to be a meatless dosh, but if you that strongly about it... add some sliced sausage coins... or some diced chicken... or some pepperoni for a spicy kick. Now you've turned it into a pizza casserole!


Wednesday, August 17, 2022

Zucchini "Apple" Pie Filling


    Do you have so much zucchini that you don't know what to do with it? Or maybe you left your zucchini in the garden too long, and now it's overgrown to the size of a small human?? What do you do?
 You make apple pie, of course! Apple pie out of zucchini? ABSOLUTELY!
  Let me explain. I don't have a garden, but I have friends and relatives who do. Very often, they'll send over their surplus crop of zucchini, and I'm always trying to think of new things to do with it. Side note, if I'm being totally honest, very often, the zucchini is MASSIVE, which is much tougher and isn't as desirable as the smaller more tender zucchini, but hey, who am I to look a gift horse in the mouth?
 Anyway, recently, I was given a large zucchini, several yellow squash, some eggplant, and tomatoes. Naturally, I made a big pot of ratatouille (as one does), and then froze it in containers. Great. But then another zucchini came in.... well, I can't make ratatouille every time....ok.... um... lets try a dessert this time! So, I hollowed out the center of the zucchini, sliced it just as I would slice apples, cooked it until tender and then added sugar, spices, lemon juice, and corn starch. Presto! Apple pie filling! You"ll be absolutely amazed at how much it tastes like sliced apples instead of sliced zucchini. The texture, specifically, is exactly that of an apple or pear.
 So now the doors are wide open! Make a pie! Make a crisp! Make a cobbler! Use it any way you'd use a can of apple pie filling. If you bake it with a buttered bread crumb topping, you have a Brown Betty. If you put it in a pan and lay a pie crust on top and then bake it..well, now you have a Pan Dowdy! And of course, pie, crisp, cobbler, or plain...you MUST serve it with a big scoop of ice cream on top. I'm pretty sure that's a law. 
 Since the amounts of all of your ingredients will depend on the your amount of zucchini, you may have to tweak an amount here or there. But don't panic, it will all turn out fine!


1 giant zucchini, or 2-3 regular ones
1/2 cup water
1 cup of brown sugar
1/2 cup lemon juice
2 tbs corn starch
2 tsp cinnamon
2 tsp apple pie spice blend
pinch salt
 

 Peel zucchini and slice off the ends. Slice it in half lengthwise. Using a metal spoon, hollow out the seeds, just like you would do with a pumpkin. Slice the zucchini into small dice or slices, just as you would do with apples. Place the zucchini slices in a large sauce pan over medium heat. Add water, and cover. Let it steam for a while until it becomes tender. Now add the remaining ingredients. Stir until it thickens. It only takes a minute or two. Now taste it. Is it tart enough? Add more lemon juice. is it sweet enough? Add more sugar. Is it bland? Add another pinch of salt. Want more cinnamon? Go for it. If it still tastes like squash, add more of everything. When it tastes just as you like it, that's all there is to it!


To make the crisp as you see pictured:

1/3 c all-purpose flour
1/3 c granulated sugar
1/3 c rolled oats
4 tbs cold butter (1/2 stick)
 
Use your hands to combine all ingredients until they come together when squeezed in your hand. Sprinkle the crumb topping over the filling in a pan. Bake at 350ºF until bubbly, about 30 minutes. 
 
 
Tips:
The key to success here is the lemon juice. Usually, many people choose Granny Smith apples for baking because they're very tart. So you really need that lemon juice to make up for the zucchini's lack of tartness. 
The other key is the brown sugar. I tried it with regular sugar, and it just wasn't the same.
And be generous with the cinnamon and nutmeg!

Sunday, July 24, 2022

Fresh Strawberry Lemonade


  When I recently went to a dear friend's house for a lovely summer hang, I was asked if I would mind bringing a dessert. Um, have you met me?? OF COURSE  I wouldn't mind! Obviously, you know I had already planned to bring something, and I decided to make something summery and strawberry. I made some fabulous strawberry cupcakes with homemade strawberry jam in the center, swirls of strawberry Swiss meringue buttercream, and a fresh whole strawberry on top. They turned out BEAUTIFULLY and everyone loved them. Full disclosure, I was actually extremely proud of them, thank you very much!
 Then I woke up the next morning, thinking... I want more strawberries!! So I went back to my local farmers' market, and bought several more pounds! They were just so gorgeous and inexpensive and sweet and perfect, I just couldn't help myself. 
 But, what shall I make? Well, we're in the middle of a brutally scathing heatwave with heat indexes over 100ºF. I think some refreshing strawberry lemonade would be just the thing!!
  So here we are! A very simple recipe that is a snap to throw together. It's perfectly sweet and tart and thirst-quenching and I don't know of a single person who doesn't absolutely LOVE it. 
Btw, the recipe is so easy, you don't even have to write it down. It's just two cups of each ingredient. As Miss Ina would say, how easy is that???
  So, go out and support your local farmers, buy a ton of strawberries, and make a few batches of lemonade. I KNOW you'll absolutely love it!!! 


2 cups water
2 cups sugar
2 cups fresh strawberries, stemmed and hulled
2 cups fresh lemon juice
2 cups ice water

First, make a simple syrup. 
In a medium sauce pot, stir together sugar and water over medium heat, until the sugar is completely dissolved. Remove from heat and place in the fridge to cool/chill. 
Place strawberries in a food processor or blender. Process until completely pureed. This will take several minutes longer than you think it will. You don't want ANY small bits of strawberry. Add your strawberry puree to your now chilled simple syrup. Stir in lemon juice and ice water. 
 Pour into a pitcher through a fine mesh strainer to catch any seeds or errant bits of strawberry. 
Serve in a tall glass over ice and enjoy!


Tips:
I believe this recipe to be the perfect blend of tart and sweet. However, you can absolutely tweak it to suit your own taste. Tweak the tartness by the amount of lemon juice you add, and tweak the sweetness by the amount of ice water you add. Start out with 1 1/2 cups of each, and then adjust as you go. Add more lemon juice for more tartness. Add more ice water for less sweetness. And if you'd like a stronger hit of strawberry flavor, just add more pureed strawberries!
When I say to puree your strawberries, I mean REALLY let them go for a while in the food processor until they are completely smooth. This will mean more strawberries making it into the lemonade instead of being strained out at the end.

Monday, July 18, 2022

Corniest Corn Muffins


  One of the very BEST things about living in the Garden State is our Jersey fresh corn on the cob. I'm not even kidding when I say I challenge anyone to find farm fresh corn that is sweeter or more delicious than ours. It's one of my favorite things about summer!! (well, that and our Jersey tomatoes!)
 So I was recently talking with my sister, Jeanie, and she was telling me how she made these corn muffins. She absolutely RAVED about them! She said they're the absolute best! In fact, she wrote a A++ note in the cookbook where she got the recipe, which is called Baking from My Home to Yours, by Dorie Greenspan. 
 She also said she only makes this recipe when she has fresh corn on the cob because it just makes all the difference in the world. I mean, yes, of course, you could use canned or frozen corn, but when you have fields of corn growing practically right in your back yard, why not use fresh, right?
 We do have a rule in our family, btw. We don't buy fresh corn until after the 4th of July. THEN we know it's good and ready. And with so many farmers markets around... OH MAN... you know it's just as fresh as can be. It also makes me feel good to support local farmers!!
 So, if you live in New Jersey, go to your favorite local farm market, buy some fresh corn, and make these muffins. In fact, make a double batch and throw half in the freezer for another time. 
 You'll be SO glad you did!!!! Promise!


1 cup flour 
1 cup yellow corn meal, preferably stone-ground  
6 tbs sugar 
2 1/2  tsp baking powder   
1/4 tsp baking soda
1/2 tsp salt 
1 pinch of freshly grated nutmeg (optional) 
1 cup buttermilk 
3 tbs unsalted butter, melted and cooled 
3 tbs corn oil 
1 large egg 
1 large egg yolk 
1 cup corn kernels (add up to 1/3 cup more if you'd like) 
 
 
Center a rack in the oven and preheat the oven to 400ºF. 
Butter or spray the 12 molds in a regular-size muffin pan or fit the molds with paper muffin cups. Alternatively, use a silicone muffin pan, which needs neither greasing nor paper cups. Place the muffin pan on a baking sheet.  
In a large bowl, whisk together the flour, cornmeal, sugar, baking powder, baking soda, salt and nutmeg, if you’re using it. In a large glass measuring cup or another bowl, whisk the buttermilk, melted butter, oil, egg and yolk together until well blended. Pour the liquid ingredients over the dry ingredients and, with the whisk or a rubber spatula, gently but quickly stir to blend. Don’t worry about being thorough - the batter will be lumpy, and that’s just the way it should be. Stir in the corn kernels. Divide the batter evenly among the muffin cups.
Bake for 15 to 18 minutes (12 minutes for minis), or until the tops are golden and a thin knife inserted into the center of the muffins comes out clean. Transfer the pan to a rack and cool for 5 minutes before carefully removing each muffin from its mold.


Tips:
Just like my sister, I'd add more corn. I mean, it says we can add up to 1/3 cup more, why not just bump it up to 2 cups? NOW we're talking!


Sunday, June 26, 2022

Joey's Applesauce Baked Beans


 I was recently gifted several pounds of dry beans. Now, if you've read my blog in the past, you know I love a good batch of baked beans, so I figured I'd take all of these beans, soak them overnight, then put up pints of pork and beans using my pressure canner. Perfect! They'll be a welcome addition to my "wall of jars", which proudly displays all of my canning and preserving endeavors.
  My goal was to come up with 20 pints of beans because that's how many jars I can fit in my pressure canner. Great. I soaked them, boiled them, made a fabulous sauce, got all of my canning supplies ready, and then filled up all the jars. They turned out perfectly!!! The only problem was, after I filled my 20 jars, I still had an entire bowl of beans leftover. Well? I guess I'm coming up with another recipe for scratch made baked beans!!
 Usually, when I make my famous baked beans, I just use canned baked beans and then zhuzh them up with bacon and onions and other flavorings. But this time, since I already had the beans all soaked and boiled and ready, I figured why not try something different?
  Then I remembered a BBQ sauce recipe that uses applesauce and molasses as a base, in addition to some of the more usual baked beans ingredients. I thought "how can this not be good?" So I went with it. 
It turned out SO good, I think this is now my go-to recipe when it comes to baked beans from scratch!!
 It's sweet, it's savory, it's tangy, it's rich, it's deep, it's complex, and it all works perfectly well together!!! Btw, the applesauce really does come through and it gives it a light fresh flavor. It was exactly what I wanted!
 So, if you have the time to do your baked beans from scratch, give this recipe a try. I promise you'll love it!!! You're guests will too! Just be careful... if you bring it to a friend's BBQ event, they might ask you to bring it every year!!


1 pound dried navy beans
8 ounces thick cut bacon , diced
1 medium yellow onion, diced
1/2 cup ketchup
1/2 cup molasses
1/2 cup plain applesauce
1/2 cup brown sugar
2 tbs apple cider vinegar
1 tbs lemon juice
1 tbs prepared mustard
1 tbs Worcestershire sauce
1 tsp liquid smoke
1 tsp garlic powder
2 tsp salt
1/2 tsp black pepper

In a large pot, cover your beans with cold water. Soak the beans over night, up to 24 hours. Drain.
Cover with fresh water and boil for 30 minutes or until beans are tender but not mushy.
Meanwhile, in a large pan, saute the bacon and onions. Drain excess bacon fat, if needed.
Add remaining sauce ingredients. Stir well. Taste the sauce and adjust seasonings, if needed. 
Add drained beans. Gently toss to coat beans in sauce. Do this in a large mixing bowl if you need to.
Place all in a large casserole dish or cast iron pan. Top with more bacon, if desired.
Bake uncovered at 350ºF for 45 minutes.


Tips: 
If you prefer a different kind of bean, go for it! Pinto beans, Great Northern beans, any kind will work. Just know that different beans absorb differently. Some beans are VERY thirsty and will drink up everything from your soaking liquid to your boiling liquid to your final sauce. Be sure your beans are good and saucey when you put them into the oven to bake. No one likes dry baked beans!
Btw, when I  made the sauce, I didn't really measure anything. The amounts are really just a guess, all added to taste. If you'd like it sweeter, add more brown sugar. If you'd like it to be a little more tangy, add more cider vinegar. If it's too sweet, add a little more Worcestershire sauce and lemon juice. Adjust it to how YOU like it!
And one last tip... If you're cooking for a BBQ, you can make them in advance, and then just reheat them for your event. A good way to do this is in your slow cooker. Another big tip is to make enough sauce to reserve a little extra on the side, just in case the beans get too dry.. you can add a little more sauce and they'll be perfect!

Wednesday, June 15, 2022

Fresh Cod with Tomatoes and Thyme

 
   Now that the weather is warmer, I tend to crave lighter fresher meals. You know, maybe something with fresh herbs (that I now having growing in pots on my patio) or maybe seafood or fresh produce. So I decided to do some browsing, and I found this recipe on a site called BBC Good Food. It looked so light and easy, I thought "ok, this one looks like it has potential", so I went with it. 
Well, lemme just tell you.. as my Dad used to say "Holy jump up and sit back down!" This is absolutely one of the most delicious recipes I've made in quite a long time. I loved it so much that the day after I made it, I went back to the store to buy more fish so I could make it again. I'm not even kidding when I tell you I couldn't stop eating it. And it was right then and there that I decided to feature this recipe in my menu for my next dinner party. 
 Not only is it absolutely delish, but it's also a snap to throw together. It's literally the perfect summer meal because it's ready in less than 30 minutes, and you don't even need to turn on the oven. Side note, I think this might also be the perfect meal to make for someone who's a little unsure when it comes to eating a fillet of fish. Buy it fresh the day you'll be serving it, and there's nothing "fishy" about it!
  And if you think buying fresh fish fillets is too expensive, just remember it's still cheaper than ordering a large pizza! I really REALLY hope you'll give this one a try!!!


1 tbs olive oil
1 onion, chopped
15oz can crushed tomatoes
1 heaped tbs brown sugar
A few sprigs fresh thyme, leaves stripped
1 tbs soy sauce
4 cod fillets, or another white flaky fish, such as pollock


Heat oil in a large frying pan, add onion, then saute for 5-8 mins until lightly browned. Stir in tomatoes, brown sugar,  soy sauce, and the leaves from a few sprigs of thyme. Bring to a boil, then reduce the heat to simmer.  Simmer for 5 mins, then nestle the cod fillets down into the sauce. Cover and gently cook for 8-10 mins until the cod flakes easily. Serve with baked or steamed potatoes, or your favorite rice.


Tips:
Ok, full disclosure, I've made this recipe easily a half dozen times, and I never ever measure anything. I'm sure the amounts are close, but seriously, they're just guidelines. I just add a splash of this and a big pinch of that. It always works. Also, I never bother to strip the leaves from the sprigs of thyme. I just throw the entire sprigs in. And then when it's done, I just take them out. Simple!
And speaking of adding a splash, Try this little addition........before you add the fillets into the sauce, add a splash of white wine to the sauce and give it a good stir. It's FABULOUS. Just a few glugs is all you need. I like to add a few glugs of wine when I cook rice too. It just elevates the flavor! Of course, it's not needed, but I love it. 
I keep saying I'm gonna try this recipe with chicken, but it never seems to happen. One of these days! 
Btw, I did make it for my next dinner party, and there was literally nothing left! Swoosh! Gone. I guess everyone liked it!!

Monday, May 2, 2022

Joey's Chicken and Greens Casserole

 
So, here's a question for you:
Are you a "little bit of this, little bit of that," sort of "throw it together" kind of cook?
Or are you a "never make anything without a trusted recipe" kind of cook?
For me, I guess it depends on what I'm making! If I'm baking, yes, definitely follow the recipe.
But usually I'm a "just throw it together" kind of a cook. That's how my Mom always cooked, so I guess I get it from her. In the case of this recipe, it was definitely a throw together dinner, born out of everything I had set aside in the fridge, thinking "I'll use that for something later."
  For Easter, I had made a few quiches, and I had a few different kinds of cheese leftover. So I thought, well, I can always do something with that later.
 I was recently planning to pressure can some collard greens, but I wasn't sure how many jars I'd have. After I finished all of my canning, I had a few handfuls of blanched greens leftover. No problem. I can always do something with them later.
 I even had some cut up boneless chicken in the fridge on stand by, just because I like to have a full canner whenever I pressure can. Who knew the greens would go so far?? So I didn't need to add any jars of chicken to the canner. But that's fine. I'm sure I can do something with it later. 
 Do you see where I'm going with this? That's literally how it all fell together. So I dredged the chicken in flour, sauteed it in a pan with some onions and the collards, added a sauce and poured it over rice. Perfect easy weeknight dinner! It'll feed a crowd too. 
 So, the next time you're not sure what to make for dinner? Open up that fridge and look at what you have. I'll just bet you already have the makings of a great dinner!


3-4 cups cooked rice
4-5 bonless chicken breasts, cut into large chunks
Flour for dredging
1 bunch of collard greens, rinsed well, cut into ribbons, and blanched for a few minutes
1 onion, diced
2 (10oz) cans condensed cream of mushroom soup
1 soup can of milk
1 cup shredded Mozzarella cheese
1 cup shredded Cheddar cheese
 
 
Heat oven to 350ºF.
In a large casserole dish, spread the cooked rice in an even layer across the bottom.
Toss all the chicken pieces in a little bit of flour until coated, then saute them in a large skillet with a little bit of oil. Just lightly brown the outside, but don't cook the chicken all the way through. Remove chicken pieces and place them over the rice. In the same pan, add the chopped greens with the diced onions, adding a little more oil if needed. Be careful, the green will splatter a little. Saute until the onions are soft. Scatter the onions and greens over the chicken. Whisk together the soup and the milk. Pour over the chicken and greens. Top with each kind of cheese. Bake for about 35 minutes.


Tips:
Remember, I used literally whatever I had in my fridge, so use this recipe as a guide to springboard into any direction you like, based on whatever you have on hand.
Don't like chicken? Use diced ham. Or turkey. Or pork sausage.
Don't like collards? Use spinach. Or Kale. Or any other veggie you want. 
Don't like cream of mushroom soup? Use any cream soup you like. Or make your own white sauce. 
Don't like Cheddar or Mozzarella? Use Swiss. Or any good melting cheese. 
Don't like rice? Pour the the whole thing over noodles! Or even better, mashed potatoes. 
Want it to be saucier? or cheesier? or meatier? add more of whatever you like!

Monday, April 11, 2022

What the Fig Ham and Cheese Pinwheels


 Here's an easy little 'picky uppy" finger food that you should add to your repertoire. It's an easy do-ahead for a party, and they're always a big hit!
 It's just my own little variation of a Pillsbury recipe. I added a little fig jam to balance with the salty ham, and the result was magic! I made them for Carly and Christopher's housewarming party and everyone loved them! They would also be perfect for a Brunch, or even just a quiet movie night.
You really can't go wrong with Pillsbury, can you?? Give 'em a try!


1 can crescent rolls or full crescent dough sheets 
4 thin slices Swiss cheese or American cheese
4 slices deli sliced ham
2-3 tbs fig jam
 
 
Heat oven to 375°F. 
Spray large cookie sheet with cooking spray, or line with cooking parchment paper. Unroll dough sheet onto large cutting board; press into 12x8-inch rectangle. If using crescent rolls, unroll and press into 12x8-inch rectangle, pressing seams together. Using an offset spatula, spread with a VERY thin layer of fig jam over the dough, leaving 1/2-inch border on each of the short ends. Top the jam with cheese and ham slices. Starting on short edge of rectangle, roll up tightly and pinch seam together. With serrated knife, cut into 8 slices, about 1 inch wide. Arrange on cookie sheet. Bake 17 to 20 minutes or until golden brown.


Tips:
Be sure to choose a salty deli ham. If you use a honey ham or something on the sweeter side, it might wind up being too sweet with the jam. 
Don't like figs? Use a different kind of jam, or just omit it! The original Pillsbury recipe said to drizzle the baked pinwheels with honey, but the jam was what I had on hand! Not a fan of salty and sweet? Go completely savory! Try some sliced roast beef and pepper jack cheese. Or maybe ham, cheddar, and a pinch of crushed red pepper flakes! You do you!
The parchment paper is key! Don't forget it! Otherwise, your pinwheels will stick from all the jammy goodness.  
This only makes 8 pinwheels. Baking for a crowd? Do several batches!

Sunday, April 10, 2022

Impossible Coconut Pie


Have you ever heard of an "impossible" pie? This was something that became popular in the mid 1970s and it still remains one of my all time favorite recipes. So, why is it called an Impossible Pie? Well, it makes it's own crust! What?? But that's impossible!! Nope, not at all. You just throw everything into a blender, pour it into an empty pie plate and bake!! Fun, right??! It's the baking mix in the recipe that sinks down to the bottom while it bakes, and that's what forms its own base. How cool is that??
 Over the years, there have been many variations of Impossible pies, even savory versions, but coconut was the original, so I'll stick with it. It really is just as easy as it sounds, and it comes together in no time at all. So, if you're looking for a quick and easy custard pie, give this one a try! And be sure to let me know if you find any other "impossible" recipes!! I'd love to try 'em!


2 cups milk
1/2 cup baking mix such as Bisquick*
1/4 cup melted butter
3/4 cup white sugar
4 eggs
1 tsp vanilla extract
1 tsp coconut extract (optional)
2 cups flaked coconut
 
Heat oven to 350ºF.
Set aside 1 1/2 cups coconut.
Place all remaining ingredients in a blender. Blend on high for 3 minutes,
Pour into an empty pie plate. Top with reserved coconut. Bake for 30-40 minute or until set. 
Serve with sweetened whipped cream, if desired. 
 
 
 *You can make your own baking mix by combining 1 cup of flour, 1 1/2 teaspoons of baking powder, 1/2 tsp of salt, and 1 tbs of oil or melted butter.
 
 
Tips:
-Be sure to use a BLENDER for this, and not a food processor or mixer. You really want everything to be completely pureed together to make one smooth batter. And be sure to blend it for the full 3 minutes!
-Whenever I make a coconut something, I like a LOT of coconut flavor, so I always add just a little coconut extract. It wasn't part of the original recipe, just my own addition, but it really goes a long way!


Monday, March 7, 2022

Sausage, Potato, and Cabbage Casserole


  Every year around St Patrick's Day, I like to find something different, instead of the standard corned beef or ham and cabbage with potatoes. So, this year, I decided to throw together a casserole using sausage instead of ham or corned beef. 
 I started with the potatoes (because how can you have an Irish inspired casserole without potatoes?) and then figured I'd just layer them with the cooked sausage and chopped cabbage. And then, sort of in an "au gratin" kind of move, I poured cream over the whole thing and baked it. 
 Well..... Let me just tell you... OMG it was amazing!!!! The cream and the extra liquid from the cabbage soaked right into the potatoes, cooking them perfectly, and the sausage seasoned the entire thing. And then the little tang of the Swiss cheese rounded the entire bite. I'm not even kidding when I tell you that I couldn't stop eating it. Btw.. I must say.. very often, when I make a giant casserole, I usually give half of it away, since there's only one of me. But in this case, I kept the entire thing for myself and then just sliced a big square of it for every meal. Talk about stretching a buck... I seriously have to do the math the see how many meals I got from just one casserole. This will definitely feed a crowd! So if you're feeling something hearty and St Patrick's Day -sh, try this one.  It's just the thing for a crisp March night and it will definitely hit the spot. Enjoy!


2 lbs bulk sausage
5 or 6 large Yukon gold potatoes (more or less)
1 small head cabbage (or half of a large one)
1 medium onion
1/2 tsp fennel seeds
1 tsp garlic powder
Salt and pepper
16 oz shredded Swiss cheese
2 cups heavy cream
1-2 cups Panko bread crumbs


Heat oven to 400ºF.
In a large skillet, brown the sausage, breaking it into small pieces. While it's cooking, roughly chop the onions and cabbage.
When sausage is cooked, remove from pan to a bowl, set aside. In the same pan, add onions and cabbage along with fennel seed, garlic powder, and salt and pepper to taste. Add a little butter or oil if needed to get things going. Saute until they begin to soften. While it's cooking, peel and slice the potatoes into thin slices.
Assemble:
In a large casserole dish, layer half of the potato slices, then add half of the sausage, then half of the cabbage. Top with half of the shredded cheese. Repeat all layers. Pour cream over all.
Cover with foil. Bake for 1 hour.
Remove cover, top with bread crumbs. Place back in oven for about 15 minutes or until golden.
Remove from oven and let sit for 15 minutes. Cut into squares and serve. Would be great witha lovely light salad.


Tips:
Use any kind of sausage you like. Don't like Swiss cheese? Use Mozzarella or a sharp Cheddar.
To save a little time, you can use already cooked potatoes when assembling your casserole, but the raw potatoes are meant to absorb all the extra liquid from the cabbage and also the cream. That's also one of the reasons for letting it sit for 15 minutes out of the oven.
 Hmm... now I'm thinking I'll go back and make it again...  with ham or corned beef ... or bacon!.... and BOTH mozzarella cheese and cheddar. Yum.

Monday, February 14, 2022

Chocolate Cobbler


 Are you a chocolate lover?? And do you like ooey gooey decadence? Well, if you are, and you do,  then I think I've found the perfect dessert for you! I think this dessert is possibly the ooiest and gooiest thing I've ever tasted. Not even kidding! Pretend chocolate pudding and a brownie had a baby. THAT's how fudge-tastic this is. SO GOOD!
 Now, I must confess that as much as I love chocolate, sometimes the chocolate dessert isn't always my first choice. Most times I would choose the hot apple pie with caramel....or the carrot cake with cream cheese icing... or the strawberry cheesecake. But sometimes.. well.. what can I say...sometimes, you know you just have to have something chocolate. I'm pretty sure that THIS is the dessert that will hit that spot. The recipe is from Southern Living, and it's absolutely delicious. Simple too!!
 So the next time you're feeling like you need a little rich chewy ooey gooey chocolateness in your life, give this recipe a try. BOOM.


Preheat oven to 350°F. 
Place butter in an 11- x 7-inch (2 qt) baking dish. Place dish in oven (the oven does not need to be fully preheated). Heat until butter melts, about 10 minutes. Remove from oven.

Monday, February 7, 2022

Joey's Brunswick Stew


Have you ever heard of Brunswick Stew? 
Basically, it's a very thick tomato based stew, with lots of beans and vegetables, and usually several different kinds of meat. It's a very Southern BBQ type of thing, and back in the day, it was a way to use up leftover smoked meats, briskets, and such. The taste is a perfect combination of smokey, spicy, and just a little bit sweet.
 Most recipes claiming authenticity call for squirrel or rabbit meat, but chicken, pork, and beef are also common ingredients. (personally, I think I'll skip the squirrel and rabbit. ) A debate currently exists as to whether Brunswick Stew was actually originally made near the town of Brunswick, Georgia, or in Brunswick County in southern Virginia. The main difference between the Georgia and Virginia versions has been the types of meat used. The Virginia version tends to favor chicken as the primary meat, while the Georgia version tends to favor pork and beef. As there is no "official" recipe, some variations have chicken, pork, beef, and other types of meat, all in the same recipe. Pretty much everyone makes it the way they like it. So there are probably as many recipes for Brunswick Stew as there are recipes for Italian Sunday Gravy. Every house makes it the way they like it, using whatever they have on hand. 
 So guess what I did? The same thing I always do! I looked at several different recipes, decided what I liked from each one, and then made my own! I noticed that all the recipes seemed to have tomatoes, corn, and lima beans in them, and many have BBQ sauce or ketchup and a little shot of hot sauce too. It all sounds wonderful to me, so I was sure to include them. 
 Originally, I was thinking this would be the perfect thing to warm you up if you're out in the subfreezing weather, but then I thought this would also be a great thing to make for a Super Bowl Party or Olympics Watch Party, or any other choose your own TV Event party. How perfect is that? Instead of doing a pot of chili, how 'bout this instead? Bake up some corn bread muffins, or some buttermilk biscuits and you're good to go!  Oh, one more thing.. If you're a novice cook, this recipe is for you! All you do is dump everything into the pot and let it cook! Easy peasy! Hope you like it!


4 slices bacon, cut into lardons 
1 large onion, diced
3 cloves of garlic, minced
2 large cans crushed or diced tomatoes
1/4 cup brown sugar 
1 cup of any favorite BBQ sauce 
1 tbs hot sauce, or to taste
1 tbs Worcestershire sauce 
1 tsp ground black pepper 
1 tsp kosher salt
2 cans cream style corn
2 cups whole kernel corn, yellow and/or white, fresh, canned, or frozen
2 cups lima beans, canned or frozen
2 cups diced carrots, fresh, canned, or frozen
2 cups peas, fresh, canned, or frozen
4 cups of stock, chicken, beef, vegetable, whatever you have
your choice of cooked meat, diced or shredded, as much as you like


Place bacon in a large heavy pot over medium heat. Slowly let the fat render for a good 5 minutes, giving it a stir every so often. Add the diced onion to the bacon. Saute until the onions begin to soften. Now add all the remaining ingredients. If you're using canned vegetables, no need to drain them. Just pour it all in. That's all there is to it! Increase the heat and bring it to a boil, then reduce the heat down to a simmer. Let it simmer for about an hour. Serve it with corn bread, buttermilk biscuits, or poured over a pile of fluffy mashed potatoes.


Tips/Options:
This is one of those stews that can go in any direction. Use whatever kinds of veggies you like, and add as much or little as you like of each kind. Instead of doing individual veggies like I did, you can just add a couple bags of mixed frozen veggies and call it a day. I just happened to have my own home canned veggies, so that's how I roll. Just be sure to include corn, lima beans, and tomatoes. They're the classics!
You can add diced potatoes, if you like, but I like the idea of serving it over a starch, like biscuits or mashed potatoes, but you do you! 
The one thing that makes this specifically a Brunswick Stew and not just any regular vegetable stew is the addition of BBQ sauce. It adds that hit of sweet smokiness that gives you a nice BBQ flavor. Basically all the other ingredients are negotiable.
Want to pump up the heat? Add crushed red pepper flakes, or a diced hot pepper of choice. 
Want to make it vegetarian? (Yes, that's actually a thing) Just leave the meat out and use a veggie stock.
Want it to be a little more smokey? Add a smoked ham hock or smoked meat of your choice. Or you could even just add a few drops of liquid smoke. 
This makes quite a pot of stew. Have fewer mouths to feed? Cut everything in half. Or just freeze half of it in containers! Giant crowd to feed? Double everything!