Showing posts with label Italian. Show all posts

Monday, April 6, 2026

Slow Cooker Pork Ragout


  I was recently looking for a “let it cook all day” kind of recipe, so I turned to my big freezer (aka the Snow Miser) to see what I happened to have on hand. Sitting right on top was a pork shoulder that I was lucky enough to get on sale, and I immediately knew that this was the clear winner. 
 But what to make?? I’m sure that when I bought it I was thinking I’d do a BBQ pulled pork in the slow cooker, but now I’m thinking “how ‘bout something different?”
 Enter this recipe. You may be asking what is a ragout? Well a ragout (or ragu) is an Italian dish of braised meat (usually pork) in a tomato sauce with aromatics, herbs, and wine, finely shredded and then served over a hearty wide pasta. Sounds heavenly, right? Yeah, I thought so too. And since I pride myself on keeping a well stocked pantry, I just happened to have all the rest of the ingredients to make it. 
 First and foremost, I have to say this was just about the easiest thing to throw together, and the payoff was AMAZING.  It was only about 15 minutes of prep, and then it cooked all day, low and slow, filling my house with the most intoxicating aromas. It was so good that it could literally be an option for my next dinner party. It’s just that good. (Hmm.. actually, that’s a really good idea.) 
 I made this during the biggest snow storm in the last 10 years, but you don’t have to wait for it to snow to make this recipe. Make it for a Sunday Dinner. Make it for a holiday. Make it for your friends. Make it just for yourself! It’s definitely a good one to keep in your back pocket. I actually already wanna make it again. (Not even kidding!) Good thing I still have another pork in the Snow Miser!


Olive oil
3 or 4 lb pork shoulder
1 onion, minced
2 carrots, peeled and finely diced
1 28oz can tomato puree
1 6oz can tomato paste
A couple sprigs of fresh thyme, leaves removed and stems discarded
1 tsp poultry seasoning 
1 tsp dried basil
Salt and pepper
1/2 cup red wine (such as Chianti or Merlot)
1 heaping tsp chicken Better Than Bouillon 
2 cups water

In a very hot skillet, in a little oil, brown the pork on all sides. Meanwhile, throw everything else into your slow cooker. 
Place the pork in the slow cooker, nestling it down into the sauce. Cover and cook on low for 8 or 9 hours, or until the pork shreds easily. 
Using two forks, pull the pork into fine shreds, removing any fat, stirring until well combined. 
Serve over wide egg noodles, pappardelle, or tagliatelle pasta with warm crusty bread. 


Tips:
When browning the pork, don’t move it around in the skillet. I know you want to, but resist the urge! Just leave it alone, and you’ll get a nice brown sear. Do this one all sides. Conversely, you can certainly just skip this step altogether, and it will be just fine. But I believe it gives a richer deeper flavor with the browning. 
A few things you can substitute:
Crushed tomatoes instead of puree. 
Dried thyme leaves instead of fresh. 
Vermouth or just a splash of red wine vinegar instead of the wine.
2 cup of chicken broth instead of the Better Than Bouillon and water.
Instead of cooking on low for 8 or 9 hours, you can cook it on high for 4 or 5, but I always prefer lower and slower if you have the time. 
Even though pork is the classic choice for this recipe, it also works very well with beef. Just be sure to cook it long enough so the meat shreds easily. 
If you’d prefer to cook this in the oven instead of the slow cooker: Brown the meat in a heavy pot with a lid, throw in all the sauce ingredients, then place in a low-ish oven, around 325ºF, for about 3-4 hours.

Sunday, January 4, 2026

Joey's Slow Cooker Classic Meat Sauce


Now that the holidays are over, my first thought is to make a pot of something that slowly cooks all day. It's comforting, it warms you up from the inside, and the delicious aromas of an all day simmer remind me of my childhood. 
 I was feeling like something pasta, so I decided to do a classic meat sauce. Now, I know people often use the terms "meat sauce" and "Bolognese Sauce" interchangeably, but they're actually not the same thing. Bolognese starts with minced carrots and celery and onions and also has the addition of some sort of dairy. This is just your basic meat ragu with lots of tomatoes and dried herbs. So, similar, but not the same. 
 I didn't really follow a recipe, but realized I always make it the same way, so I decided to write it down this time. And like my Mom always said "Just put it in a pot and let it cook." Originally, I was gonna do it on the stove top, but then opted for the slow cooker. And then I served it up with some hearty rigatoni. It smelled fabulous as it was cooking all day, and it was just the thing after cleaning and un-decorating all day. 
 And OMG it was so delicious!! And it's so easy, even the cooking novice can do it. It's a good all-around classic sauce to have in your cooking repertoire. Whether you cook it in the slow cooker or on the stove top, give this one a try!


1 lb ground beef
1 lb ground Italian sausage (mild, hot, or half of each)
2 28oz cans crushed tomatoes
1 15oz can tomato puree
1 6oz can tomato paste
3 cloves garlic, minced
1 small onion, minced
Salt and pepper to taste
1 tsp dried basil
1 tsp dried oregano
1/2 tsp dried thyme
1 or 2 small bay leaves
Pinch of crushed red pepper flakes.
Handful of grated Parmesan cheese


Brown the meat in a saucepan, breaking it up as it cooks. Meanwhile add all other ingredients to your slow cooker.
When the meat has mostly browned, drain any excess fat, then add it to the pot.
Cook on low for 8-9 hours or on high for 4-5 hours. Remove lid for the last hour of cooking time to let the sauce reduce a little. Serve over rigatoni, tagliatelle, or tortellini. Top with more grated cheese, if desired. 
 
 
Tips:
If you decide to do it on the stove, just keep the heat very low, and give it a stir every so often to make sure it's not burning on the bottom. 
For an even richer depth of flavor, add about a cup of red wine. Full disclosure, I thought of adding it after the sauce was already finished, but I'll definitely remember it for next time. 
I like to do a mixture of ground beef and sausage, but you can absolutely do all of one or the other. I like to include the sausage because it really seasons the sauce. If you choose to omit the sausage and do just beef or any other kind of ground meat, be sure to adjust your seasonings as needed. 
This is a perfect sauce to use when layering lasagna, just sayin'!
It can also be canned... Specifically, it must be pressure canned, since it contains meat. Processing times are 75 minutes for pints, and 90 minutes for quarts. Happy canning!

Tuesday, September 17, 2024

Chicken Parm Bubble Up Bake


   OK, this is about the easiest "shortcut meal" you'll ever make. It reminds of me a show that used to be on the food network called Semi-Homemade, remember that one? It basically showed recipes where you add store bought ingredients with a few fresh ingredients. Lots of time savers and easy short cuts. I don't know if I would spend the extra money on diced onions rather than just cutting one myself, but you get the idea. Side note, it always cracked me up that the entire kitchen was always redecorated for each themed episode, and the fact that she would called her table a "table-scape". Also she used to finish each episode by making a cocktail. Too funny. But I digress..
 This casserole is super simple because you only need a few store bought ingredients, and then you just throw 'em all together and bake. Love it! It feeds a crowd too, which is always a plus in my book.
 So if you're in a rush to get something hearty on the table, this one's a keeper. Tbh I have no idea whose recipe it is. There are actually lots of different variations of "bubble up" recipes where you add cut up biscuits to a casserole and then they bubble up when you bake them. I'm guessing it's a Pillsbury invention? Who knows? 
 Anyway, if you like chicken parm, you'll love this!


1 (24oz) bag frozen chicken bites or popcorn chicken nuggets (I used Tyson)
1 (24oz) jar of your preferred tomato sauce (I used Prego)
2 cups shredded mozzarella cheese
1 can Pillsbury Grands biscuits
Parmesan cheese
Italian spices


First, cut the pieces of chicken down to bite size, if needed. Now add the chicken bites, tomato sauce, and half of the mozzarella cheese to a large bowl. Stir to coat with sauce. 
Open the can of biscuits. Cut each one into 6 pieces. (cut each one one half, then cut each half into thirds). Add them to the bowl with a sprinkle of Parmesan cheese and Italian seasoning. Toss well.
Pour all into a sprayed casserole dish.  Bake in a 350º oven for about 25 minutes. Top with remaining mozzarella cheese. Add an extra sprinkle of Italian seasoning, if desired. Bake for an addition 20-25 minutes. It's done when all the biscuits are "bubbled up".
Let stand for a few minutes before serving. 
 
 
Tips:
 Feel free to add any extras you want. Do you like it spicy? Add a few pinches of crushed red pepper flakes. Do you like extra garlic? Go for it. Also, the amounts are just guidelines. Do you want it to be more meaty or saucy? or cheesy?? or biscuit-y? Add more! If you like a lot, add a lot! Adjust it to how you like it. You could even turn it into a pizza bake by using pizza sauce and adding diced pepperoni, sauteed onions, mushrooms, and bell peppers, etc. Yum!
Btw, I should mention, the original recipe said to bake it at 375, but it seems to me the the outside biscuits always start to overbake before the ones in the center are done. I've had bubble ups with burnt biscuits on the outside and raw ones in the center. So I decided to bake it at a slightly lower temperature (350), just to let the center biscuits catch up. Problem solved!

Monday, January 4, 2021

Joey's Unstuffed Pepper Casserole


 Usually at the start of the new year, I like to do recipes that are warm and hearty and comforting. Nothing does that like a casserole, am I right? But right after the holidays, I’m not so inclined to have a casserole that is so heavy you need to take a nap after you eat it.
 So that brings me to this one. It’s just like the classic stuffed peppers, but it’s all mixed up together in a casserole. It has the standard combo of beef and rice, and it cooks in a nice hearty tomato sauce that won’t weigh you down. Feel free to add more vegetables to it if you like! That’s the beauty of casseroles. You can  add anything that suits your fancy! Serve it up with a fresh crisp salad and you’re good to go! Enjoy!


1 lb ground beef
1 medium onion, chopped
1 clove garlic, (or more) minced
2 medium (or 1 large) bell peppers, chopped
1-2 cups cooked rice
1 29oz can crushed tomatoes
1/2 cup water
a few splashes of Worcestershire sauce
1 tbs sugar
salt and pepper to taste
chopped fresh basil to taste
1-2 cups shredded mozzarella cheese


Saute onions and peppers in a little oil in a large skillet. Add ground beef and cook until browned. Drain excess fat. In a large mixing bowl, combine beef mixture and remaining ingredients, adding only half of the cheese. Pour into a casserole dish. Cover and bake 30 minutes. Remove cover, top with remaining half of cheese. Bake another 15-20 minutes or until the cheese is melted and bubbly.


Tips:
This is a great way to use up leftover rice whenever you order take out. Just sayin!
If you’re not a meat person, go ahead and swap out the beef for something else. You could do hearty chopped cremini mushrooms, or any other vegetable, or choose your own protein!
Btw, the sugar is there just to offset the acidity of the tomatoes. Plus I do like a slightly sweet tomato sauce on my stuffed peppers. Same idea!
Don't have mozzarella? Use Cheddar instead!

Monday, May 18, 2020

Joey's Chicken Parm Tortellini Bake


  This dish was born out of what I happened to have on hand in my pantry. I didn't even know that "Pantry Pasta" was a thing, but that's exactly what this is...  I took a brief inventory of what I had in the freezer and pantry, and all signs pointed to this, so here we are!
 TBH, it's not very groundbreaking, but boy did it hit the spot! So I figured, yup, this definitely needs to be shared! It's all very simple, not very many ingredients, and it's ready in no time. No need to boil the tortellini in advance, it cooks in the sauce! The other thing that makes this recipe very simple is that there's no measuring. A bag of frozen tortellini, a jar of marinara sauce, a block of mozzarella cheese. It all comes together quite nicely!
 Ya know, sometimes we stand there forever with the fridge door open, thinking "there's nothing to eat." Well, sometimes, you just have to look at what you have and then see what you can do with it! Words to live by!


1 small onion, diced
2 cloves garlic, minced
2 or 3 boneless chicken breasts
1 lb frozen tortellini
1 28oz jar marinara sauce
8 oz mozzarella cheese, shredded
Parmesan cheese, optional


Heat oven to 350ºF.
In a large skillet, saute diced onions in a little oil over medium heat. Add garlic and saute for another minute or two. In the meantime, cut the chicken into small bite sized pieces. Add them to the skillet, season with salt and pepper, then give them a toss with the onions. Brown them slightly, but don't cook them all the way through.
In a large bowl, toss the frozen uncooked tortellini with the jar of sauce. Add the chicken mixture from the pan, along with half of the shredded cheese. Give everything a good toss until well coated. Pour everything into 2 qt casserole dish. Top with remaining shredded cheese. Bake in oven for 20-30 minutes or the cheese is melted and bubbly. Top with grated Parmesan cheese, if desired.


Tips:
 I actually debated about whether or not to partially cook the chicken before adding it to the casserole. It all turned out perfectly, so I guess this was a good idea. Just be careful not to leave it in the oven for too long because then the chicken will be overcooked.
Want to add some other ingredients to it? Add whatever you like! Spinach? Fresh basil? Go for it!
You could turn it into a pizza tortellini by using pizza sauce, and then adding sauteed pizza ingredients like mushrooms and peppers, then adding slices of pepperoni on top. 
For a completely different twist, use Alfredo sauce instead of marinara sauce. Love it!

Saturday, March 28, 2020

Crock Pot Lasagna


   Ok, so this one is more of a technique than a recipe. I wanted to do a quick and easy something that I could assemble in advance, and then have dinner ready by the time I returned home from work. So I looked in my pantry and fridge to see what ingredients I had on hand, and I just happened to have all the components of a lasagna. Perfect! Now, of course, you can go in any of several directions with a lasagna. Marinara sauce, Alfredo sauce, you could do just cheese, or add veggies, or do a meat sauce, or even seafood, and so on. But at its most basic, in my opinion, you just need 4 components: lasagna noodles, sauce, ricotta cheese, and mozzarella cheese. For me, that's the bare minimum. So that's where I started with this particular lasagna. At first, I was going to just assemble the lasagna in a casserole dish as one would usually do, and then have it ready to pop in the oven the next day. But then I saw a video of someone making it in a slow cooker. THAT seems like the right idea! I just layered the ingredients into my slow cooker and by the time I got home from work, BOOM! A fabulous lasagna dinner was waiting for me! TBH, I was kind of expecting it to be too mushy, or maybe burnt around the edges, but it turned out perfectly! This is definitely something a novice cook can make. Maybe next time I'll add other things to it, meat sauce, etc. For this one, I didn't even really measure out the amounts, but I'll just give you a ballpark of how much of everything I used. I hope you'll try it!


2 lbs ricotta cheese
2 eggs
Parmesan cheese
chopped parsley
salt and pepper
1 lb lasagna noodles
2 jars (maybe about 4 cups?) marinara sauce
2 lbs shredded mozzarella cheese


 In a mixing bowl, stir together ricotta cheese, eggs, a handful or two of Parmesan cheese, a handful of chopped parsley, and a big pinch of salt and pepper. Congratulations, you've just completed the most difficult part of this recipe! Now it's time to layer:
First, you want to spray your 6 qt slow cooker with nonstick cooking spray. Now do a generous layer of sauce on the bottom. Next, do a layer of lasagna noodles, uncooked, dry, right out of the box. Break the noodles to fit. Now do a few dollops of the ricotta mixture, and use a rubber spatula to spread into an even layer. It doesn't have to completely cover. Finally, top with a handful of shredded mozzarella cheese.
Repeat layers until you use up all ingredients. I think I did 4 layers, so use roughly a quarter of each ingredient per layer.
For the last layer, I ended with a layer of sauce and then more mozzarella cheese.
Cover and cook it on low for about 4 to 5 hours. And that's all there is to it!
Serve it with extra sauce, if desired.


Tips:
First, be sure to be VERY GENEROUS with your sauce for each layer. It's the extra sauce that will cook the noodles, so your lasagna won't be dry at the end. Come to think of it, I probably used more than 4 cups of sauce. I used 2 jars plus a little extra, but then again, I like a saucier lasagna.
After you finish the cooking, turn the crock pot completely off, and let it sit for at least 15-20 minutes. This lets everything relax and your lasagna will set up better. Now you can cut it into segments for serving, and it will stay together.
If your crock pot has a removable insert, you can assemble it the night before you want to serve it, and just keep it in the fridge overnight. Then, the next morning, be sure to take it out of the fridge about a half hour before you turn on your slow cooker.


Monday, June 3, 2019

Joey's Creamy Fettuccine with Zucchini and Peas


  OK, so, I have a confession to make. I don't eat pasta very often. Like, maybe only a few times a year. There. I said it. I know. I know. That's blasphemy in some households, right? I mean, of course, I do LOVE it, but very often I find it to be a little bit heavy. So, unless I'm doing a big spaghetti dinner, or maybe doing fresh pasta for friends, I kind of have to be in the mood for it. That's not a crime, is it? Actually, one of my favorite ways to have pasta is with a bunch of fresh vegetables. Since I live in The Garden State, I absolutely can't wait for the warmer months of the year and all of the fabulous produce that comes with them. THAT'S when I'll definitely be in the mood for a nice dish of pasta and some of Jersey's freshest veggies to go with it.
 For this one, I decided to go with zucchini. I saw it at a local farm stand, and it was so brilliantly green that I was inspired to keep with that theme and add peas and fresh herbs. The result was an amazing pasta dish, perfect in its simplicity, kind of similar to an alfredo, but a little bit lighter.
 So if you're a "pasta every week" kind of household (or even more), you should definitely add this one to the rotation. It was quick and easy and it was just the thing to hit the spot! Hope you like it!


1 lb fettuccine
1 stick butter
1 medium onion
4 or 5 cloves of garlic, chopped
1 large (or 2 small-ish) zucchini, cut into large dice
Salt and crushed red pepper flakes
1 cup chicken broth
1/2 cup heavy cream
1/2 cup grated Parmesan cheese, plus more for serving
1 10oz box of frozen peas
5 or 6 large leaves of fresh basil
Fresh parsley


   Bring a large pot of water to a boil. Add a handful of salt. Boil fettuccine according to package directions to reach desired doneness. While your waiting for the water to boil, make the sauce.
  In a large pan, melt butter over medium heat. Add diced onions. Saute until they soften a bit. Add chopped garlic and continue to saute. Add diced zucchini, season with salt and crushed red pepper flakes, and continue to saute, stirring frequently. When the zucchini are tender, add chicken broth, cream, and grated cheese. Stir all until well combined. Reduce heat to simmer. Let the sauce reduce a bit until the pasta is done. At the last minute, add the frozen peas and fresh basil. Give it a good stir. Taste and adjust seasoning, if needed. Add drained pasta and toss all together. Let it sit for a few minutes before serving. Top with chopped fresh parsley and a bit more cheese.


Tips:
The sauce is meant to be kind of thin so that the pasta will really drink it in.
Be sure to taste it and adjust the seasoning. It will need a bit more salt than you think it will. If you don't like crushed red pepper flakes, then just use black pepper.
For an extra punch of flavor, add a splash of white wine to the sauce!


Monday, April 1, 2019

Joey's Spicy Shrimp and Linguini


 Right off the bat, I should probably say that I don't often go the spicy route with my cooking. I mean, yes, of course, I like lots of spices, but just not very much HEAT. Very often, I'll taste something and think "that's too hot." And someone else will say "I can't even taste any heat!" Hmm... Maybe I'm a Supertaster? (Yes, that's a real thing) Or maybe I just don't like really hot food. But every so often.... actually not very often at all....  once in a blue moon... I'll try something with a little extra heat. And that would be today!
 I was thinking of doing a shrimp and pasta something. Awesome. Love it. My first thought was to do something with lots of butter and garlic, but then I decided that it would be too similar to Shrimp Maureen, which is already a perfect dish and needs no tweaking. So I opted for a tomato sauce, still with lots of garlic, and maybe a few pinches of crushed red pepper flakes, which is usually my go-to when it comes to adding heat. I kept it pretty simple with just a few basic ingredients, and then I cooked the shrimp right in the sauce. It was SO GOOD! I was so pleased with it, I even pushed the heat a little further than I normally would. Absolutely delicious! The shrimp flavors the tomato sauce, and it's zesty and garlicky and was just exactly what I was craving. It was ready in less than 30 minutes too! So you could easily throw this together for a Friday night quiet dinner after a long day of work, or save it for the next time you want to impress someone. It's that easy and elegant!
 So if you're all about hot and spicy, try adding this to your repertoire. It's really tasty and I know you love it! Enjoy!


4 tbs butter
1/2 medium onion, minced
3 or 4 cloves garlic, sliced
1 29 oz can crushed tomatoes
1 14 oz can tomato sauce
1 tsp dried basil
Salt to taste
Crushed red pepper flakes to taste
2-3 tbs grated Parmesan cheese
1 lb linguini or other long pasta
1 lb large shrimp, peeled and deveined, tails removed
Fresh parsley, for garnish and a pop of freshness


 In a large pan or sauce pot, melt butter over medium heat. Saute onions until they begin to soften. Add garlic and continue to gently saute, making sure not to brown them too much. Add crushed tomatoes, tomato sauce, basil, salt, pepper flakes, and grated cheese. Bring to a boil, then reduce heat to low. Let it simmer for about 10 minutes. Meanwhile, bring a large pot of salted water to a boil. Add linguini and cook according to package direction to desired doneness.
Add the cleaned shrimp to the sauce. Simmer for another 5-10 minutes or until shrimp are cooked through. Toss the linguini with the sauce. Top with more grated cheese and chopped fresh parsley.


Tips:
One of the best things about this dish is that you can tailor it to your own tastes. Make it as spicy as you like! I just did a few pinches of red pepper flakes, but if you like it really spicy, add as much as you want! Add more butter and garlic. Add more onions! Are you making a big batch? Double everything! I also added more than just a pound of shrimp. More is more!!
Whenever you boil pasta, be sure to add enough salt to the water. You want it to be as salty as the ocean!

Monday, August 21, 2017

Joey's Chicken Aurora


  Have you ever heard of Aurora sauce? Basically, it's just a fancy name for a tomato cream sauce. Kind of like if Marinara and Alfredo had a baby, her name would be Aurora. (see what I did there?) You may have also heard of it as a "blush" sauce, but it's pretty much the same thing either way. I made this dish for a casual movie night not too long ago, and I must say it turned out exactly as I hoped it would. This is my go-to type of recipe whenever I'm having a few friends over and it's always a big hit. Bite-sized chicken pieces, dredged in a little flour to give some texture, served over pasta with a rich delicious sauce. Seriously, what's not to love?
 TBH, this recipe did not start as a chicken recipe. I was looking for a way to use some of my fresh herbs. I have window boxes filled with herbs all summer long, and they grow like CRAZY! So this was a good way to use some of them. Adding the chicken was sort of an afterthought!
 Now, I know the sauce is a little bit rich, but trust me, the fresh herbs really cut through it, and the tang from the tomatoes really rounds everything out. I'm not even kidding when I tell you that I couldn't stop eating it! I don't eat pasta very often, but when I do, I like to make it count. And this dish is ABSOLUTELY worth every bite, with its velvety cream sauce, the fresh herbs, the zesty tomatoes, and that tiny little game-changing splash of sherry. Definitely add this to your repertoire of quick meals. It's just as perfect for a quickie no fuss weeknight meal as it is for a movie night or an elegant dinner. You'll definitely get rave reviews! Promise


1 lb any shape cut pasta
3 boneless chicken breasts
seasoned flour for dredging
1 jar sun died tomatoes, in oil
3 cloves garlic, minced
1 cup heavy cream
1 cup milk
a splash or three of dry sherry
1 tbs fresh basil, chopped
1 tbs fresh oregano, chopped
handful of grated Parmesan cheese
salt and pepper to taste


 Fill a large pot with water. Add a good handful of salt. Bring to a boil. Add pasta and give it a stir. Boil according to package directions to desired tenderness. Drain well.
Meanwhile, cut the chicken into small pieces. Dredge the chicken pieces in flour until coated. In a large shallow pan, saute the chicken in a little oil or butter, until lightly browned on the outside, and cooked almost but not quite all the way through. Do this in batches, making sure not to crowd the pan. Remove chicken to a separate plate and set aside. While the chicken is cooking, drain the sun dried tomatoes and then julienne them into strips. After removing the last batch of chicken from the pan, add remaining ingredients. Stir well, making sure to scrape up any browned bits from the pan. Now add the chicken back to the pan, and finish cooking in the sauce. Adjust seasoning, if needed. Serve over pasta.


Tips:
You can easily serve this as a meatless dish. It absolutely stands on its own without the chicken.
For the seasoned flour, I like to just add salt, pepper, and garlic powder, but feel free to use anything you like.
When you're cooking the sauce, if it becomes too thick, just add a few more glugs of milk.
If you don't have sherry, you can add a little brandy, or vodka, or a little dry white wine. It's absolutely the key to the whole dish, so be sure to include it!
When you're adding the herbs, cheese, and sherry, add as much as you like!
If you'd like to add a little heat, add a few shakes of crushed red pepper flakes.
Btw, this sauce is FABULOUS over any kind of ravioli. Just sayin!

Monday, July 25, 2016

Joey's Easy One-Pot Pasta


 This is one of those recipes that has been circulating around the interwebs for a while now. It seems there are several versions, and they're all very similar. Martha has one, Southern Living has one, and on and on. My problem with many of them is that they only use 12 ounces of pasta instead of the full pound. It's fine. I get it. If you add the full pound to your skillet, it won't all fit with the rest of the ingredients. But who cooks only 12 ounces? I don't know about you, but I always cook the whole pound. So I figured, why not just use a bigger pot??? Seemed like a no-brainer to me. My next issue with the other versions is that it doesn't really go very far. I mean, I wanted it to be enough to feed 4 people. So, I figured, let's add sausage to it! That'll help stretch it a little. And that's exactly what I did. And do you know what? It turned out perfectly!! It tasted great, everyone had plenty to eat, and I even had enough leftover for lunch the next day. And it's so easy, you just keep adding things to the pot! Simple! So you should definitely keep this recipe your repertoire. It's ready in less than a half hour so it's perfect for any weeknight dinner. It's also a great menu option for an easy casual dinner with friends. I got RAVE reviews for it. You will too! Definitely a keeper!


8 Italian sausage links (I used chicken sausage)
1 medium onion, roughly chopped

1 lb pasta (I used linguine)
12 oz cherry or grape tomatoes, halved

2-3 cloves garlic, minced
1/2 teaspoon red pepper flakes
2-3 tsp chopped fresh oregano leaves
2-3 large sprigs fresh basil, chopped

5 cups water
1 cup Parmesan cheese

Slice sausage into bite sized pieces and place in a pot along with the chopped onion and a few glugs of olive oil. Cook and stir over medium heat just until the sausage is slightly browned and the onions are cooked down a bit. Add all of the remaining ingredients except for the cheese.

Cover pot and bring to a boil. Reduce to a low simmer and keep covered and cook for about 10 minutes, stirring every 2 minutes or so. Cook until almost all liquid has evaporated. Add the cheese and give it a good toss with the pasta. Season to taste with salt and pepper. Serve with more cheese and a few more chopped fresh basil leaves over the top. 


Tips:
Feel free to use any kind of sausage you like. Pork, chicken, turkey, sweet or hot,  even Chorizo or Andouille. Any kind will work! Not a fan of sausage? Just leave it out! That makes it even easier. You just throw everything right into the pot, bring it up to a boil and then simmer as directed. Done.
You can use vegetable broth or chicken stock instead of water, but water works just fine.

Monday, May 9, 2016

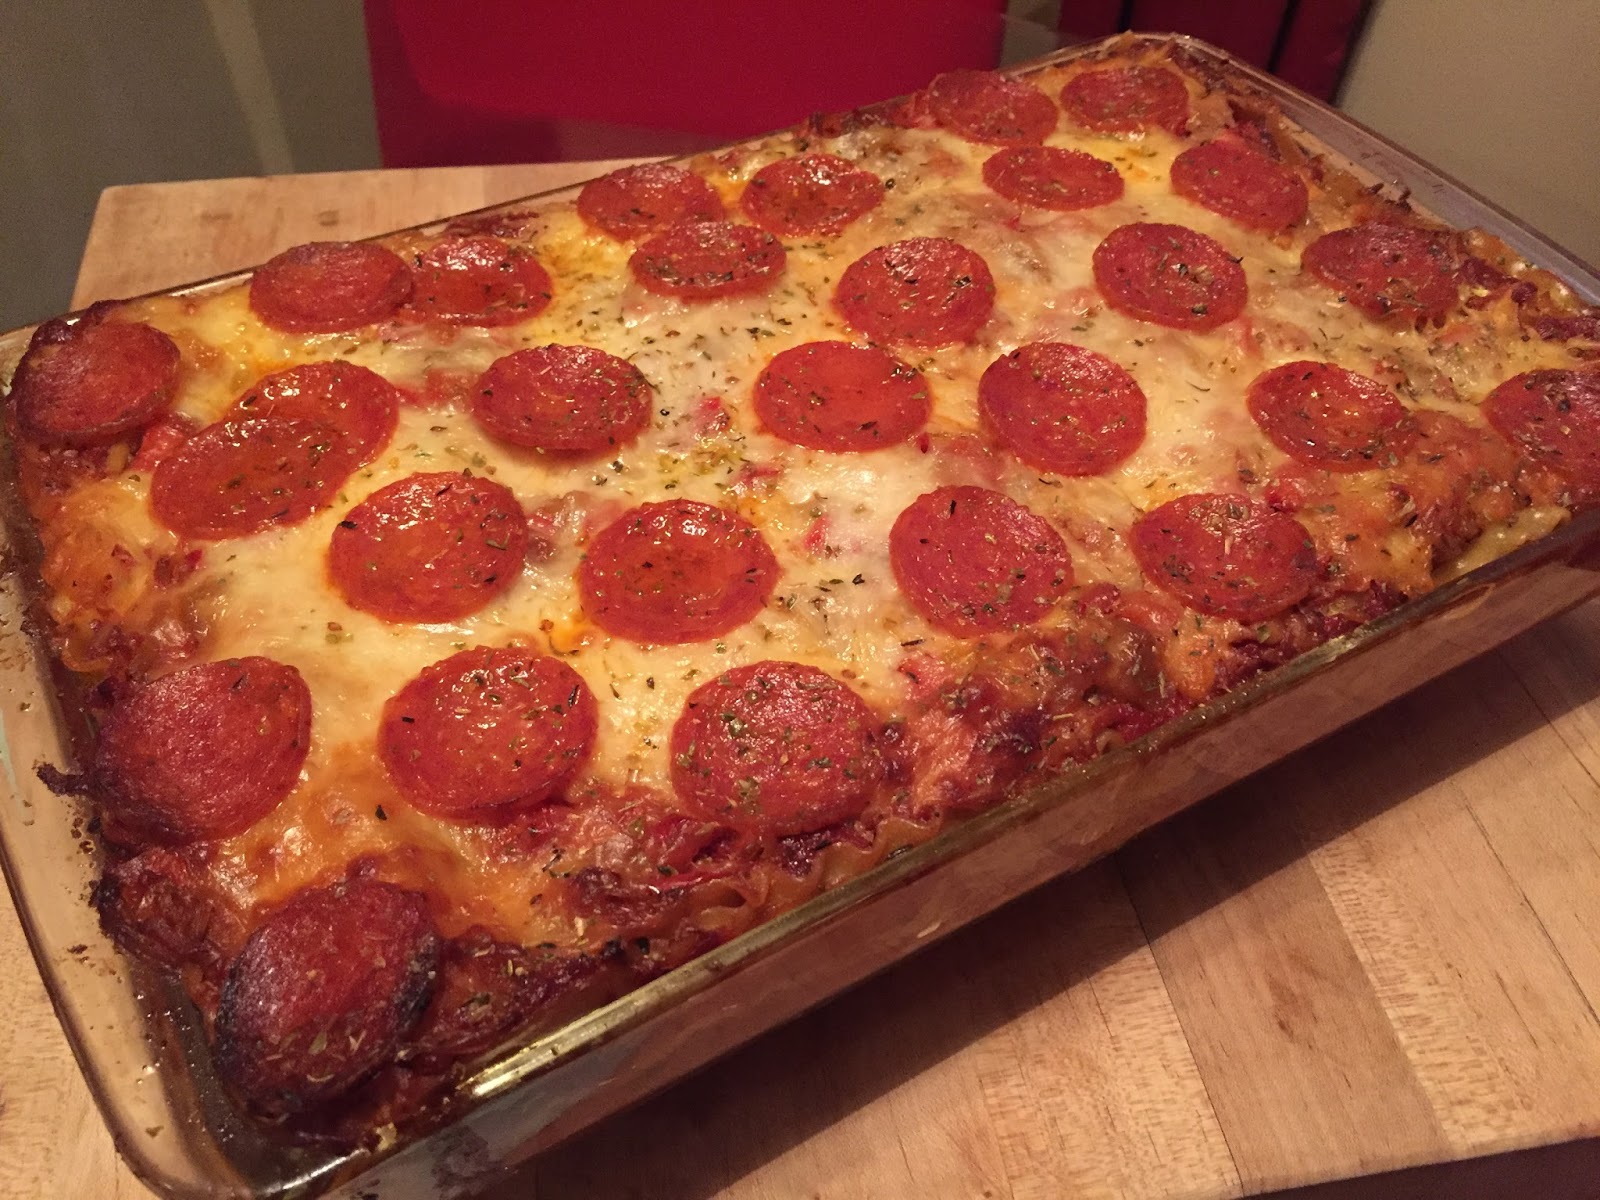
Joey's Pizza Lasagna


 Ever since I started this cooking blog, I've tried to post recipes that I think people would like to cook. It's not enough for someone to look at a recipe and think "That looks delicious"", I want someone to think "I can make that!" So I looked back on the most popular posts over the last 8 years. The most popular recipe to date is Crock Pot Pizza Pasta. So I figured, why not take that same idea and do it as a baked lasagna instead of in the crock pot? I basically did the same process, but with a few minor tweaks and I must say, I'm pretty happy with how it turned out!
 The idea was that each layer of lasagna noodles would basically be its own pizza, with sauce, toppings and cheese. So the first layer was sausage and bacon, the next layer was peppers and onions, the next layer was mushrooms, and the top layer, pepperoni! Then the whole thing is baked until bubbly and fabulous. Pretty cool, huh?  I chose these toppings because they're my favorite, but you can absolutely do whatever pizza toppings you like! Do a meat-lovers' pizza, do a veggie pizza, do just one topping, anything will work!
 Hopefully you'll see this recipe and think "I can make that!!" Because, do you know what??
YOU CAN!

Joey's Go-To Homemade Pizza Sauce, or jarred, or your own
1 lb lasagna noodles
1 lb Italian sausage, mild or hot
1/2 lb thick cut bacon, chopped
2 bell peppers, any color, coarsely chopped
1 large sweet onion, coarsely chopped
1 lb baby bella mushrooms (or other mushroom of choice)
1 lbs sliced pepperoni
2 lbs shredded mozzarella cheese

 Heat oven to 350ºF.
Fill a wide shallow pan with very hot water. Place the lasagna noodles in the water to soak while you prepare the other ingredients.
Remove the sausage from casings and brown in a skillet. I browned the bacon in the same pan. Drain excess grease.  Set the meat aside. In the same pan, saute the onions and peppers (I used some of the drained bacon fat) until slightly softened and caramelized. Set aside. Do the same with the mushrooms or other toppings of your choice.
 By now your noodles should be pliable but not too mushy.
 In a 9x13 baking dish, place a layer of sauce, then a layer each of noodles, more sauce, toppings and cheese. Layer the toppings in whatever order you'd like. Continue making layers until all of your ingredients are used up. End with a layer or pepperoni on top of the last layer of cheese.
 Cover with foil and bake for about 45 minutes. Remove foil and continue baking for another 15 or until the cheese is lightly golden and the pepperoni is sizzly. (is that a word? I'm going with it.)
 Let it rest for a good 10-15 minutes before slicing.

Tips:
 One of the best things about making lasagna is that its a total do ahead. It's actually BETTER if you do it the night before, and then just heat it up when you want to serve. If you don't want to heat it twice, you can absolutely assemble it the night before and then bake it just before you want to serve it. I do recommend letting it sit for 10 to 15 minutes after removing it from the oven because then it'll have a chance to set up a bit, which will result in nice perfect squares of lasagna that stay together.
 Another thing that will help your lasagna stay together (instead of the top half of your slice of lasagna sliding off) is to layer your noodles in different directions. So, for instance, if you're doing 4 layers of noodles, layers one and three should go longways in your pan, and layers two and four should go across. Just cut the noodles to fit. Yes, it takes a few extra minutes, but it'll keep your layers locked together.
You can definitely use regular marinara sauce, if that's what you have on hand. Just add a little dried oregano to make it more like pizza sauce!
 Btw, I purposely didn't include ricotta cheese in this lasagna, just because I wanted it to taste more like pizza, but you do you! If you want to add ricotta, go for it!

Joey's Go-To Homemade Pizza Sauce


 I was recently making a Pizza Lasagna, and I realized that I didn't have a go-to pizza sauce recipe. So I figured I'd come up with one! Just as I usually do, I looked up a few different recipes and took what I liked from each one. And here it is! Now I have my go-to recipe and I hope you'll give it a try. Of course you can use it for homemade pizza or Crock Pot Pizza Pasta, but try it as a dipping sauce for Sausage and Pepperoni Pizza Puffs, or your favorite mozzarella sticks. You could also do mini pizzas in the toaster oven on English muffins with a little shredded mozzarella cheese on top. It's also fabulous just as a spicy sauce poured over your favorite pasta. Hopefully this will now be YOUR go-to pizza sauce recipe too! Enjoy!

3 tbs olive oil
3 tbs butter
1 small onion, finely minced
1 clove garlic, minced
1 tsp crushed red pepper flakes
2 tsp dried oregano
2 tsp cracked fennel seeds
2 (28oz) cans Tuttoroso crushed tomatoes
2 large whole sprigs fresh basil
1 tbs sugar
S&P to taste

Add the first 7 ingredients to a heavy saucepot over medium heat. Stir and saute for 2 or 3 minutes. Add the remaining ingredients. Increase the heat to bring it up to a boil, then reduce it to a low simmer for about 30 minutes, stirring occasionally. That's all there is to it! Can be made in large batches and frozen, if desired.

Tips:
 For the fennel seeds, I used a mortar and pestle to crack them and crush them a bit. You can also place them in a ziploc bag and use something heavy the bash them up so you won't have big seeds floating around in your sauce.
I leave the sprigs of basil whole so you can easily fish them out after the sauce is finished cooking. If you want, you can chop them up and just leave 'em in the sauce.
 I usually don't mention specific brands, but in this case, I only use Tuttoroso. For one thing, all crushed tomatoes aren't created equally. Sometimes they're very chunky, more like stewed tomatoes, other times they're almost like puree. Tuttoroso crushed tomatoes are the exact texture I like for pizza sauce. And I seem to remember seeing on America's Test Kitchen that they were the best tasting ones too. I could be completely wrong on that, but I'm going with it. If you don't have Tuttoroso crushed tomatoes, then I recommend using any favorite canned whole tomatoes and crushing them to your desired texture.

Monday, April 18, 2016

Mussels Marinara


 Have you ever cooked mussels? I know they might seem a little daunting, but seriously, let me just say that they are REALLY easy to do! They're inexpensive, readily available, and you'll impress the hell out of everyone. They're amazingly quick too!
 To be quite honest, I never had an occasion to make them, but then when we decided to do a seafood theme for my friend Jim's birthday, I figured why not?! And OMG let me just tell you how delicious they are!! Actually, since I'm being honest here, for me it's all about the sauce. I could literally bypass all the actual mussels and dive into a vat of that sauce with a loaf of crusty Italian bread. It's SO amazingly flavorful.
 So if you've never given mussels a try, I urge you to take a leap and give it a shot. I think you'll be pleasantly surprised! They're elegant enough to serve for any holiday (my family has them every year on Christmas) and they're just as perfect for a casual Sunday dinner with friends. This recipe is from Robert Irvine (you know, the Restaurant Impossible guy) and it's absolutely delish.
Give it a try! And don't forget the crusty Italian bread for dipping!!


3 tablespoons light oil or olive oil
1 small white onion, finely chopped
4 large cloves garlic, finely chopped
1 cup white wine
2 or 3 cans chopped plum tomatoes (32 to 48 ounces total)
1 tablespoon fresh chopped oregano leaves
1 tablespoon fresh chopped parsley leaves
Salt and pepper
4 pounds fresh mussels, de-bearded, scrubbed and rinsed
Pasta, as an accompaniment or crusty bread for dipping
1 tablespoon fresh chopped basil leaves

Heat the oil in a large saute pan over medium heat. Add the onion and garlic and saute until cooked. Add the wine and reduce by half, then add the plum tomatoes, oregano and parsley. Add the mussels to the pan and allow to cook for about 10 minutes until all the mussels are open. Transfer mussels to a platter. (Discard any mussels that do not open.)

You can mound some pasta in the center of the plate surrounded by the mussels or have some crusty bread handy for dipping into the sauce.

Adjust the seasoning for the sauce with salt and pepper, as necessary. Coat the mussels with the sauce and sprinkle with fresh chopped basil just before serving.

Tips:
I added a pinch or two or crushed red pepper flakes, just because I wanted just a little spicy poke.  
If I were going to serve them with pasta, I think I'd probably serve them with regular spaghetti or maybe angel hair pasta.
If you don't have fresh herbs, you can use dried. Just use half as much of each kind.. Fresh herbs bring so much more to the party, though, if you can manage getting some. Just sayin!

Monday, February 22, 2016

Meatball Sub Bubble-Up Bake


 People always ask me "Do you have any new recipes?" and I always respond with "Absolutely! what exactly are you looking for?" Most often, they'll say they want something that "is easy to make during the work week", or "only needs a few ingredients", or "will feed a crowd", or "doesn't dirty a lot of dishes." Most times, when I'm looking for a recipe, I want something delicious and hearty and comforting. This recipe is all of the above! And it's so easy, anyone can make it!
 It's a Pillsbury recipe, but I first saw it on Facebook. I can't remember who posted or shared it, but it was one of those recipe videos that are always bouncing around social media. (To be honest, sometimes I look at those videos and think "yeah, I'll probably never make that." But this was definitely NOT one of those times!)  I made it for Chris and Claire and it was an immediate hit! For some reason, they never seem to mind when I show up at their door with a casserole. LOL
 It always seems to hit the spot, especially during the colder months of the year when you want something warm and satisfying. Hope you give it a try! I know you'll love it!


1 can Pillsbury Grands Biscuits
1 bag frozen meatballs
2 cups marinara sauce (your favorite store bought or your own)
1 1/2 cups shredded mozzarella cheese
Parmesan cheese and fresh basil, (optional)

Cut the uncooked biscuits into 8ths. Place into greased 9x13 dish.
Cover with sauce, start with 1½ cups, add more if you think it needs a little extra.
Place the meatballs on top of the biscuits.
Sprinkle with the cheese.
Bake at 375 for about 30-40 minutes.
Before serving, sprinkle with Parmesan cheese and fresh basil, if desired.


Tips:
The original recipe as posted on Pillsbury.com includes a sauteed green bell pepper. I didn't include it, but you do you! Add whatever you like! Sauteed peppers, onions, mushrooms, all good! 
If you don't care about having to wash another bowl, you can stir all the ingredients together in a large mixing bowl, and then pour it into a greased baking dish before topping it with the mozzarella. I think it's a little easier to mix everything in a big bowl rather than in the casserole dish. Just sayin!
When you bake the casserole, be sure that the biscuits in the center are done before you remove it from the oven. When I made it, the ones on the outside were fine, but the center ones were a little underdone. Just be sure to check that.
 

Monday, August 11, 2014

Zesty Zucchini "Spaghetti"


 Here's a quick and easy throw together dinner that, for me, screams summer in a bowl. Instead of having pasta (since I'm choosing to restrict carbs from my diet), I decided to make "noodles" out of the zucchini! It's not exactly the same, of course, but it absolutely satisfies the craving for a big bowl of delicious and hearty Italian-ness.
 I used a mandolin slicer to make long strands of zucchini and they act as the spaghetti. Then you add some tomatoes, basil and cheese, and boom, there's your dinner. It was SO flavorful, I couldn't stop eating it! And it's something different to do with all the extra zucchini (if you happen to be lucky enough to have your own vegetable garden.) Definitely give this one a try!


3 medium zucchini
olive oil
2 cloves garlic, chopped
1 14oz can diced tomatoes
1 pint grape tomatoes, halved
handful fresh basil
kosher salt to taste
crushed red pepper flakes to taste
lots of Parmesan cheese (or Vegan substitute)

 Shred zucchini into long noodles using a mandolin slicer or box grater. Set aside. Add a few glugs of olive oil to a large pan over medium heat. Add garlic and saute for just a minute or so, being careful not to burn it. Add the can of tomatoes, salt and red pepper flakes. Add the zucchini noodles and give everything a good stir. Cover and cook about 8-10 minutes or until noodles are tender. Add grape tomatoes, chopped fresh basil and Parmesan cheese. Toss everything together and serve immediately.


Tips:
 When you shred the zucchini, go lengthwise so you wind up with nice long noodles. Just shred the outside of the zucchini down to the seeds. If you try to make noodles out of the center where the seeds are, they'll just fall apart. You can either discard the center or chop it up and throw it into a soup or salad.
If you don't have a mandolin slicer, you can still dice up the zucchini and saute it for a bit before adding the other ingredients.
If you'd like to add chopped onions with the garlic, go for it!
 If you'd like a thicker sauce, add a little tomato paste with the can of tomatoes.


Sunday, September 29, 2013

Easy Italian Chicken with Bertolli Bowties


 I recently received an email from one of my readers, Dave. He wanted me to take a look at a certain crock pot recipe, and he had a few questions about it. As I said to him, I really don't like to cook chicken in a crock pot because it often comes out overdone or rubbery. I just think it's not good to cook chicken for such a long time. So I told him I'd probably nix the crock pot altogether and just make the recipe on the stove top. Of course you know I needed to try it out to see if I was right. A few changes in method, a few extra ingredients, and here we are!
  I have to say, I think it turned out pretty great! It's really simple and flavorful! And it was ready in less than 30 minutes. Perfect! I honestly have no idea where Dave found the original recipe, but like I always say, since he's the one who brought it to me, he's the one who gets the credit! Thanx for the inspiration, Dave! I hope you'll give my new version of this recipe a try!

flour for dusting
salt and pepper
3 or 4 boneless chicken breasts, cut into chunks
a few glugs of olive oil
1 onion, chopped
2 14oz cans diced tomatoes
1 envelope Lipton Savory Herb w/ Garlic soup mix
1 heaping tbs tomato paste
a few shakes crushed red pepper flakes
1 lb Bertolli bowtie pasta
Parmesan cheese
chopped fresh basil

 Place flour and salt and pepper in a large bowl. Add chicken pieces, a few at a time. Toss until coated. Shake off excess flour. Add oil to a large skillet over medium heat. Add floured chicken to pan. Saute until browned on all sides, but not cooked all the way through. Do this in batches so you don't crown the pan. As you finish browning each batch, remove the chicken to a plate and set aside. Pour out any oil from the pan and use a paper towel to remove any excess flour that is still in the pan. Add a little fresh oil. Add the chopped onions and saute until they begin to soften a bit. Add the tomatoes, soup mix, pepper flakes, and tomato paste. Give it a good stir until well combined. Add the chicken back to the pan, stirring to coat. Let it simmer for about 15 minutes until the chicken is cooked through. Meanwhile, boil the Bertolli bowtie pasta according to package directions. Serve chicken over pasta with a little sprinkle of Parmesan cheese and some chopped fresh basil.

Tips:
You can use any kind of tomatoes you want. Crushed, puree, diced, plain, low sodium, with Italian herbs, whatever you like. It will all work.
There's no need to add any seasoning to the sauce because the soup mix takes care of that for you.
If you don't have bowties, try it with any other Bertolli cut pasta, such as ziti, rotelle, or penne. You can certainly try it with another brand of pasta, but I bet it won't taste as good.

Monday, June 10, 2013

ATK's Ultimate Baked Ziti


Here's another recipe from America's Test Kitchen. I love their recipes because they've already done all the research and worked out the kinks of each new recipe. In this case, the goal was to make the ultimate baked ziti, and by ultimate, I mean CHEESIEST! Seriously, I think this is the cheesiest baked ziti I've ever tasted. It's awesome! I made it for AJ and Kelsie when they came over for dinner one night, and it was a big hit! Serve it with a salad, some garlic bread and tall glass of iced tea, and there's your fabulous Sunday dinner!
 

2 tbs olive oil
5 cloves garlic, minced
1 28oz can tomato sauce
1 14oz can diced tomatoes
1 tsp. dried oregano
1/2 cup chopped fresh basil
1 tsp sugar
salt and pepper

1 lb cut ziti
3/4 tsp corn starch
1 cup heavy cream
2 eggs
1 cup grated Parmesan cheese, plus more
1 lb whole milk cottage cheese
3/4 cup shredded mozzarella, plus more


Heat oven to 350F.

Place garlic and olive oil in a cold pan. Slowly saute over medium heat, but don't brown. Add tomato sauce, tomatoes, and oregano. Simmer for about 10 minutes. Stir in basil, sugar, salt and pepper. Set aside.

Meanwhile, boil the ziti in 4 qts of salted water for 5 minutes.
drain. Set aside.

 In a large bowl, whisk corn starch together with the cream. Pour it into a large pot over medium heat until it thickens. Meanwhile. in a large bowl, whisk the eggs, Parmesan cheese, and cottage cheese. Remove pot from the burner and add the cheese mixture to the thickened cream, along with mozzarella cheese and 1 cup of the cooked tomato sauce.
Now add the partially cooked ziti and stir until well coated. Pour pasta into a 9x13 pan, then pour the remaining tomato sauce over the top. Sprinkle the top with more mozzarella and more Parmesan. Cover with foil. Bake at for 30 minutes, then remove foil and bake for another 30 minutes.

Tips:
Instead of using heavy cream, you can use whole milk, but increase corn starch to 2 tsp.
At first, it may seem like there is too much sauce, but use all of it anyway. In fact, I would probably add a little more than just the one cup to the cheese mixture. The pasta will continue to absorb the liquid as it bakes, and you don't want it to come out too dry.

Monday, April 22, 2013

Chicken Cacciatore


Here's a classic recipe that seems like a lot of work, but it's really not difficult at all. All you're doing is browning some chicken, and then throwing a bunch of things into the pot. That's not so difficult, right? And since everyone has heard of this dish, they'll all be impressed when you make it for them. It's true! As soon as you say that you'll be serving Chicken Cacciatore, everyone goes OOOO and AAAHHH.... but they don't have to know how simple it was to make! It can be our little secret I promise I won't tell! It's hearty and delicious too! Perfect for  a Sunday supper.
Try it!

8 chicken thighs, skin on
Salt and pepper to taste
1/2 cup all-purpose flour 
4 tbs olive oil
2 tbs butter 
1 medium onion, sliced
1 green bell pepper, cored and sliced
1 red bell pepper, cored and sliced
5 cloves garlic, minced
1 lb sliced mushrooms, any kind
1/2 tsp dried thyme leaves
2 sprigs fresh oregano
1 cup chicken broth
1 cup dry white wine
1 28 oz can tomatoes
handful of parsley
Parmesan cheese
1 lb wide egg noodles

Preheat oven to 350 degrees (F).
 Salt and pepper both sides of the pieces of chicken. Dredge chicken in flour. Heat olive oil and butter in a heavy skillet or Dutch oven on the stove top over medium-high heat. Place chicken skin down in pan, a few pieces at a time. Brown chicken on both sides, then remove to a clean plate. Repeat with remaining chicken. Pour off half the fat in the pan and discard.
Add sliced onions and peppers, as well as the garlic. Stir and saute for 1 minute. Add mushrooms and continue to saute for another minute or two. Add thyme, and salt and pepper. (And crushed red pepper flakes if you like things a little spicy.) Add extra black pepper to taste, if you like. Stir, then pour in wine. Allow to bubble.
Pour in canned tomatoes and stir to combine. Add chicken back into the pan, skin side up, without totally submerging the chicken. Place lid on the pot and put it into the oven for 45 minutes. Remove lid and increase heat to 375 degrees. Cook for an additional 15 minutes.
Remove pan from the oven. Remove chicken from the pot and place it on a plate. Remove vegetables from pot and place them on a plate. Return pot to burner and turn heat to medium high. Cook and reduce sauce for a couple of minutes. In the meantime, cook noodles according to package directions. 
Pour cooked, drained noodles onto a large platter or into a big serving bowl. Add vegetables all over the top, then place chicken pieces on top of the vegetables. Spoon juices from the pot over the chicken and pasta (amount to taste.)
Before serving, sprinkle on chopped fresh parsley and grated Parmesan.

Tips:
If you're not a fan of chicken skin, still cook the chicken with the skin on, and then just discard it after the dish is finished cooking. It really helps the chicken to stay nice and moist.
I always use chicken thighs because I think they work best with this recipe. 

Monday, March 4, 2013

Reen's Rabe and Roasted Red


Here's another amazing dish from my sister, Reen. She loves throwing together all kinds of delicious appetizers by using fresh ingredients and they're ALWAYS incredible and ALWAYS easy to make! That's exactly how I would describe this one. It's SO delicious! Your family and friends will RAVE about it. They'll think you went to a lot of trouble making it, but they don't have to know how crazy simple it is to make. Don't worry. Your secret is safe with me! You should try it!
Thanx Been!


Broccoli Rabe
lots of fresh garlic
olive oil
roasted peppers
shaved Parmesan cheese
sliced hearty crusty bread


Rinse and chop the broccoli rabe, removing any
woody ends. Blanch it in boiling water for a few minutes. Drain.
Then saute in a frying pan with garlic and olive oil until tender. I serve it
with roasted peppers, sharp cheese and crostini as an appetizer, or I
mix it with sausage, short pasta and Parmesan cheese as a meal.
Enjoy!

Tips:
The ingredient amounts are to your own taste. Do you like a lot?Add a lot!
You can buy roasted peppers in a jar, or you can roast them yourself. If you're not sure how to roast them, have a quick look at my video How to Roast Peppers.
If you're serving it with sausage and pasta, you can slice links of Italian sausage into little wheels and then saute it, or remove the casing completely and then fry it up in the pan before tossing it with any kind of cooked short pasta.
To make crostini, simply arrange the slices of crusty bread in one layer on a baking sheet, drizzle with olive oil, and then bake at 350F until lightly crispy. Be careful not to burn them!
Btw, if you leave out the bread and pasta, this is a great dish if you're low carbing. And even if you're not!

Monday, January 7, 2013

Spaghetti Pie


 Did you know that January 4th was National Spaghetti Day? I must admit that I was not so informed in advance, (otherwise I would have posted this recipe on the actual day!) but better late than never, right?
 Here's a really easy recipe that uses spaghetti in a non traditional way. Besides being delicious, it's really economical because you can make 2 pies out of only a pound of pasta. And you don't use as much marinara sauce, so it goes a lot further. And it's super easy!!! Make this one in advance and then just pop it in the oven for an quick mid-week dinner. Your family will love you for it!

8 oz cooked spaghetti
olive oil
2 eggs
1 cup grated Parmesan cheese
1 cup ricotta cheese
1 cup marinara sauce, either purchased or home made
1 cup shredded mozzarella cheese
Dried Italian seasoning (optional)

Heat oven to 350F.
Toss spaghetti with olive oil in large bowl. Stir in eggs and Parmesan cheese. Pour spaghetti mixture into greased pyrex deep dish pie plate. Press it down in the center and up the sides to form into a "crust". Spread ricotta cheese over pasta to within an inch of the edge. Spread the marinara over the ricotta. Top with mozzarella cheese. Sprinkle with more Parmesan cheese and dried Italian seasoning. Bake for about 25-30 minutes. Let it sit for a few minutes before cutting with a sharp knife.

Tips:
 If you have more than one pie plate, it's easy to form the crust simply by pressing an empty pie plate into the one with the spaghetti. It shapes it into the perfect crust!
 The amounts are just guesses. I honestly didn't measure a thing. I just added everything until it was enough.
 For an easy variation, use a different kind of pasta sauce. How about alfredo sauce? or maybe a delicious and creamy tomato blush sauce? Use any pasta sauce you like!
 I used 8 oz of pasta because I wanted MORE pasta in each slice. It is a SPAGHETTI pie, after all. But if you'd prefer a greater cheese/sauce to pasta ratio, go ahead and use a little less spaghetti. You'll have a thinner "crust" which will give you more room for the cheese and sauce in the pie.