Monday, September 12, 2022

Joey's Scalloped Tomato Casserole


 Usually, whenever I decide to "just throw something together", I decide who the star of the dish is going to be, and then I see where the inspiration takes me.
The first spark of inspiration for this one came from one of my favorite Youtubers. Miss Lori over at Whippoorwill Holler was making an old timey tomato casserole with layers of fresh tomato slices and day old bread.  That sounded pretty awesome to me, especially with all of the fabulous Jersey Tomatoes available. Perfect! There's the star of my show! The problem was that I didn't have any bread or rolls or anything to add to the casserole. Hmm... 
 So I decided to do it anyway, but instead of doing layered slices of bread, I thought, "well, how about bread crumbs instead?" I had tons and tons of Panko bread crumbs, and I thought "oh, yes, THAT would work." Great. What else? Well.... you can't go wrong with something onion-y... chives, scallions, onions, onion powder.. definitely! What else? Garlic? Sure! And how about something fresh? Basil? Parsley? of course. Salt and pepper? Absolutely. It was all coming together quite nicely!
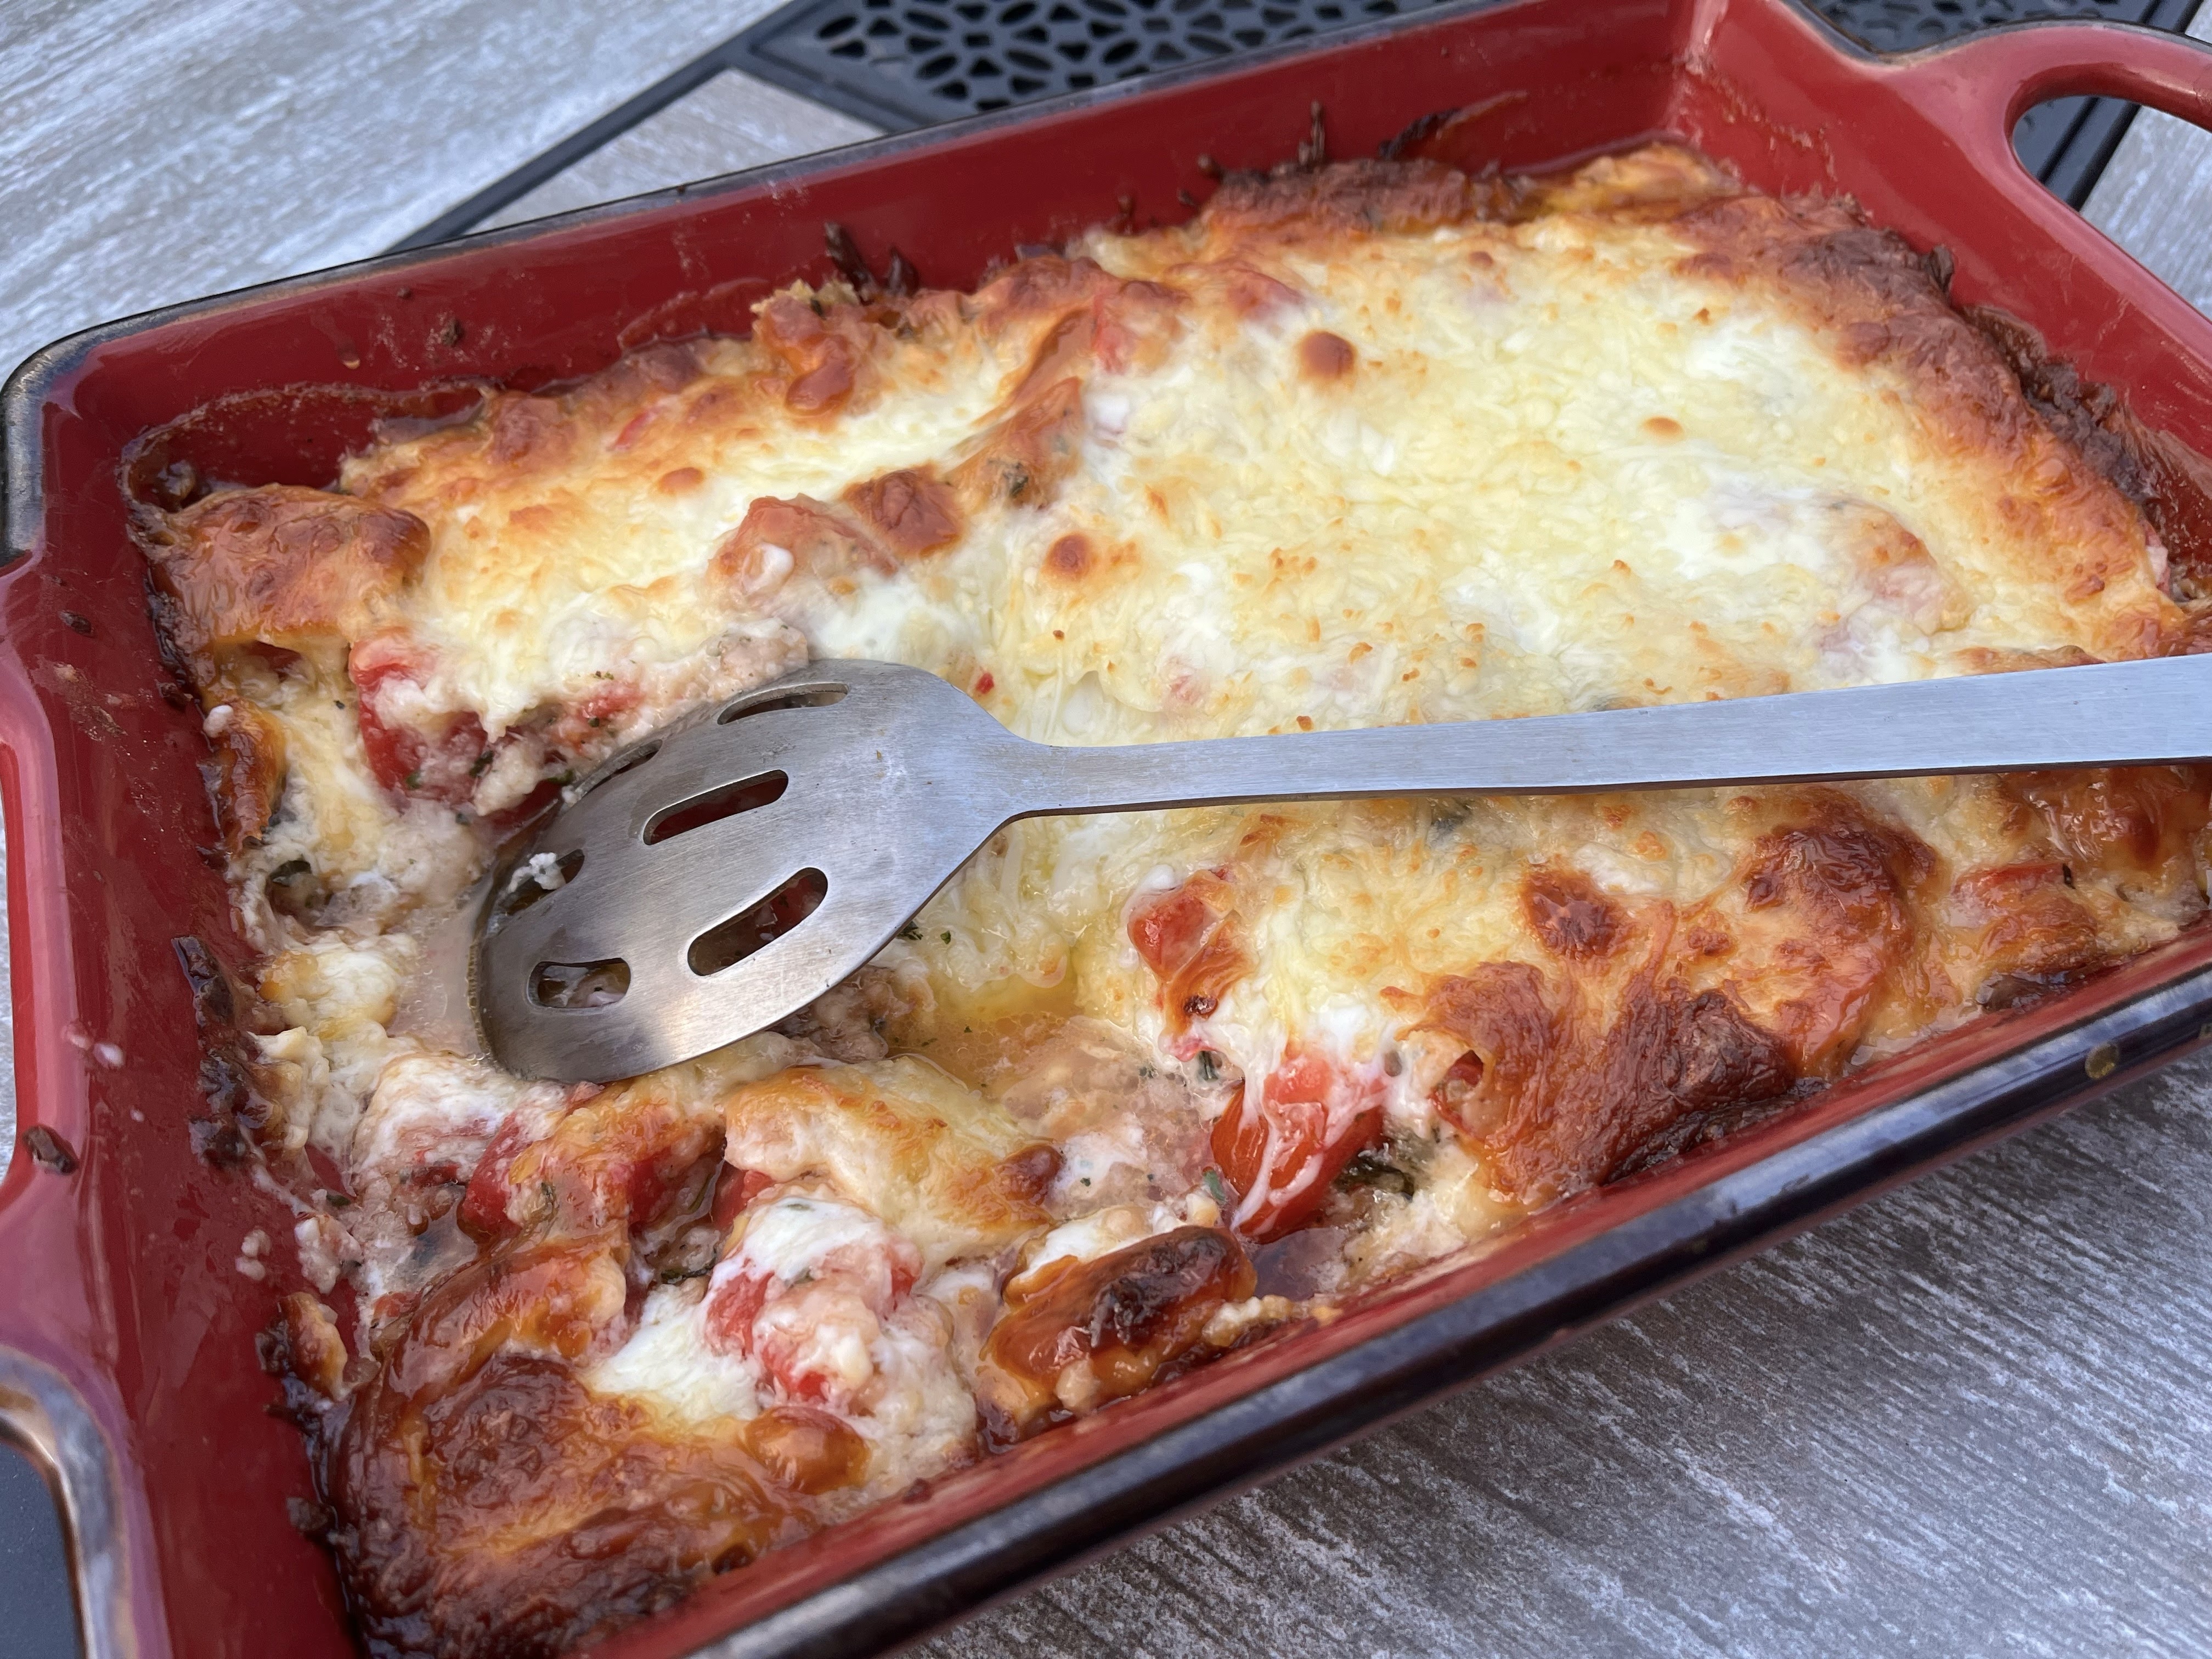
 The only question that remained was: cheese or no cheese? Since I happened to have it on hand, I went with it. I melted some cheese over the top, and I used quite a lot, actually. The result was pretty fabulous, I must say! And it turned out to be a great way to use up the few ingredients I had on hand. It would be a great way for you to use up those extra few tomatoes you have ripening on the window sill!
 Oh, and btw, it would have been perfectly fabulous without any cheese melted over the top. And it would work as a fabulous side dish, maybe with a piece of grilled fish and some roasted green vegetables. I do think the cheese turns it into a stand alone entree, though. 
 Either way, if you love tomatoes as much as I do, especially JERSEY tomatoes, you simply MUST give this one a try! Thanx again to Miss Lori for the spark of inspiration!


4 large tomatoes
3 scallions, chopped
1 large clove garlic, minced
2 tbs fresh basil leaves, minced
1 1/2 cups panko bread crumbs
1/4 cup AP flour
Salt and pepper to taste
1-2 cups shredded Mozzarella cheese 

Cut out the core of the tomatoes and cut them into large chunks. Place in a large bowl along with all remaining ingredients except the cheese. Give everything a good toss. Now place in a large caasserole dish. Top with cheese, bake at 350ºF for about 30-45 minutes, or until golden and bubbly on top. Let it sit for a good 10-15 minutes before serving. 


Tips:
You can peel the tomatoes if you want to, but I just left the skins on. To peel them, cut an X in the bottom of each tomato, then plunge into rapidly boiling water for about 30 seconds to a minute. Now remove from boiling water and plunge into ice water.  The peels will slip right off. 
Don't have scallions? or garlic? or basil? Use one of the other things I mentioned. Garlic powder or garlic salt instead of cloves of garlic. Onion powder, chives,  minced onions or shallots instead of scallions. Any fresh herb you like... parsley, basil, oregano, even fresh thyme or rosemary would work. That's the beauty of a casserole. It will all work!
Yes, that's the correct amount of bread crumbs. 1 1/2 cups is a lot, but remember, this isn't just a little sprinkle on top. This is an actual ingredient in the casserole and it adds body in addition to soaking up some of the tomato juices. The flour does the same thing, especially if you add the cheese over the top. The fat from the melted cheese will mix with the flour and that's how the sauce sets up. (Look at me, always thinking!)
And finally, this was meant to be a meatless dosh, but if you that strongly about it... add some sliced sausage coins... or some diced chicken... or some pepperoni for a spicy kick. Now you've turned it into a pizza casserole!


Wednesday, August 17, 2022

Zucchini "Apple" Pie Filling


    Do you have so much zucchini that you don't know what to do with it? Or maybe you left your zucchini in the garden too long, and now it's overgrown to the size of a small human?? What do you do?
 You make apple pie, of course! Apple pie out of zucchini? ABSOLUTELY!
  Let me explain. I don't have a garden, but I have friends and relatives who do. Very often, they'll send over their surplus crop of zucchini, and I'm always trying to think of new things to do with it. Side note, if I'm being totally honest, very often, the zucchini is MASSIVE, which is much tougher and isn't as desirable as the smaller more tender zucchini, but hey, who am I to look a gift horse in the mouth?
 Anyway, recently, I was given a large zucchini, several yellow squash, some eggplant, and tomatoes. Naturally, I made a big pot of ratatouille (as one does), and then froze it in containers. Great. But then another zucchini came in.... well, I can't make ratatouille every time....ok.... um... lets try a dessert this time! So, I hollowed out the center of the zucchini, sliced it just as I would slice apples, cooked it until tender and then added sugar, spices, lemon juice, and corn starch. Presto! Apple pie filling! You"ll be absolutely amazed at how much it tastes like sliced apples instead of sliced zucchini. The texture, specifically, is exactly that of an apple or pear.
 So now the doors are wide open! Make a pie! Make a crisp! Make a cobbler! Use it any way you'd use a can of apple pie filling. If you bake it with a buttered bread crumb topping, you have a Brown Betty. If you put it in a pan and lay a pie crust on top and then bake it..well, now you have a Pan Dowdy! And of course, pie, crisp, cobbler, or plain...you MUST serve it with a big scoop of ice cream on top. I'm pretty sure that's a law. 
 Since the amounts of all of your ingredients will depend on the your amount of zucchini, you may have to tweak an amount here or there. But don't panic, it will all turn out fine!


1 giant zucchini, or 2-3 regular ones
1/2 cup water
1 cup of brown sugar
1/2 cup lemon juice
2 tbs corn starch
2 tsp cinnamon
2 tsp apple pie spice blend
pinch salt
 

 Peel zucchini and slice off the ends. Slice it in half lengthwise. Using a metal spoon, hollow out the seeds, just like you would do with a pumpkin. Slice the zucchini into small dice or slices, just as you would do with apples. Place the zucchini slices in a large sauce pan over medium heat. Add water, and cover. Let it steam for a while until it becomes tender. Now add the remaining ingredients. Stir until it thickens. It only takes a minute or two. Now taste it. Is it tart enough? Add more lemon juice. is it sweet enough? Add more sugar. Is it bland? Add another pinch of salt. Want more cinnamon? Go for it. If it still tastes like squash, add more of everything. When it tastes just as you like it, that's all there is to it!


To make the crisp as you see pictured:

1/3 c all-purpose flour
1/3 c granulated sugar
1/3 c rolled oats
4 tbs cold butter (1/2 stick)
 
Use your hands to combine all ingredients until they come together when squeezed in your hand. Sprinkle the crumb topping over the filling in a pan. Bake at 350ºF until bubbly, about 30 minutes. 
 
 
Tips:
The key to success here is the lemon juice. Usually, many people choose Granny Smith apples for baking because they're very tart. So you really need that lemon juice to make up for the zucchini's lack of tartness. 
The other key is the brown sugar. I tried it with regular sugar, and it just wasn't the same.
And be generous with the cinnamon and nutmeg!

Sunday, July 24, 2022

Fresh Strawberry Lemonade


  When I recently went to a dear friend's house for a lovely summer hang, I was asked if I would mind bringing a dessert. Um, have you met me?? OF COURSE  I wouldn't mind! Obviously, you know I had already planned to bring something, and I decided to make something summery and strawberry. I made some fabulous strawberry cupcakes with homemade strawberry jam in the center, swirls of strawberry Swiss meringue buttercream, and a fresh whole strawberry on top. They turned out BEAUTIFULLY and everyone loved them. Full disclosure, I was actually extremely proud of them, thank you very much!
 Then I woke up the next morning, thinking... I want more strawberries!! So I went back to my local farmers' market, and bought several more pounds! They were just so gorgeous and inexpensive and sweet and perfect, I just couldn't help myself. 
 But, what shall I make? Well, we're in the middle of a brutally scathing heatwave with heat indexes over 100ºF. I think some refreshing strawberry lemonade would be just the thing!!
  So here we are! A very simple recipe that is a snap to throw together. It's perfectly sweet and tart and thirst-quenching and I don't know of a single person who doesn't absolutely LOVE it. 
Btw, the recipe is so easy, you don't even have to write it down. It's just two cups of each ingredient. As Miss Ina would say, how easy is that???
  So, go out and support your local farmers, buy a ton of strawberries, and make a few batches of lemonade. I KNOW you'll absolutely love it!!! 


2 cups water
2 cups sugar
2 cups fresh strawberries, stemmed and hulled
2 cups fresh lemon juice
2 cups ice water

First, make a simple syrup. 
In a medium sauce pot, stir together sugar and water over medium heat, until the sugar is completely dissolved. Remove from heat and place in the fridge to cool/chill. 
Place strawberries in a food processor or blender. Process until completely pureed. This will take several minutes longer than you think it will. You don't want ANY small bits of strawberry. Add your strawberry puree to your now chilled simple syrup. Stir in lemon juice and ice water. 
 Pour into a pitcher through a fine mesh strainer to catch any seeds or errant bits of strawberry. 
Serve in a tall glass over ice and enjoy!


Tips:
I believe this recipe to be the perfect blend of tart and sweet. However, you can absolutely tweak it to suit your own taste. Tweak the tartness by the amount of lemon juice you add, and tweak the sweetness by the amount of ice water you add. Start out with 1 1/2 cups of each, and then adjust as you go. Add more lemon juice for more tartness. Add more ice water for less sweetness. And if you'd like a stronger hit of strawberry flavor, just add more pureed strawberries!
When I say to puree your strawberries, I mean REALLY let them go for a while in the food processor until they are completely smooth. This will mean more strawberries making it into the lemonade instead of being strained out at the end.

Monday, July 18, 2022

Corniest Corn Muffins


  One of the very BEST things about living in the Garden State is our Jersey fresh corn on the cob. I'm not even kidding when I say I challenge anyone to find farm fresh corn that is sweeter or more delicious than ours. It's one of my favorite things about summer!! (well, that and our Jersey tomatoes!)
 So I was recently talking with my sister, Jeanie, and she was telling me how she made these corn muffins. She absolutely RAVED about them! She said they're the absolute best! In fact, she wrote a A++ note in the cookbook where she got the recipe, which is called Baking from My Home to Yours, by Dorie Greenspan. 
 She also said she only makes this recipe when she has fresh corn on the cob because it just makes all the difference in the world. I mean, yes, of course, you could use canned or frozen corn, but when you have fields of corn growing practically right in your back yard, why not use fresh, right?
 We do have a rule in our family, btw. We don't buy fresh corn until after the 4th of July. THEN we know it's good and ready. And with so many farmers markets around... OH MAN... you know it's just as fresh as can be. It also makes me feel good to support local farmers!!
 So, if you live in New Jersey, go to your favorite local farm market, buy some fresh corn, and make these muffins. In fact, make a double batch and throw half in the freezer for another time. 
 You'll be SO glad you did!!!! Promise!


1 cup flour 
1 cup yellow corn meal, preferably stone-ground  
6 tbs sugar 
2 1/2  tsp baking powder   
1/4 tsp baking soda
1/2 tsp salt 
1 pinch of freshly grated nutmeg (optional) 
1 cup buttermilk 
3 tbs unsalted butter, melted and cooled 
3 tbs corn oil 
1 large egg 
1 large egg yolk 
1 cup corn kernels (add up to 1/3 cup more if you'd like) 
 
 
Center a rack in the oven and preheat the oven to 400ºF. 
Butter or spray the 12 molds in a regular-size muffin pan or fit the molds with paper muffin cups. Alternatively, use a silicone muffin pan, which needs neither greasing nor paper cups. Place the muffin pan on a baking sheet.  
In a large bowl, whisk together the flour, cornmeal, sugar, baking powder, baking soda, salt and nutmeg, if you’re using it. In a large glass measuring cup or another bowl, whisk the buttermilk, melted butter, oil, egg and yolk together until well blended. Pour the liquid ingredients over the dry ingredients and, with the whisk or a rubber spatula, gently but quickly stir to blend. Don’t worry about being thorough - the batter will be lumpy, and that’s just the way it should be. Stir in the corn kernels. Divide the batter evenly among the muffin cups.
Bake for 15 to 18 minutes (12 minutes for minis), or until the tops are golden and a thin knife inserted into the center of the muffins comes out clean. Transfer the pan to a rack and cool for 5 minutes before carefully removing each muffin from its mold.


Tips:
Just like my sister, I'd add more corn. I mean, it says we can add up to 1/3 cup more, why not just bump it up to 2 cups? NOW we're talking!


Sunday, June 26, 2022

Joey's Applesauce Baked Beans


 I was recently gifted several pounds of dry beans. Now, if you've read my blog in the past, you know I love a good batch of baked beans, so I figured I'd take all of these beans, soak them overnight, then put up pints of pork and beans using my pressure canner. Perfect! They'll be a welcome addition to my "wall of jars", which proudly displays all of my canning and preserving endeavors.
  My goal was to come up with 20 pints of beans because that's how many jars I can fit in my pressure canner. Great. I soaked them, boiled them, made a fabulous sauce, got all of my canning supplies ready, and then filled up all the jars. They turned out perfectly!!! The only problem was, after I filled my 20 jars, I still had an entire bowl of beans leftover. Well? I guess I'm coming up with another recipe for scratch made baked beans!!
 Usually, when I make my famous baked beans, I just use canned baked beans and then zhuzh them up with bacon and onions and other flavorings. But this time, since I already had the beans all soaked and boiled and ready, I figured why not try something different?
  Then I remembered a BBQ sauce recipe that uses applesauce and molasses as a base, in addition to some of the more usual baked beans ingredients. I thought "how can this not be good?" So I went with it. 
It turned out SO good, I think this is now my go-to recipe when it comes to baked beans from scratch!!
 It's sweet, it's savory, it's tangy, it's rich, it's deep, it's complex, and it all works perfectly well together!!! Btw, the applesauce really does come through and it gives it a light fresh flavor. It was exactly what I wanted!
 So, if you have the time to do your baked beans from scratch, give this recipe a try. I promise you'll love it!!! You're guests will too! Just be careful... if you bring it to a friend's BBQ event, they might ask you to bring it every year!!


1 pound dried navy beans
8 ounces thick cut bacon , diced
1 medium yellow onion, diced
1/2 cup ketchup
1/2 cup molasses
1/2 cup plain applesauce
1/2 cup brown sugar
2 tbs apple cider vinegar
1 tbs lemon juice
1 tbs prepared mustard
1 tbs Worcestershire sauce
1 tsp liquid smoke
1 tsp garlic powder
2 tsp salt
1/2 tsp black pepper

In a large pot, cover your beans with cold water. Soak the beans over night, up to 24 hours. Drain.
Cover with fresh water and boil for 30 minutes or until beans are tender but not mushy.
Meanwhile, in a large pan, saute the bacon and onions. Drain excess bacon fat, if needed.
Add remaining sauce ingredients. Stir well. Taste the sauce and adjust seasonings, if needed. 
Add drained beans. Gently toss to coat beans in sauce. Do this in a large mixing bowl if you need to.
Place all in a large casserole dish or cast iron pan. Top with more bacon, if desired.
Bake uncovered at 350ºF for 45 minutes.


Tips: 
If you prefer a different kind of bean, go for it! Pinto beans, Great Northern beans, any kind will work. Just know that different beans absorb differently. Some beans are VERY thirsty and will drink up everything from your soaking liquid to your boiling liquid to your final sauce. Be sure your beans are good and saucey when you put them into the oven to bake. No one likes dry baked beans!
Btw, when I  made the sauce, I didn't really measure anything. The amounts are really just a guess, all added to taste. If you'd like it sweeter, add more brown sugar. If you'd like it to be a little more tangy, add more cider vinegar. If it's too sweet, add a little more Worcestershire sauce and lemon juice. Adjust it to how YOU like it!
And one last tip... If you're cooking for a BBQ, you can make them in advance, and then just reheat them for your event. A good way to do this is in your slow cooker. Another big tip is to make enough sauce to reserve a little extra on the side, just in case the beans get too dry.. you can add a little more sauce and they'll be perfect!

Wednesday, June 15, 2022

Fresh Cod with Tomatoes and Thyme

 
   Now that the weather is warmer, I tend to crave lighter fresher meals. You know, maybe something with fresh herbs (that I now having growing in pots on my patio) or maybe seafood or fresh produce. So I decided to do some browsing, and I found this recipe on a site called BBC Good Food. It looked so light and easy, I thought "ok, this one looks like it has potential", so I went with it. 
Well, lemme just tell you.. as my Dad used to say "Holy jump up and sit back down!" This is absolutely one of the most delicious recipes I've made in quite a long time. I loved it so much that the day after I made it, I went back to the store to buy more fish so I could make it again. I'm not even kidding when I tell you I couldn't stop eating it. And it was right then and there that I decided to feature this recipe in my menu for my next dinner party. 
 Not only is it absolutely delish, but it's also a snap to throw together. It's literally the perfect summer meal because it's ready in less than 30 minutes, and you don't even need to turn on the oven. Side note, I think this might also be the perfect meal to make for someone who's a little unsure when it comes to eating a fillet of fish. Buy it fresh the day you'll be serving it, and there's nothing "fishy" about it!
  And if you think buying fresh fish fillets is too expensive, just remember it's still cheaper than ordering a large pizza! I really REALLY hope you'll give this one a try!!!


1 tbs olive oil
1 onion, chopped
15oz can crushed tomatoes
1 heaped tbs brown sugar
A few sprigs fresh thyme, leaves stripped
1 tbs soy sauce
4 cod fillets, or another white flaky fish, such as pollock


Heat oil in a large frying pan, add onion, then saute for 5-8 mins until lightly browned. Stir in tomatoes, brown sugar,  soy sauce, and the leaves from a few sprigs of thyme. Bring to a boil, then reduce the heat to simmer.  Simmer for 5 mins, then nestle the cod fillets down into the sauce. Cover and gently cook for 8-10 mins until the cod flakes easily. Serve with baked or steamed potatoes, or your favorite rice.


Tips:
Ok, full disclosure, I've made this recipe easily a half dozen times, and I never ever measure anything. I'm sure the amounts are close, but seriously, they're just guidelines. I just add a splash of this and a big pinch of that. It always works. Also, I never bother to strip the leaves from the sprigs of thyme. I just throw the entire sprigs in. And then when it's done, I just take them out. Simple!
And speaking of adding a splash, Try this little addition........before you add the fillets into the sauce, add a splash of white wine to the sauce and give it a good stir. It's FABULOUS. Just a few glugs is all you need. I like to add a few glugs of wine when I cook rice too. It just elevates the flavor! Of course, it's not needed, but I love it. 
I keep saying I'm gonna try this recipe with chicken, but it never seems to happen. One of these days! 
Btw, I did make it for my next dinner party, and there was literally nothing left! Swoosh! Gone. I guess everyone liked it!!

Monday, May 2, 2022

Joey's Chicken and Greens Casserole

 
So, here's a question for you:
Are you a "little bit of this, little bit of that," sort of "throw it together" kind of cook?
Or are you a "never make anything without a trusted recipe" kind of cook?
For me, I guess it depends on what I'm making! If I'm baking, yes, definitely follow the recipe.
But usually I'm a "just throw it together" kind of a cook. That's how my Mom always cooked, so I guess I get it from her. In the case of this recipe, it was definitely a throw together dinner, born out of everything I had set aside in the fridge, thinking "I'll use that for something later."
  For Easter, I had made a few quiches, and I had a few different kinds of cheese leftover. So I thought, well, I can always do something with that later.
 I was recently planning to pressure can some collard greens, but I wasn't sure how many jars I'd have. After I finished all of my canning, I had a few handfuls of blanched greens leftover. No problem. I can always do something with them later.
 I even had some cut up boneless chicken in the fridge on stand by, just because I like to have a full canner whenever I pressure can. Who knew the greens would go so far?? So I didn't need to add any jars of chicken to the canner. But that's fine. I'm sure I can do something with it later. 
 Do you see where I'm going with this? That's literally how it all fell together. So I dredged the chicken in flour, sauteed it in a pan with some onions and the collards, added a sauce and poured it over rice. Perfect easy weeknight dinner! It'll feed a crowd too. 
 So, the next time you're not sure what to make for dinner? Open up that fridge and look at what you have. I'll just bet you already have the makings of a great dinner!


3-4 cups cooked rice
4-5 bonless chicken breasts, cut into large chunks
Flour for dredging
1 bunch of collard greens, rinsed well, cut into ribbons, and blanched for a few minutes
1 onion, diced
2 (10oz) cans condensed cream of mushroom soup
1 soup can of milk
1 cup shredded Mozzarella cheese
1 cup shredded Cheddar cheese
 
 
Heat oven to 350ºF.
In a large casserole dish, spread the cooked rice in an even layer across the bottom.
Toss all the chicken pieces in a little bit of flour until coated, then saute them in a large skillet with a little bit of oil. Just lightly brown the outside, but don't cook the chicken all the way through. Remove chicken pieces and place them over the rice. In the same pan, add the chopped greens with the diced onions, adding a little more oil if needed. Be careful, the green will splatter a little. Saute until the onions are soft. Scatter the onions and greens over the chicken. Whisk together the soup and the milk. Pour over the chicken and greens. Top with each kind of cheese. Bake for about 35 minutes.


Tips:
Remember, I used literally whatever I had in my fridge, so use this recipe as a guide to springboard into any direction you like, based on whatever you have on hand.
Don't like chicken? Use diced ham. Or turkey. Or pork sausage.
Don't like collards? Use spinach. Or Kale. Or any other veggie you want. 
Don't like cream of mushroom soup? Use any cream soup you like. Or make your own white sauce. 
Don't like Cheddar or Mozzarella? Use Swiss. Or any good melting cheese. 
Don't like rice? Pour the the whole thing over noodles! Or even better, mashed potatoes. 
Want it to be saucier? or cheesier? or meatier? add more of whatever you like!