Monday, May 9, 2016

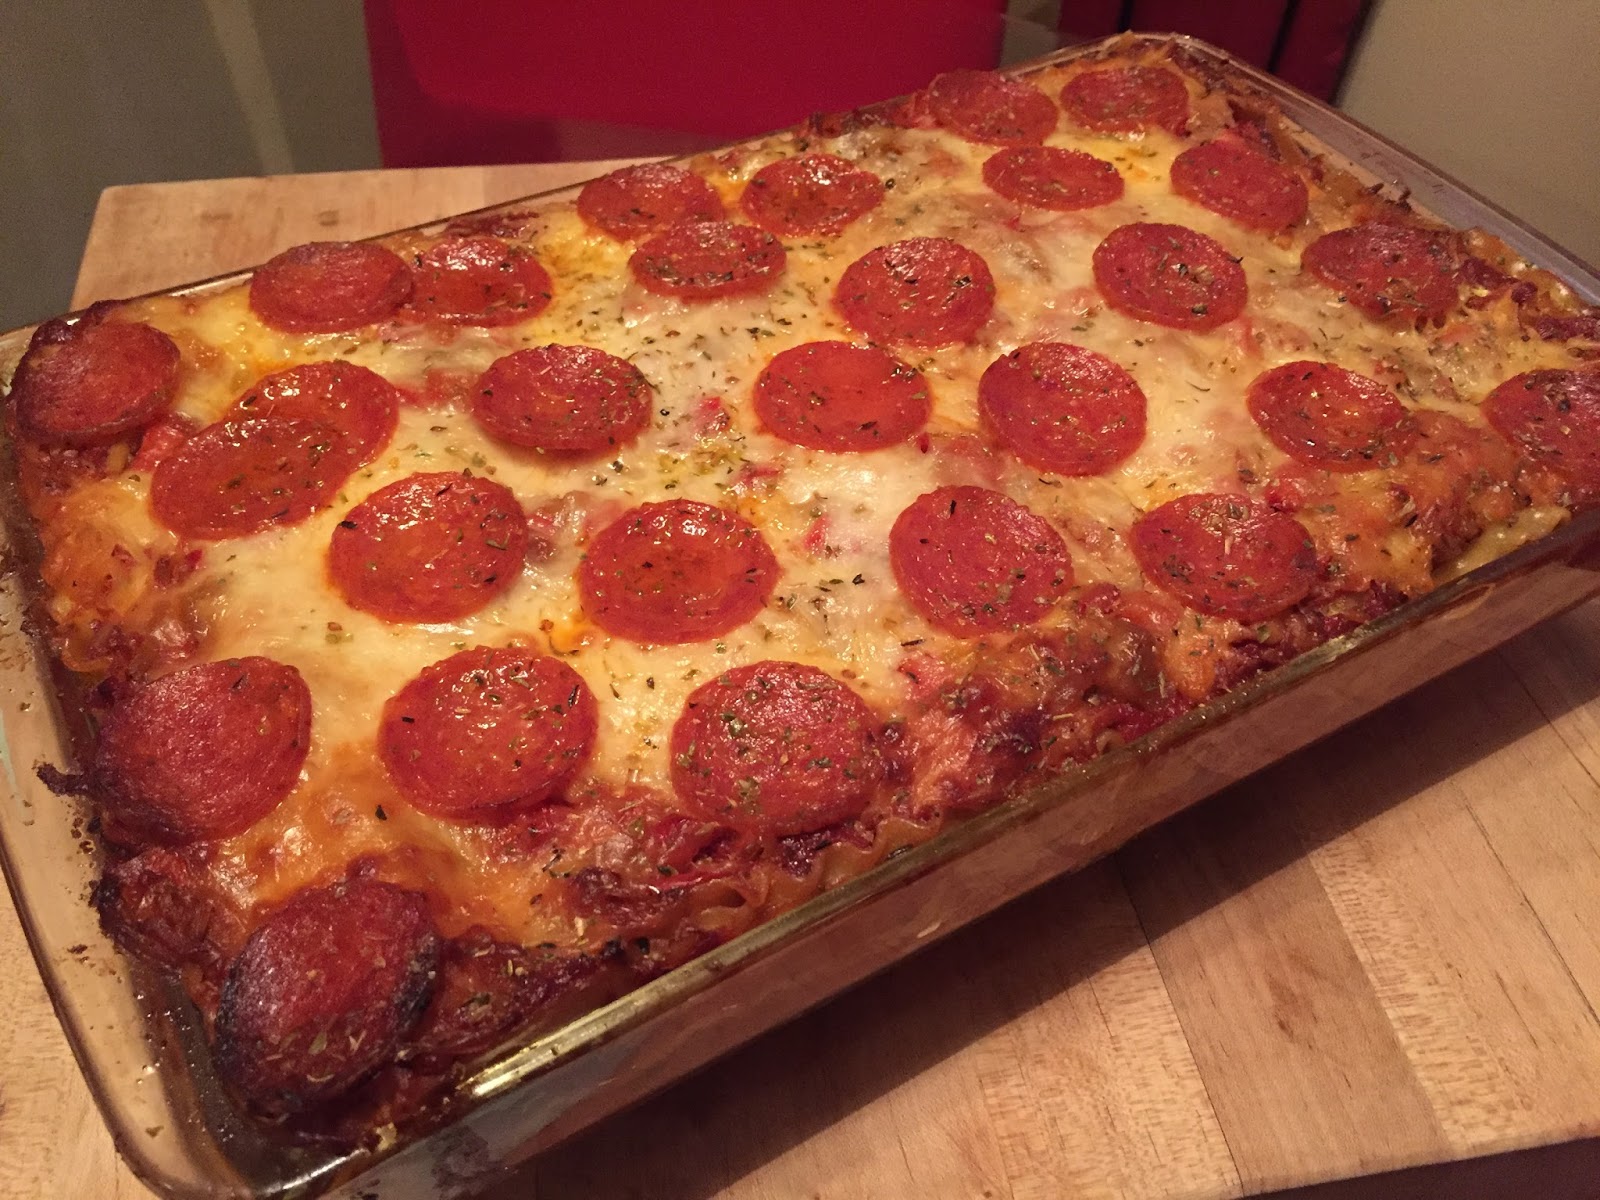
Joey's Pizza Lasagna


 Ever since I started this cooking blog, I've tried to post recipes that I think people would like to cook. It's not enough for someone to look at a recipe and think "That looks delicious"", I want someone to think "I can make that!" So I looked back on the most popular posts over the last 8 years. The most popular recipe to date is Crock Pot Pizza Pasta. So I figured, why not take that same idea and do it as a baked lasagna instead of in the crock pot? I basically did the same process, but with a few minor tweaks and I must say, I'm pretty happy with how it turned out!
 The idea was that each layer of lasagna noodles would basically be its own pizza, with sauce, toppings and cheese. So the first layer was sausage and bacon, the next layer was peppers and onions, the next layer was mushrooms, and the top layer, pepperoni! Then the whole thing is baked until bubbly and fabulous. Pretty cool, huh?  I chose these toppings because they're my favorite, but you can absolutely do whatever pizza toppings you like! Do a meat-lovers' pizza, do a veggie pizza, do just one topping, anything will work!
 Hopefully you'll see this recipe and think "I can make that!!" Because, do you know what??
YOU CAN!

Joey's Go-To Homemade Pizza Sauce, or jarred, or your own
1 lb lasagna noodles
1 lb Italian sausage, mild or hot
1/2 lb thick cut bacon, chopped
2 bell peppers, any color, coarsely chopped
1 large sweet onion, coarsely chopped
1 lb baby bella mushrooms (or other mushroom of choice)
1 lbs sliced pepperoni
2 lbs shredded mozzarella cheese

 Heat oven to 350ºF.
Fill a wide shallow pan with very hot water. Place the lasagna noodles in the water to soak while you prepare the other ingredients.
Remove the sausage from casings and brown in a skillet. I browned the bacon in the same pan. Drain excess grease.  Set the meat aside. In the same pan, saute the onions and peppers (I used some of the drained bacon fat) until slightly softened and caramelized. Set aside. Do the same with the mushrooms or other toppings of your choice.
 By now your noodles should be pliable but not too mushy.
 In a 9x13 baking dish, place a layer of sauce, then a layer each of noodles, more sauce, toppings and cheese. Layer the toppings in whatever order you'd like. Continue making layers until all of your ingredients are used up. End with a layer or pepperoni on top of the last layer of cheese.
 Cover with foil and bake for about 45 minutes. Remove foil and continue baking for another 15 or until the cheese is lightly golden and the pepperoni is sizzly. (is that a word? I'm going with it.)
 Let it rest for a good 10-15 minutes before slicing.

Tips:
 One of the best things about making lasagna is that its a total do ahead. It's actually BETTER if you do it the night before, and then just heat it up when you want to serve. If you don't want to heat it twice, you can absolutely assemble it the night before and then bake it just before you want to serve it. I do recommend letting it sit for 10 to 15 minutes after removing it from the oven because then it'll have a chance to set up a bit, which will result in nice perfect squares of lasagna that stay together.
 Another thing that will help your lasagna stay together (instead of the top half of your slice of lasagna sliding off) is to layer your noodles in different directions. So, for instance, if you're doing 4 layers of noodles, layers one and three should go longways in your pan, and layers two and four should go across. Just cut the noodles to fit. Yes, it takes a few extra minutes, but it'll keep your layers locked together.
You can definitely use regular marinara sauce, if that's what you have on hand. Just add a little dried oregano to make it more like pizza sauce!
 Btw, I purposely didn't include ricotta cheese in this lasagna, just because I wanted it to taste more like pizza, but you do you! If you want to add ricotta, go for it!

Joey's Go-To Homemade Pizza Sauce


 I was recently making a Pizza Lasagna, and I realized that I didn't have a go-to pizza sauce recipe. So I figured I'd come up with one! Just as I usually do, I looked up a few different recipes and took what I liked from each one. And here it is! Now I have my go-to recipe and I hope you'll give it a try. Of course you can use it for homemade pizza or Crock Pot Pizza Pasta, but try it as a dipping sauce for Sausage and Pepperoni Pizza Puffs, or your favorite mozzarella sticks. You could also do mini pizzas in the toaster oven on English muffins with a little shredded mozzarella cheese on top. It's also fabulous just as a spicy sauce poured over your favorite pasta. Hopefully this will now be YOUR go-to pizza sauce recipe too! Enjoy!

3 tbs olive oil
3 tbs butter
1 small onion, finely minced
1 clove garlic, minced
1 tsp crushed red pepper flakes
2 tsp dried oregano
2 tsp cracked fennel seeds
2 (28oz) cans Tuttoroso crushed tomatoes
2 large whole sprigs fresh basil
1 tbs sugar
S&P to taste

Add the first 7 ingredients to a heavy saucepot over medium heat. Stir and saute for 2 or 3 minutes. Add the remaining ingredients. Increase the heat to bring it up to a boil, then reduce it to a low simmer for about 30 minutes, stirring occasionally. That's all there is to it! Can be made in large batches and frozen, if desired.

Tips:
 For the fennel seeds, I used a mortar and pestle to crack them and crush them a bit. You can also place them in a ziploc bag and use something heavy the bash them up so you won't have big seeds floating around in your sauce.
I leave the sprigs of basil whole so you can easily fish them out after the sauce is finished cooking. If you want, you can chop them up and just leave 'em in the sauce.
 I usually don't mention specific brands, but in this case, I only use Tuttoroso. For one thing, all crushed tomatoes aren't created equally. Sometimes they're very chunky, more like stewed tomatoes, other times they're almost like puree. Tuttoroso crushed tomatoes are the exact texture I like for pizza sauce. And I seem to remember seeing on America's Test Kitchen that they were the best tasting ones too. I could be completely wrong on that, but I'm going with it. If you don't have Tuttoroso crushed tomatoes, then I recommend using any favorite canned whole tomatoes and crushing them to your desired texture.

Monday, May 2, 2016

Coconut Flan


 Here's a perfect dessert for Cinco de Mayo. When I saw Marcela Valladolid making it on her show, Mexican Made Easy, I knew I wanted to try it.  I know, I know. I say that all the time. But it's true! And isn't that the point? You see something delicious on TV (or on a cooking blog!) and you think "I WANT THAT!" Am I right?? And seriously, you really do want this one! It's sweet and creamy and SO easy to make. Make it way in advance so you can give it plenty of time to chill before taking it out of the pan, and then you'll hear all the OOOOs and AAHHs as you serve it to your friends and family. I made it for my family and it was a big hit!
 Tbh, when I decided to make it, I wasn't sure how it would go. As far as custards go, I don't like it when they're too eggy or too jello-y, know what I mean? I want something that is velvety smooth and creamy, and that's exactly what this is. So I was VERY pleased with how this turned out. I think you'll be pleased too! So even if it's not for a holiday, you should definitely give this recipe a try. It's special enough for any holiday and easy enough for a simple Sunday supper.
You're friends and family will thank you!! Promise!!


Vegetable oil cooking spray
1 cup cajeta* or caramel sauce, at room temperature
3 (14-ounce) cans sweetened condensed milk
1 (14-ounce) can unsweetened coconut milk
1 (12-ounce) can evaporated milk
6 large eggs, at room temperature
1 tablespoon vanilla extract
1/2 teaspoon salt
1/2 cup shredded sweetened coconut, toasted
*can be found in Hispanic grocery stores

Preheat the oven to 350ºF. 
Spray a 10-cup Bundt or tube pan with vegetable oil cooking spray. Drizzle the cajeta into the prepared pan, turning to coat the bottom and sides. Set aside. 
Using an electric mixer, beat the milks, eggs, vanilla extract, and salt. Pour the mixture into the pan. Place the pan inside a large roasting pan. Fill the roasting pan with enough water to come halfway up the sides. Cover the Bundt pan with foil. 
Bake until the center jiggles slightly when pan is moved, about 1 hour 40 minutes. Remove from the oven and let cool at room temperature for 30 minutes. Refrigerate, covered, for 3 hours or overnight. 
Turn the flan out onto a platter. Sprinkle with toasted coconut and serve.
Tips:
To make the toasted coconut, place your shredded coconut in a dry pan over medium heat, stirring it constantly until it just begins to brown. You don't want to walk away from it because it can burn rather quickly! You can also do it in the oven, but I find it to be quicker and easier in a dry pan.
Instead of using the cajeta or store bought caramel sauce, I just made Home Made Caramel Sauce. It's SO much better than purchased caramel sauce, and it was for a special occasion, so I went with it!
If you don't have a roasting pan, just use a large casserole dish such as a 9x13 baking pan. Worked for me!

Monday, April 25, 2016

Bread & Butter Pickles


 A little over a year ago, I decided that I wanted to learn the process of canning and preserving. I always loved the idea of making my own jams and jellies, and since I live in the Garden State, I have lots of fabulous produce readily available for my home canning endeavors.
 When I first mentioned this to my fabulous, gorgeous, talented, youthful, vibrant, funny, caring and all-around wonderful sister, Cathy, she was immediately on board with the whole idea, and we began to make a mental list of things we wanted to preserve. We knew we'd want to do peaches and also tomatoes during the summertime (since you just can't beat Jersey peaches and tomatoes!) but the very FIRST thing on our to-do list was to make PICKLES!
We decided to make a day of it (now referred to as Pickle Day) and we made two kinds of pickles, Garlic Dill, and Bread & Butter. The garlic pickles were pretty good, but the bread & butter pickles were just out of this world! The first Pickle Day was sort of a trial run, just to see how things would go. We immediately decided that we needed to do bigger jars and more of them! So now after a few Pickle Days, we have it down to a pretty good system. We do 50 lbs of cucumbers which comes to about 28-30 quarts of pickles! Cool, huh?? What can I say? More is more, right??? I know it seems like a crazy amount, but we figure if we're gonna do it, then lets DO it! Plus, it's really nice to have those jars of pickles on hand when you need a last minute homemade something to give as a gift.
 If you've never had Bread & Butter pickles, you're just not living your best life. They're sweet and tangy and they go fabulously with a sandwich and chips. My nephew, Gregger, loves them with tuna, and I have to say I agree. They're pretty awesome with chicken salad as well.
 Btw, if you're wondering why they're called Bread & Butter pickles instead of just sweet and sour pickles, I've read a couple articles stating that they were very popular served on buttered bread as a sandwich during the Great Depression. Backyard gardens often produced more cucumbers than any family could eat in one season, so they pickled them. Bread, butter, & cucumber sandwiches are a hold over from our country's English heritage, so using the sweet pickles instead of fresh cucumbers was just another variation.
 So there you go. I'm not sure if this is true, but it sounds good, so I'll go with it. I heard another origin story about someone who grew hundreds of pounds of cucumbers and then pickled and sold them, earning him his daily "bread and butter." I guess either of those stories could be true. Who knows? Anyway, if you've never made home made pickles, you should give it a try. I found this recipe on Allrecipes.com and they really are one of life's simple pleasures! I just made some and I'm already looking forward to our next Pickle Day! Enjoy!


10 lbs pickling cucumbers, thinly sliced
1 medium Vidalia or other sweet onion, thinly sliced
2 red bell peppers, diced
3 cloves garlic, chopped
1/2 cup kosher salt
3 cups apple cider vinegar
5 cups white sugar
2 tablespoons mustard seed
1 1/2 teaspoons celery seed
1/2 teaspoon whole cloves
1 tablespoon ground turmeric
Pickle Crisp (optional)

 
 In a large container or several large bowls, mix together cucumbers, onions, red bell peppers, garlic and salt. Allow to stand approximately 3 hours.
In a large pot, mix the cider vinegar, white sugar, mustard seed, celery seed, whole cloves and turmeric. Bring to a boil.
Drain liquid from the cucumber mixture. Stir the mixture into the boiling vinegar mixture. Remove from heat shortly before the combined mixtures return to boil. Refrigerate in airtight containers for up to a month or preserve in jars.

For preserving:
Ladle the pickles and pickling liquid into hot sterilized jars, leaving about 1/2 inch below each jar's neck. If using Pickle Crisp, add 1/4 tsp to quart jars and 1/8 tsp to pint jars. Wipe rims of jars with a clean, damp cloth; cover tightly with sterilized lids and screw tops. Using tongs or a jar clamp, transfer jars to a rack in a large canning pot or a large, deep pot filled with hot water, being sure to keep jars upright at all times. (Jars should be spaced 1 inch apart, and should not touch sides of pot.) Cover with water by 1 inch. Cover pot, and bring to a boil. Process pint jars in boiling water for 10 minutes and quart jars for 15 minutes. Remove from pot and place on a tray or kitchen counter lined with a thick towel. Let cool completely. Press down on each lid. If lid pops back, it's not sealed; refrigerate unsealed jars immediately, and use within 1 month. Sealed jars can be stored in a cool, dark place for up to 1 year.

Tips:
If you'd like to make the pickles, but don't know how to do the canning, just make a smaller batch and then keep them in the fridge until you're ready to eat them.
Be sure to salt them and let them sit for a good few hours. It's really amazing how much water will drain from the cucumbers. That's definitely key!
I like to use red bell peppers instead of green, just because it makes the jars look so much prettier, but feel free to use whichever color you like.
I used a mandoline slicer to make nice even krinkle cuts, but cut them however you like. Spears would be awesome as well!
Pickle Crisp is just an additive to make the pickles stay more crisp (I guess you probably worked that out on your own) but it's completely optional.
Instead of chopping the garlic, I just threw a peeled clove of garlic into each jar just before filling them. You'll use much more garlic than the recipe directs, but I'm not seeing this as a bad thing!

Monday, April 18, 2016

Mussels Marinara


 Have you ever cooked mussels? I know they might seem a little daunting, but seriously, let me just say that they are REALLY easy to do! They're inexpensive, readily available, and you'll impress the hell out of everyone. They're amazingly quick too!
 To be quite honest, I never had an occasion to make them, but then when we decided to do a seafood theme for my friend Jim's birthday, I figured why not?! And OMG let me just tell you how delicious they are!! Actually, since I'm being honest here, for me it's all about the sauce. I could literally bypass all the actual mussels and dive into a vat of that sauce with a loaf of crusty Italian bread. It's SO amazingly flavorful.
 So if you've never given mussels a try, I urge you to take a leap and give it a shot. I think you'll be pleasantly surprised! They're elegant enough to serve for any holiday (my family has them every year on Christmas) and they're just as perfect for a casual Sunday dinner with friends. This recipe is from Robert Irvine (you know, the Restaurant Impossible guy) and it's absolutely delish.
Give it a try! And don't forget the crusty Italian bread for dipping!!


3 tablespoons light oil or olive oil
1 small white onion, finely chopped
4 large cloves garlic, finely chopped
1 cup white wine
2 or 3 cans chopped plum tomatoes (32 to 48 ounces total)
1 tablespoon fresh chopped oregano leaves
1 tablespoon fresh chopped parsley leaves
Salt and pepper
4 pounds fresh mussels, de-bearded, scrubbed and rinsed
Pasta, as an accompaniment or crusty bread for dipping
1 tablespoon fresh chopped basil leaves

Heat the oil in a large saute pan over medium heat. Add the onion and garlic and saute until cooked. Add the wine and reduce by half, then add the plum tomatoes, oregano and parsley. Add the mussels to the pan and allow to cook for about 10 minutes until all the mussels are open. Transfer mussels to a platter. (Discard any mussels that do not open.)

You can mound some pasta in the center of the plate surrounded by the mussels or have some crusty bread handy for dipping into the sauce.

Adjust the seasoning for the sauce with salt and pepper, as necessary. Coat the mussels with the sauce and sprinkle with fresh chopped basil just before serving.

Tips:
I added a pinch or two or crushed red pepper flakes, just because I wanted just a little spicy poke.  
If I were going to serve them with pasta, I think I'd probably serve them with regular spaghetti or maybe angel hair pasta.
If you don't have fresh herbs, you can use dried. Just use half as much of each kind.. Fresh herbs bring so much more to the party, though, if you can manage getting some. Just sayin!

Monday, April 11, 2016

Slow Cooker Whole Chicken


 Ok, let me just start by saying that this is one of the easiest recipes I've ever made. I mean, I know I say ever recipe is easy, but seriously, this one is just stupid easy. I honestly don't know how anyone could possibly get this one wrong. And you get so much bang for your buck, you won't even believe it. It's perfect for a warm day when you don't feel like turning on the oven, or on a weekday when you want dinner to be ready by the time you get home from work. It's as moist and juicy as any roasted or rotisserie chicken and it's completely fall-off-the-bone tender! It's perfect for a novice cook and only takes a few minutes of prep. Actually, come to think of it, I bet this would be pretty perfect for a college student. (Do they even allow crock pots in dorm rooms???)
 Anyway, next time you're doing your grocery shopping, pick up a roaster, and give this recipe a try. Prep it the night before, turn it on in the morning, and it'll be ready when you get home! You can serve it for dinner, and use the leftovers for salads, casseroles, sandwiches, you name it!
 I PROMISE you, once you give this one a try, it just might be your new favorite way to cook a chicken!

1 large onion
1 whole head of garlic
1 whole roaster chicken
Olive oil
Fresh or dried herbs, (thyme, rosemary, oregano, sage, etc)
Seasonings (paprika, lemon pepper, onion powder, garlic powder, seasoned salt, etc)
Salt and pepper


 Peel the onion and cut into halves or quarters. Place in the bottom of the crock pot. Slice horizontally through the entire head of garlic. Place both halves face down in the bottom of the crock pot with the onions. (No need to peel the garlic). Remove the packaging from the outside of the chicken as well as the giblet bundle from inside the cavity and discard. Rinse the chicken inside and out. Pat dry with a paper towel. Place chicken on top of the onions and garlic. Drizzle with a couple glugs of olive oil (or your choice of oil). Season with your choice of herbs and spices. I used a bundle of fresh rosemary, a bundle of fresh thyme, lemon pepper, paprika, salt and pepper, but use whatever you like! Place the lid on top. Cook on low for 6-8 hours. That's it!

If you'd like to use the drippings to make gravy:
 First strain through a fine sieve into a small sauce pot. Discard the onions and garlic. Skim off most of the fat. Make a slurry of a little cold water and a couple tbs flour, add it to the pot, and stir over medium heat until it thickens. Taste and adjust seasoning with salt and pepper, if needed.

Tips:
 I have a large oval-shaped crock pot, so I was able to do a pretty big roaster, about 9 lbs. Do whatever size chicken fits in your crock pot! If you only have a small crock pot, then just do a small chicken! Just be sure to check for doneness closer to the 6 hour mark instead of the 8 hour mark.
 To be honest, I left mine in the crock for longer than 8 hours, and it still came out perfect. Slow cookers are very forgiving! So if you find yourself running a half hour late, don't sweat it!
 If you don't want to put onions and garlic in the bottom of the crock, you can roll up a couple balls of aluminum foil and place the chicken on top of them.


Monday, April 4, 2016

Dirt Cupcakes


 When my niece, Kristin, was planning her daughter Shyla's first birthday party, she sent me a text and asked if I would make Dirt or cupcakes for the party. (If you're not familiar with Dirt, it's basically a tray of chocolate pudding with crushed oreos and gummy worms on top, made to look like, well, Dirt!) Anyway, she explained that the theme for the party would be 10 Little Ladybugs (since that's Shyla's favorite book), and there would be butterflies and grass and trees and stuff like that. She said the pudding would look more like the theme, but she likes cupcakes better. So I figured, why not do both in one?? And here we are!
 First, I baked the chocolate cupcakes. Then when they were completely cooled, I cut out the centers, filled each one and also swirled the top with chocolate pudding whipped cream, then dipped it in crushed Oreo crumbs. All it needed was a little gummy worm on top, and boom, it's a Dirt Cupcake!! Aren't they adorable? They were just perfect for our beautiful little lady bug on her first birthday, and they were a big hit at the party!
 For the cupcakes, I used Hershey's Double Chocolate Cupcake recipe, and for the pudding, I used the same recipe as I do when I'm making a trifle, only with chocolate instant pudding instead of vanilla. They were such a big hit, I have a feeling I'll be getting many more requests for them in the future!
Happy Birthday, Shyla!
 

Hershey's Double Chocolate Cupcakes

1-1/2 cups all-purpose flour
3/4 cup sugar
1 teaspoon baking soda
1/2 teaspoon salt
1 cup water
2 tablespoons vegetable oil
1 tablespoon white vinegar
1 teaspoon vanilla extract
3 sections (1/2 oz. each) HERSHEY'S Unsweetened Chocolate Baking Bar , melted

  Heat oven to 350°F. Line 12 muffin cups (2-1/2 inches in diameter) with paper bake cups.
Stir together flour, sugar, baking soda and salt in large bowl. Add water, oil, vinegar and vanilla; beat with whisk or spoon until batter is smooth. Blend in melted chocolate. Fill muffin cups 2/3 full with batter. Bake 16 to 18 minutes or until wooden pick inserted in center of cupcakes comes out clean. Remove from pan to wire rack. Cool completely.

Chocolate Pudding Whipped Cream

1 3.5 box instant pudding
1 cup cold milk
1 cup cold heavy cream.

Using a mixer (preferably with a whisk attachment), mix the dry pudding with the milk until the powder is dissolved and the mixture becomes very thick. Add the cream and whip until completely combined and fluffy. That's all there is to it!

To make the Dirt Cupcakes:

First, have all of your components ready: the cooled cupcakes, the pudding whipped cream, the Oreo crumbs, and the gummy worms. For the crumbs, I just threw a bunch of Oreos into the food processor and blitzed it until they were completely crushed down to fine crumbs. Then I placed them in a large bowl. The gummy worms were a bit too long for a cupcake, so I cut each one of them in half.
 Using an apple corer, cut a vertical hole in each cupcake, straight through the center all the way down to the bottom of the cupcake, making sure not to cut through the paper at the bottom.
 Fill a ziploc plastic bag with pudding and snip off one of the corners with scissors, then squeeze enough pudding into each cupcake to fill the hole. Finish with a swirl of pudding on top. To cover each one with crumbs, gently but quickly dip the top of each cupcake in the crumbs, being careful not to lose any of the pudding into the bowl of crumbs. It's best if you do it in one quick motion. Place a half of a gummy worm on the top of each.

 Bonus dessert idea! Make individual chocolate trifles!
 Place a little bit of your leftover pudding in the bottom of a few pretty wine glasses. Crumble some of the cut out cupcake centers on top of each. Repeat with a second layer of cream and then more crumbs, then top each glass with a swirl of whipped cream and a bit of shaved chocolate.

Tips:
-Yes, it's correct that there are no eggs in this recipe. Just sayin'!
-This recipe makes 12 cupcakes, but it was no problem to double it.
-Even if you're not planning to do the pudding, Oreos, and gummy worms, this is still a great go-to cupcake recipe. Simply frost them with your favorite frosting and you're good to go!
-Instead of adding a cup of water as the recipe says, I added a cup of strong coffee. It doesn't make it taste like coffee, it just gives it a richer, deeper chocolate flavor.
-If you have another chocolate cupcake recipe that you'd prefer, go for it! The dirt idea will work with pretty much any cupcake recipe.
-Oh and one other thing, if you decide to use a regular cake recipe instead of a cupcake recipe, be sure to adjust your baking time for cupcakes instead of setting your timer as for a cake. Otherwise you'll end up with 4 dozen charcoal briquettes and you'll have to throw them out and start all over. Not that I would know this from experience or anything...